Link to First Drive Video
Link to First Full Throttle Test Video
Link to Aerial view from a drone
9/7/2024
Fun time at the Port Townsend Wooden Boat Festival.
Off Center Harbor made this cool video of our boat there.
9/2/2024
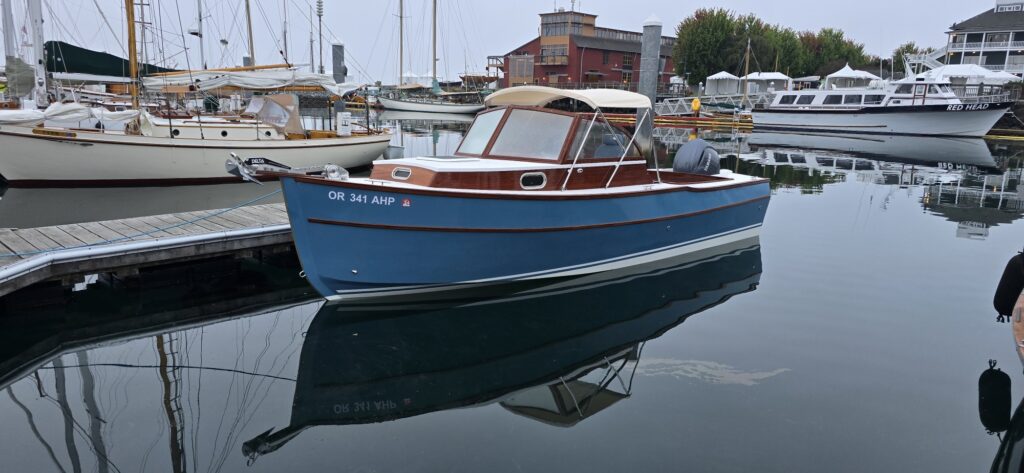
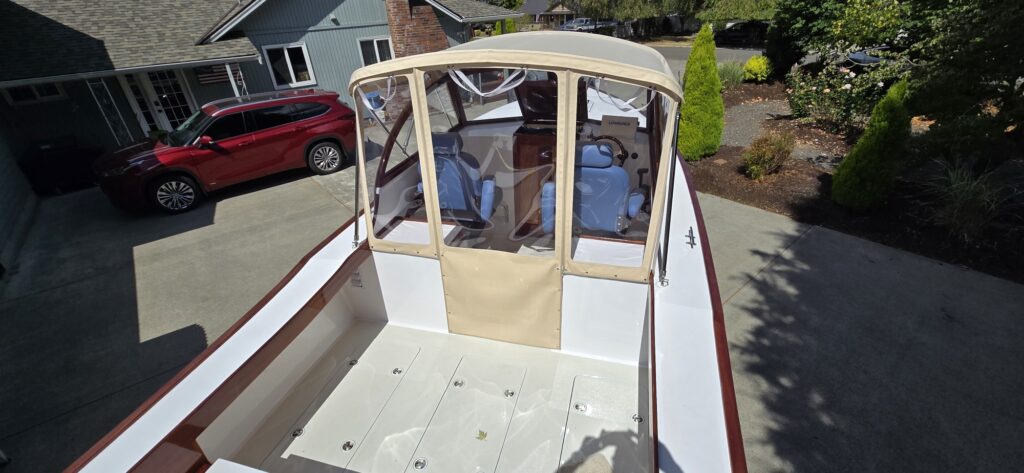
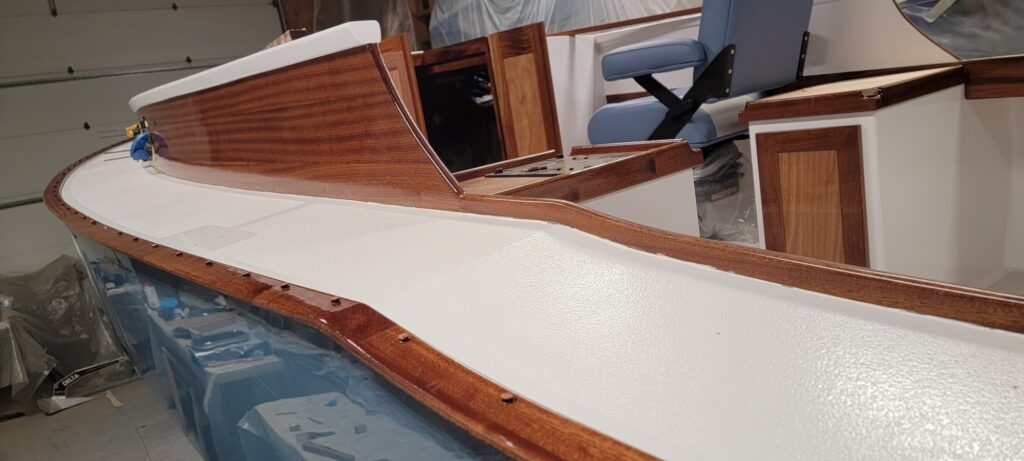
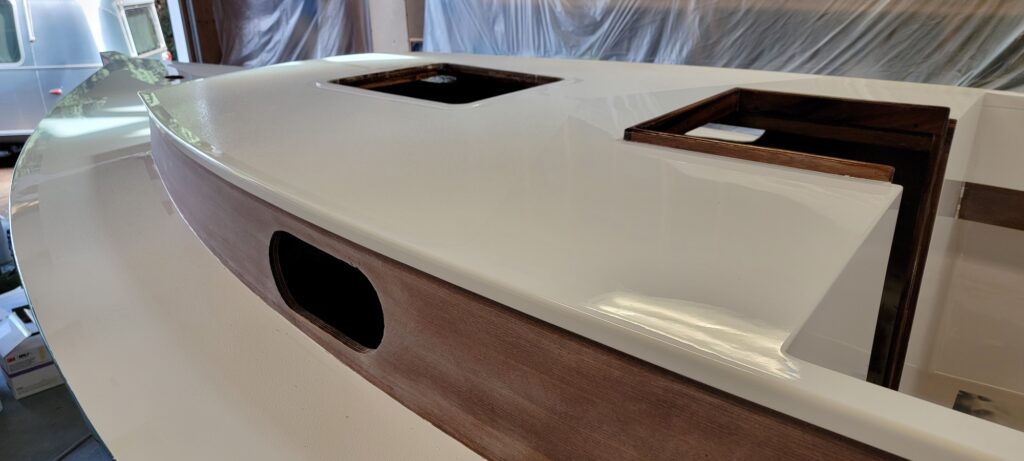
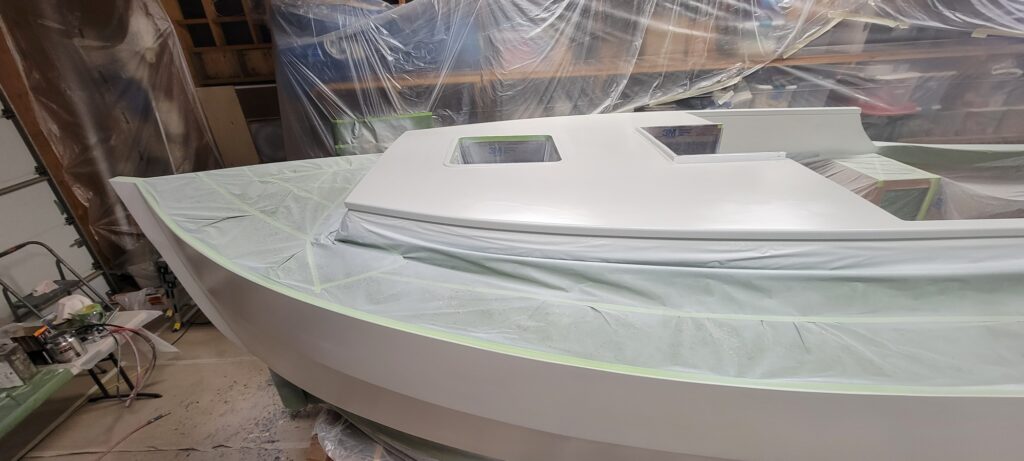
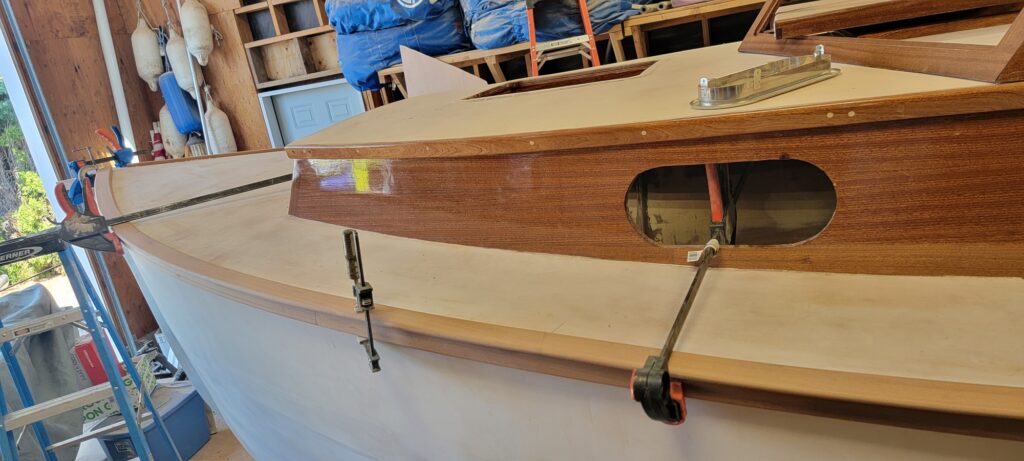
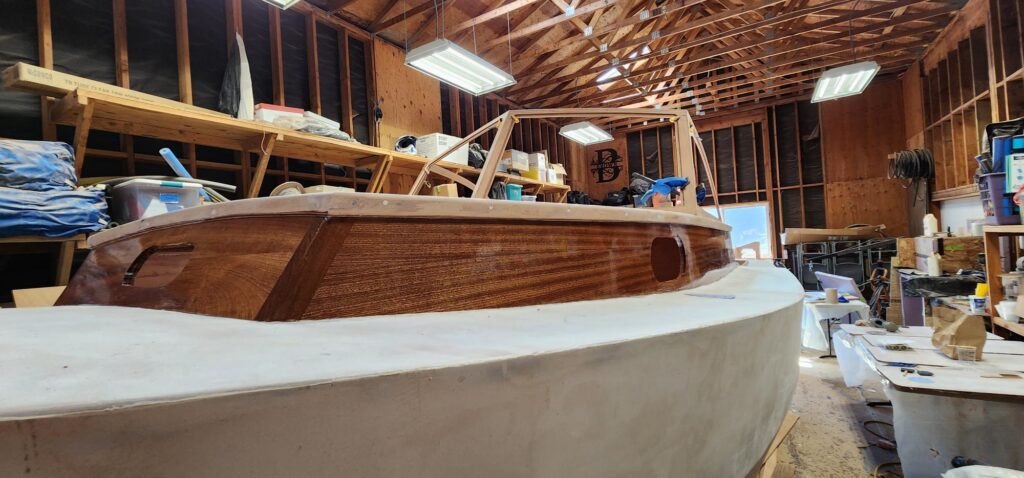
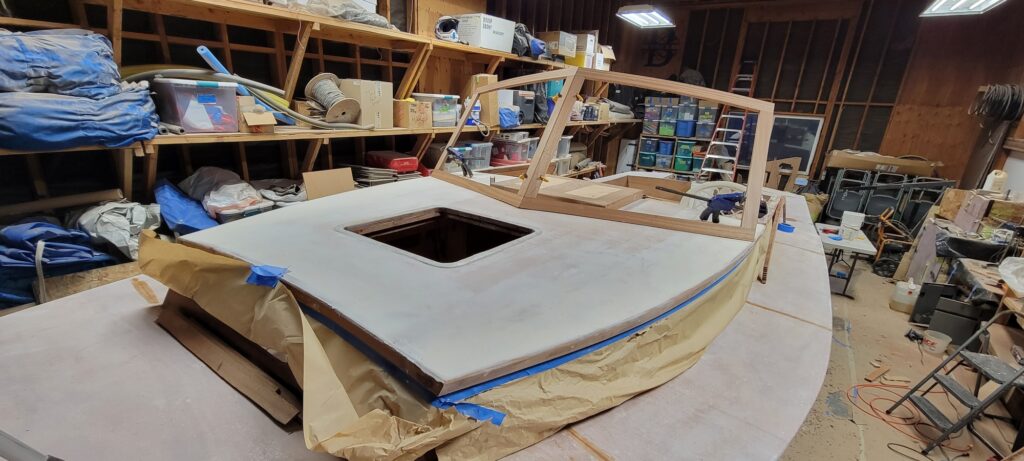
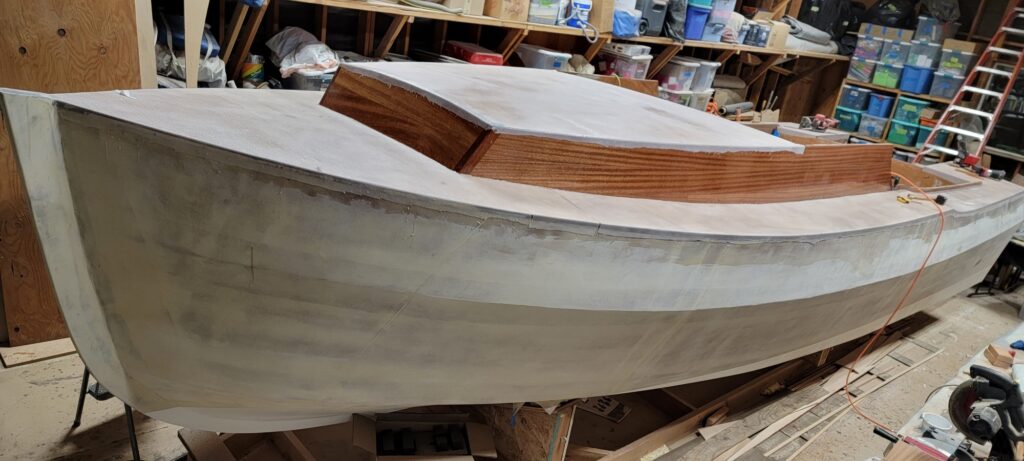
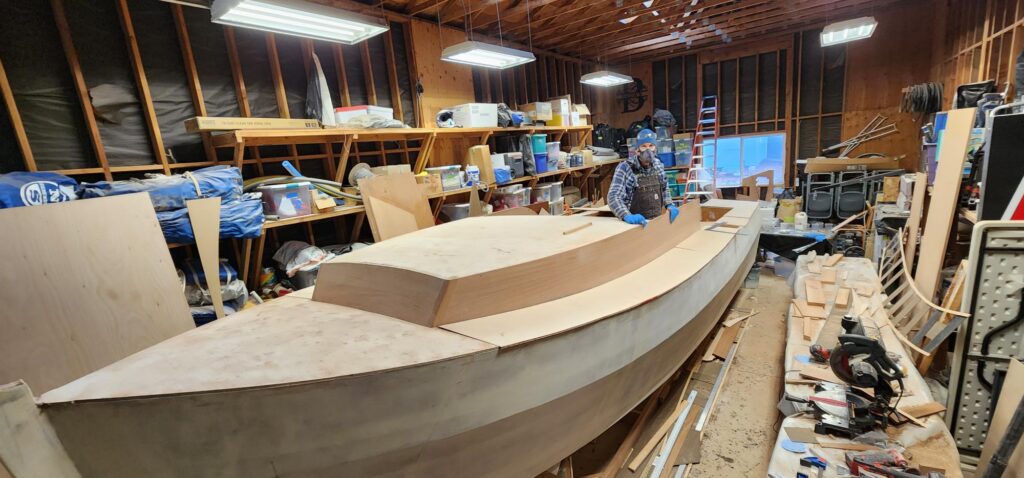
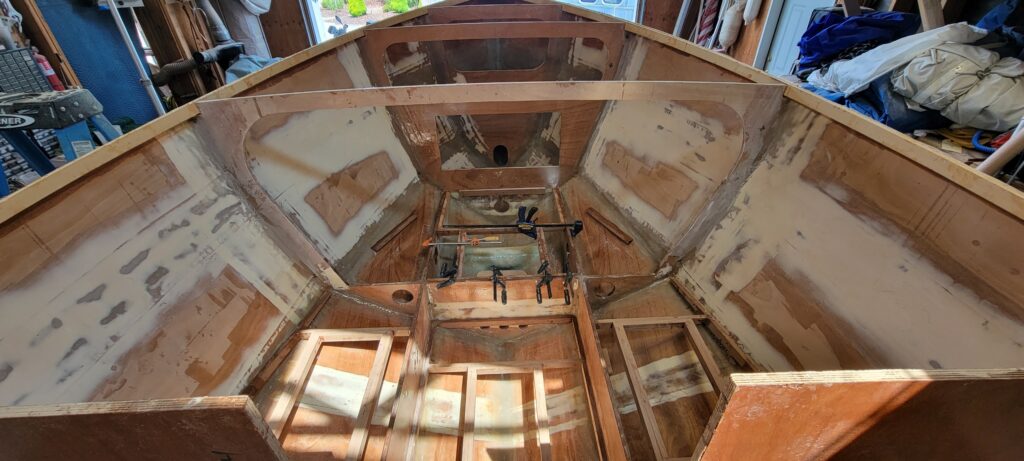
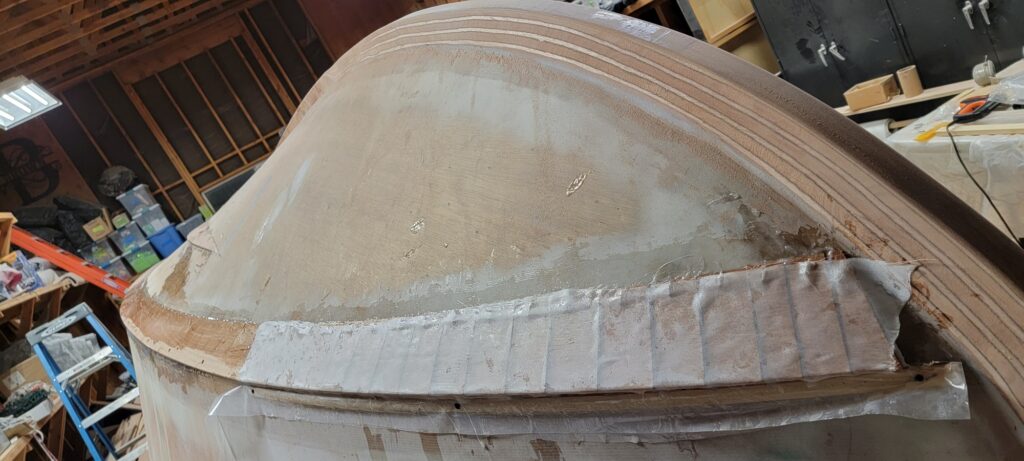
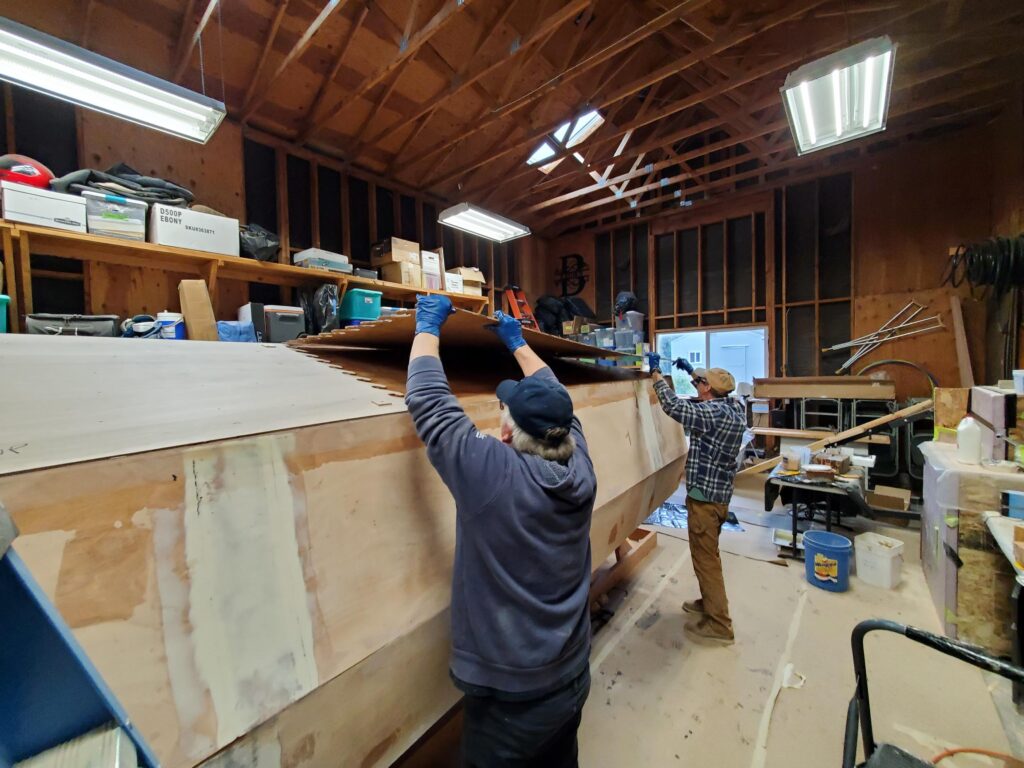
Got her back from getting a top made by Hayden Island Canvas. All the windows zip out, leaving a shady bimini top with about 6’4″ of headroom to walk around and almost as much at the helm.
Exciting week as she was accepted into the Port Townsend Wooden Boat Festival and we’ll be there to see about 300 other wooden boats of all varieties.
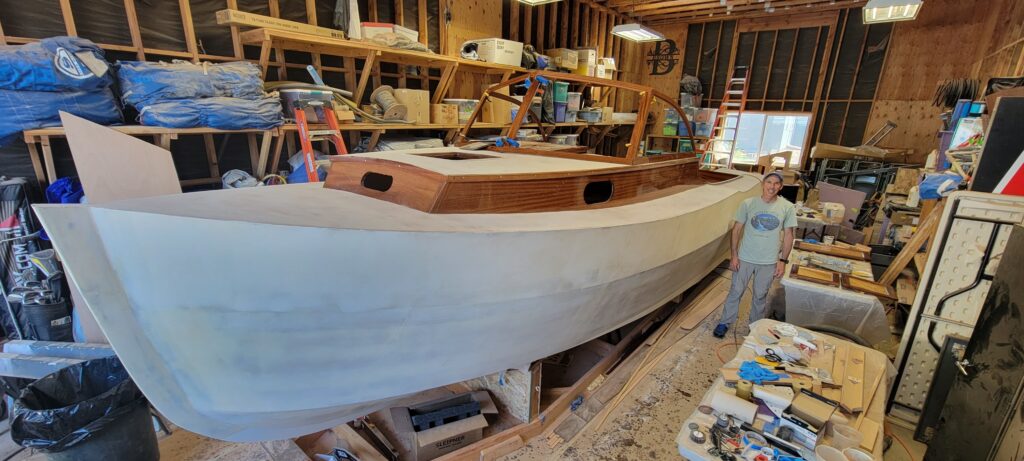
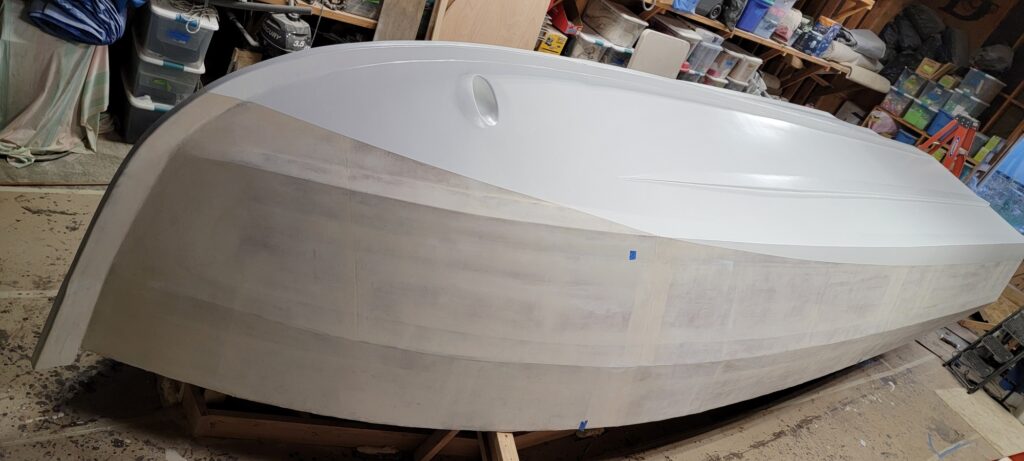
5/31/2024
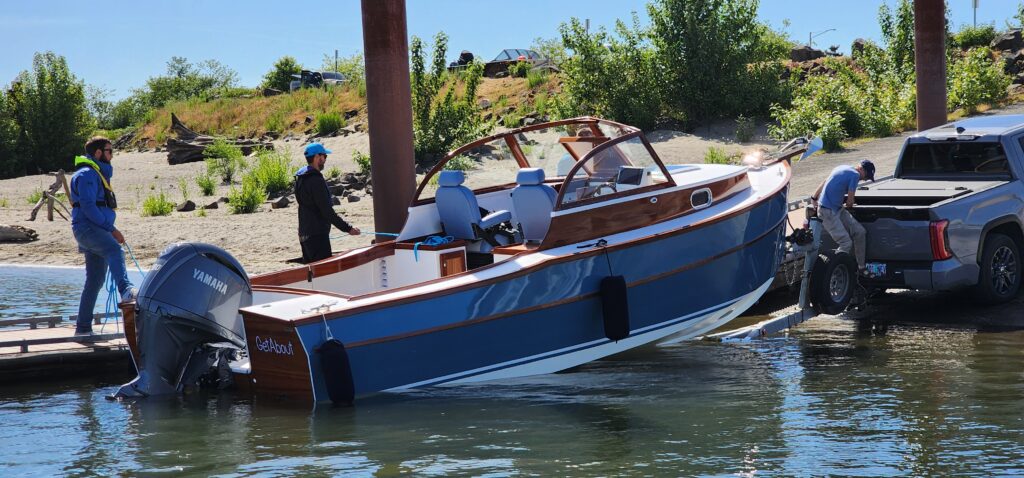
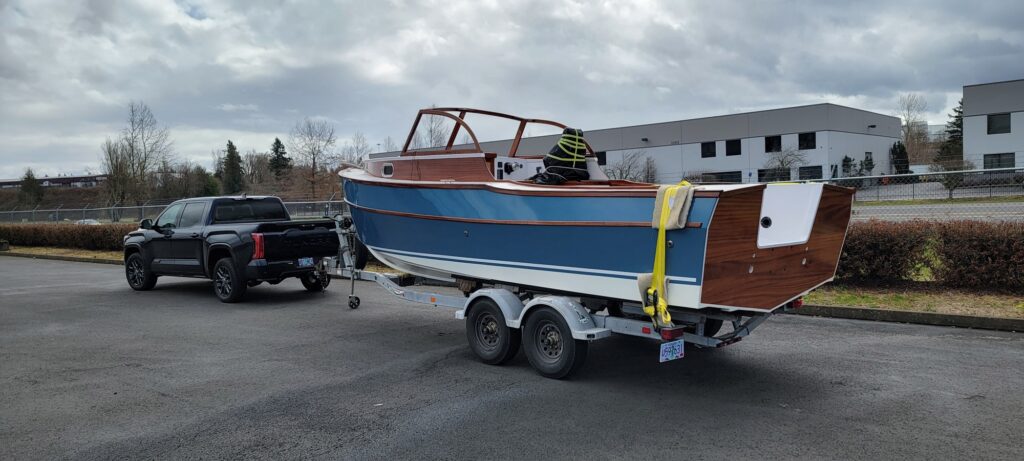
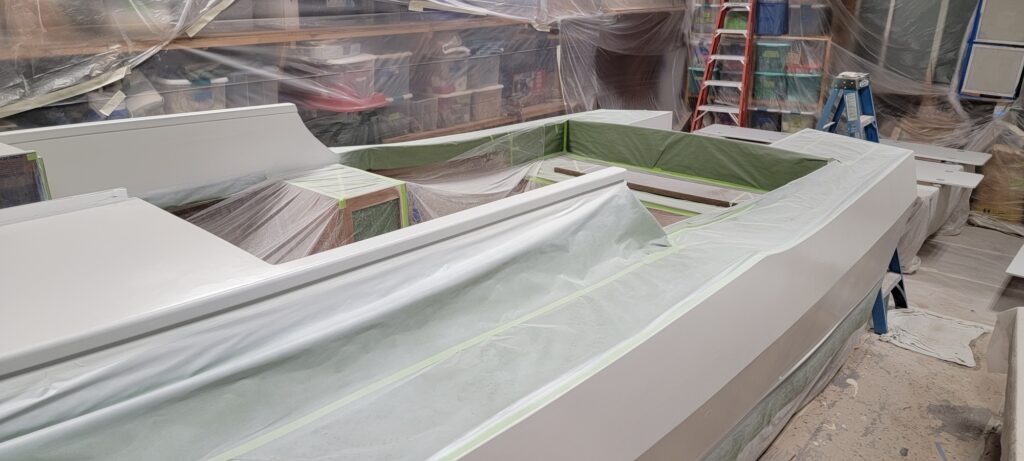
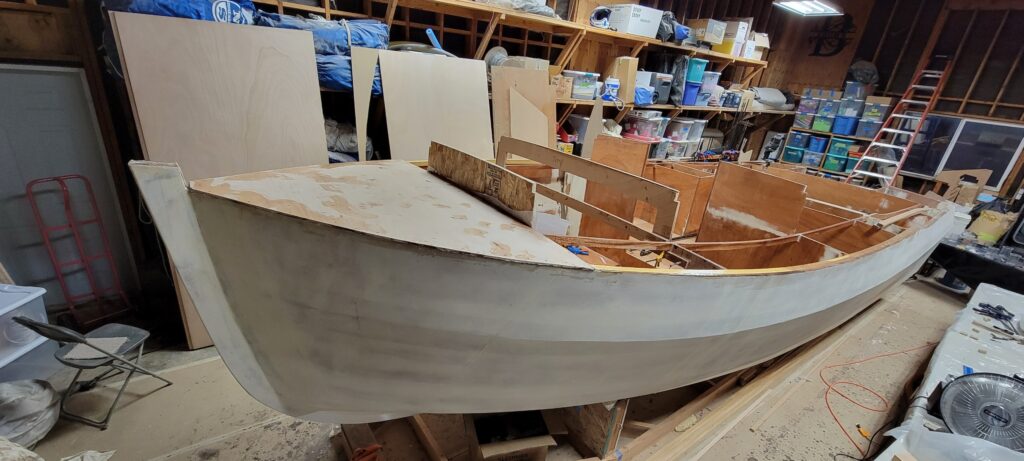
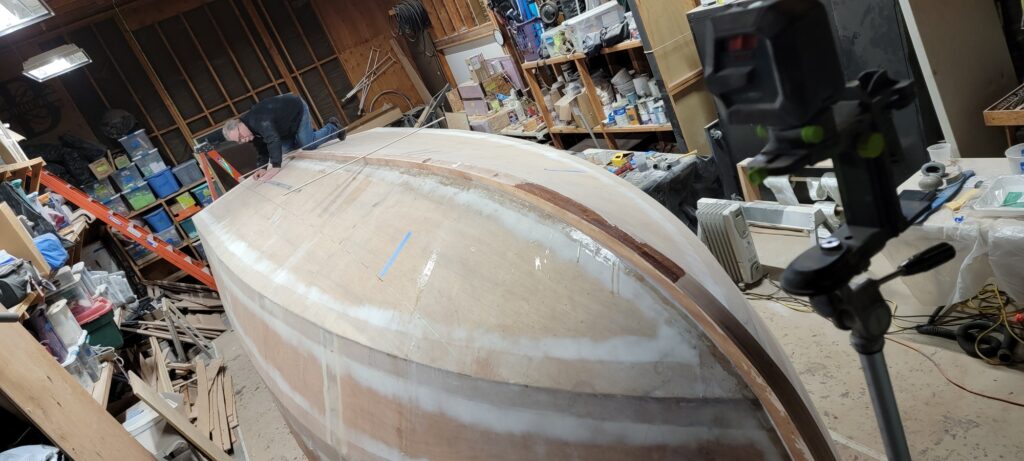
She is launched. Trial went pretty good. After the break-in period did a brief run at full throttle to see if prop is sized right. Topped out at 5500 rpm @ 35 mph. Smooth ride. Satisfying and fun day!
5/3/2024
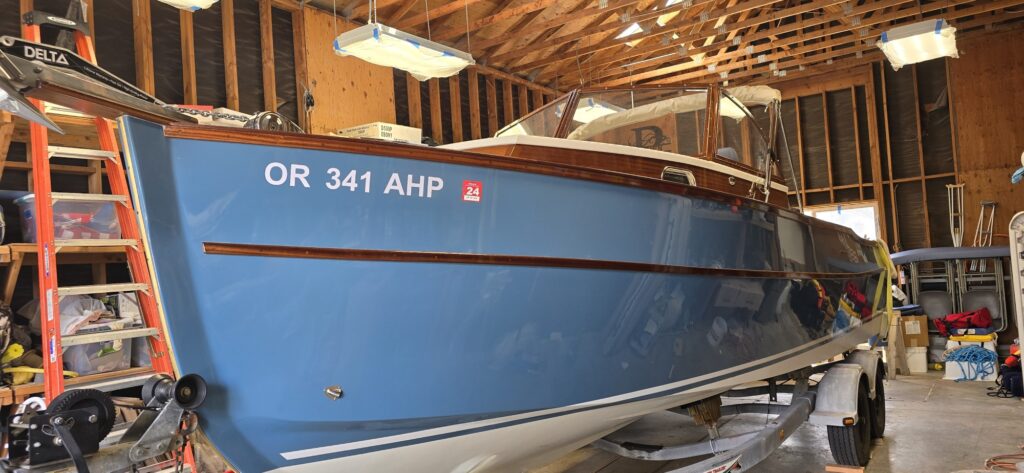
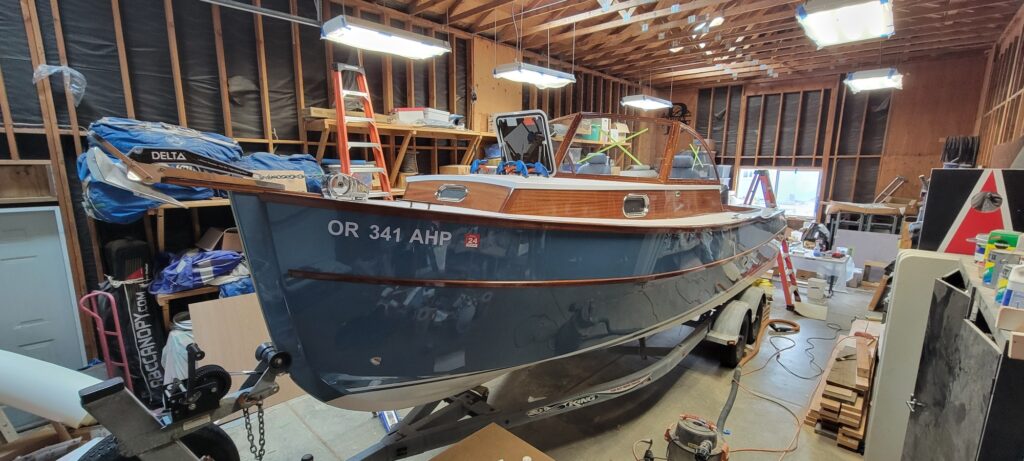
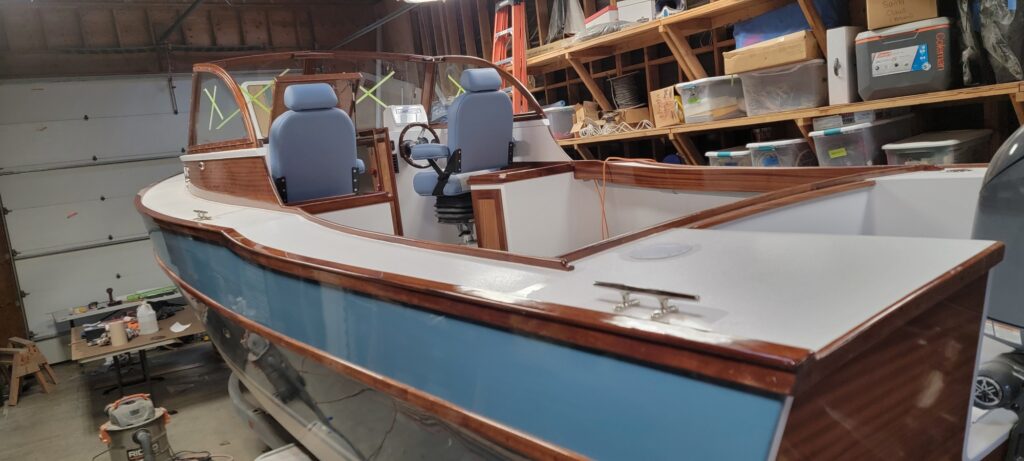
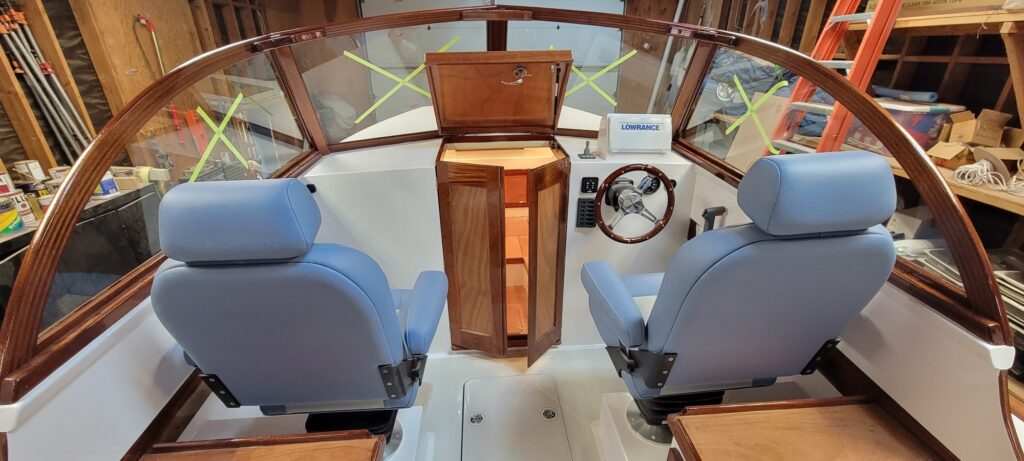
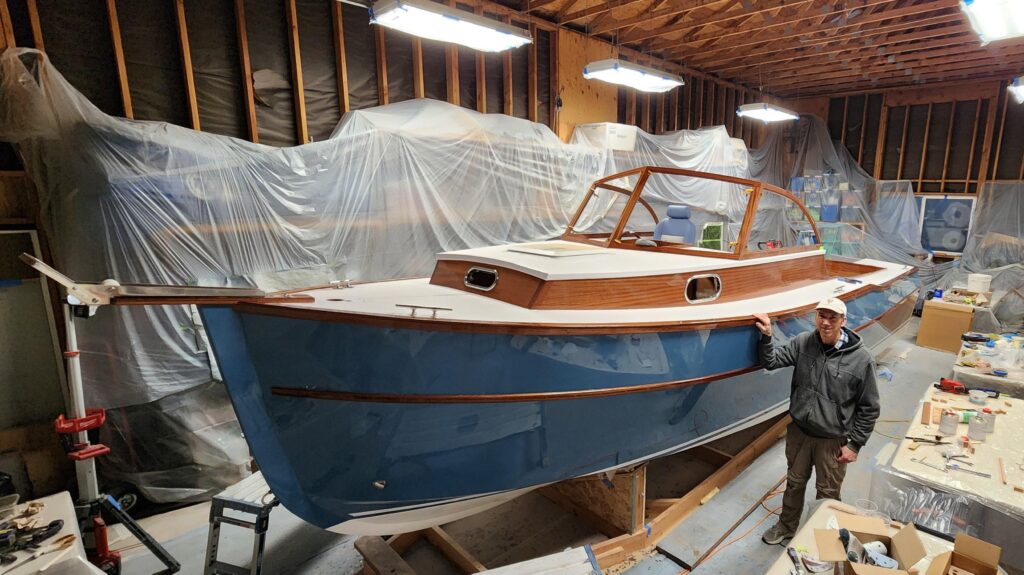
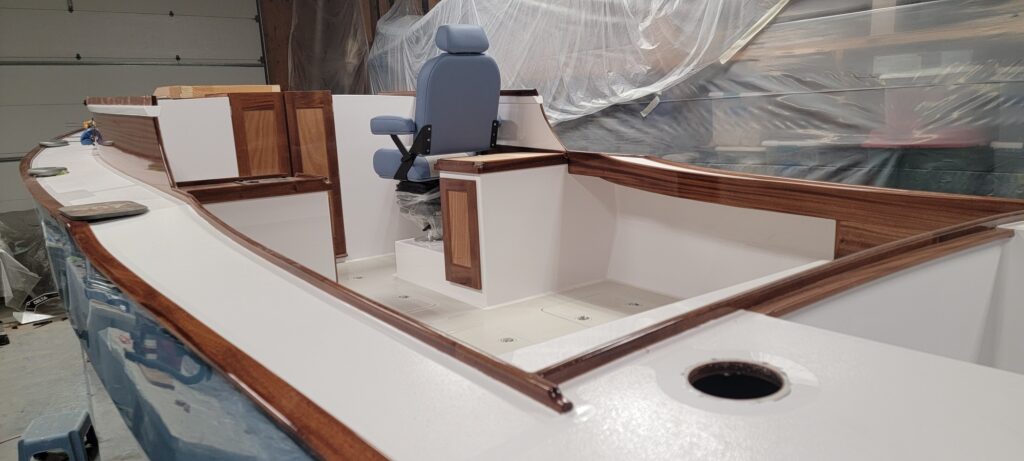
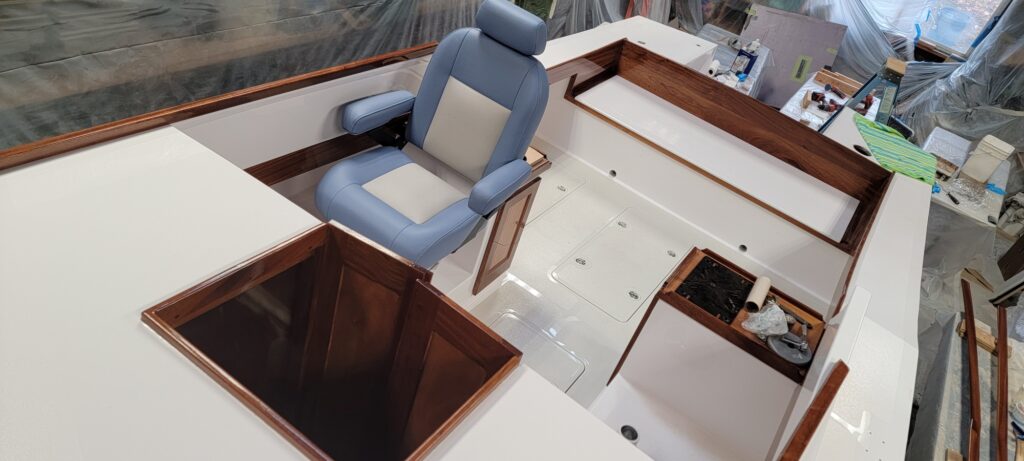
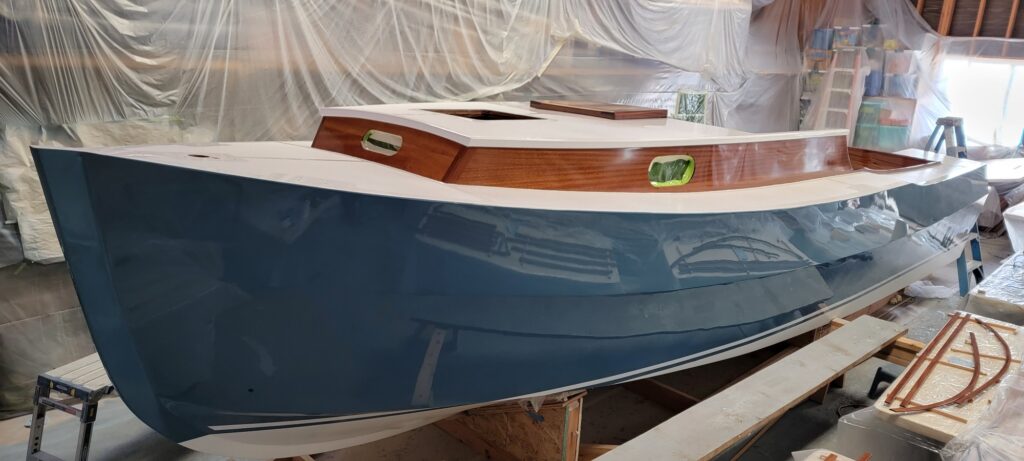
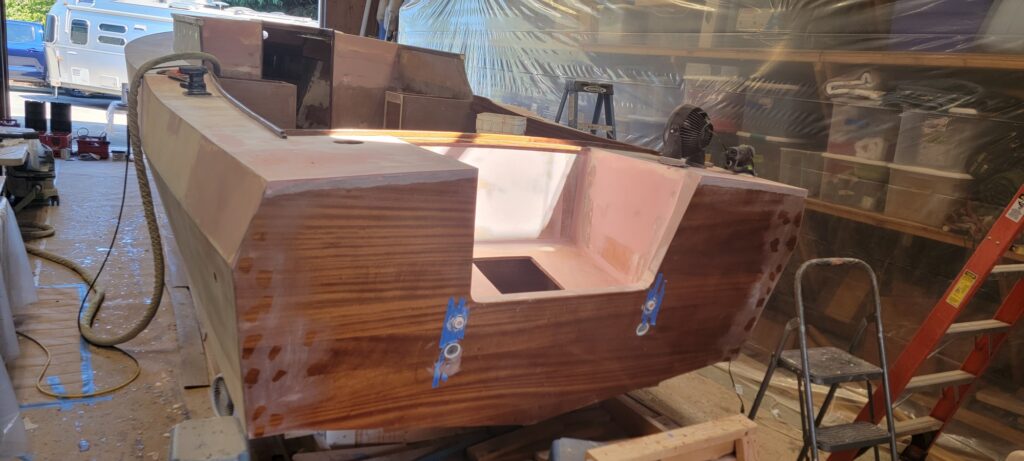
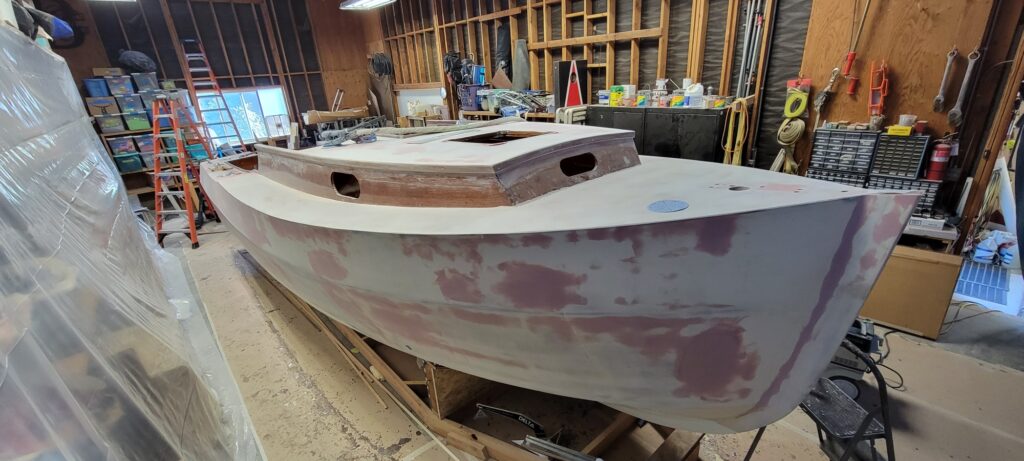
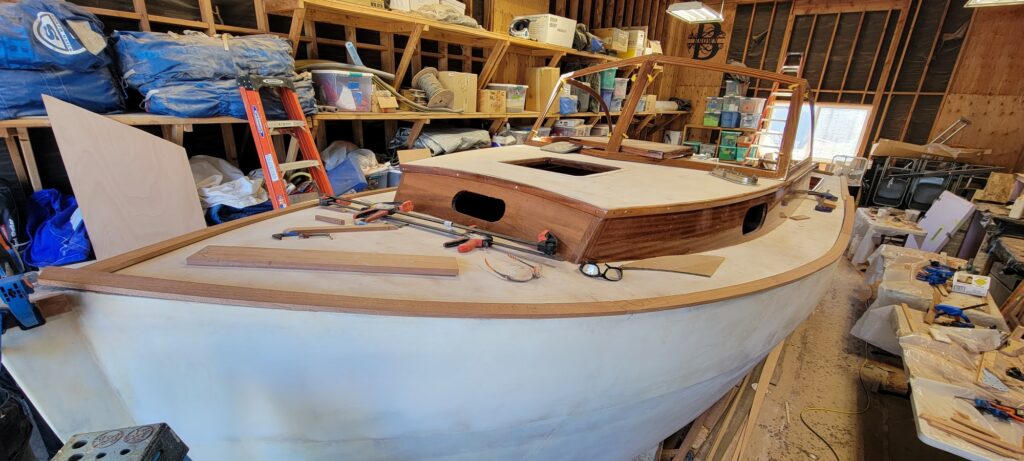
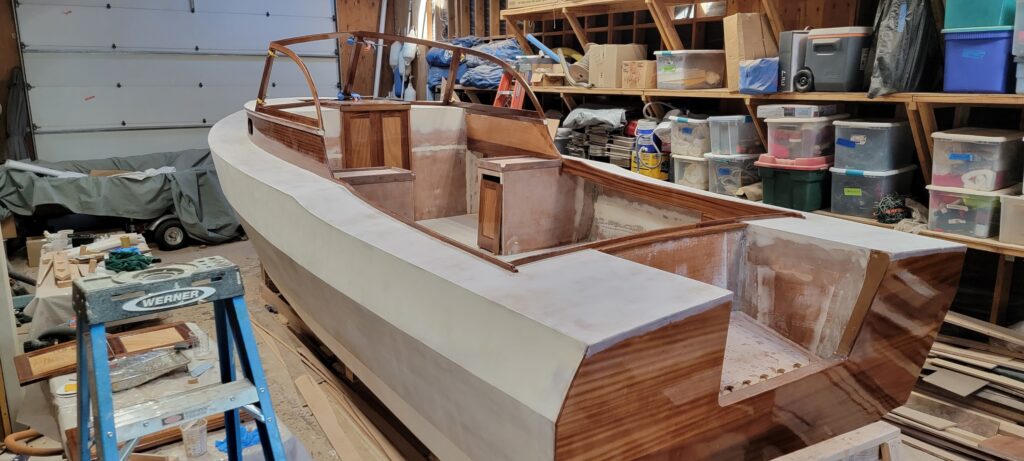
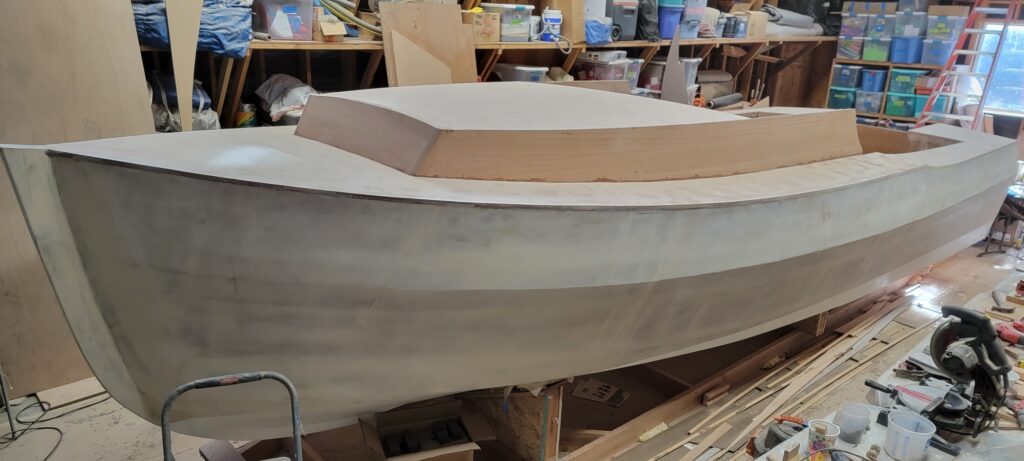
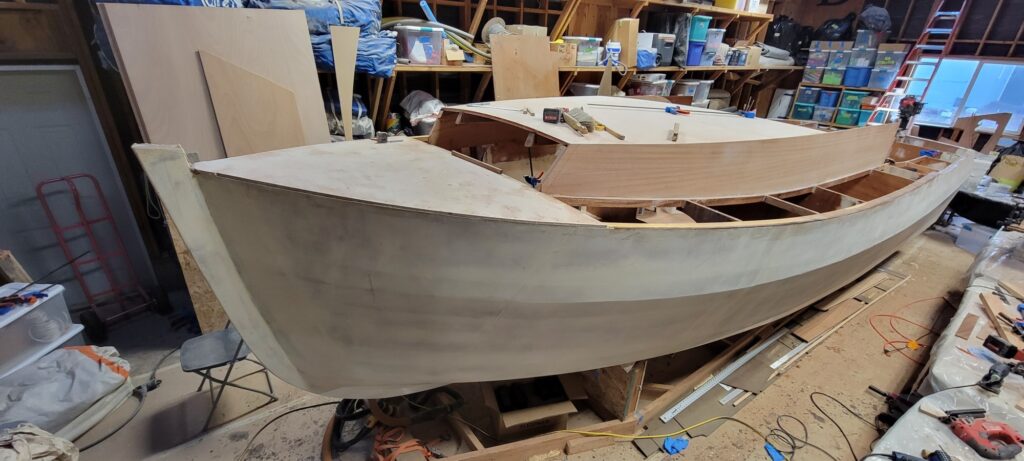
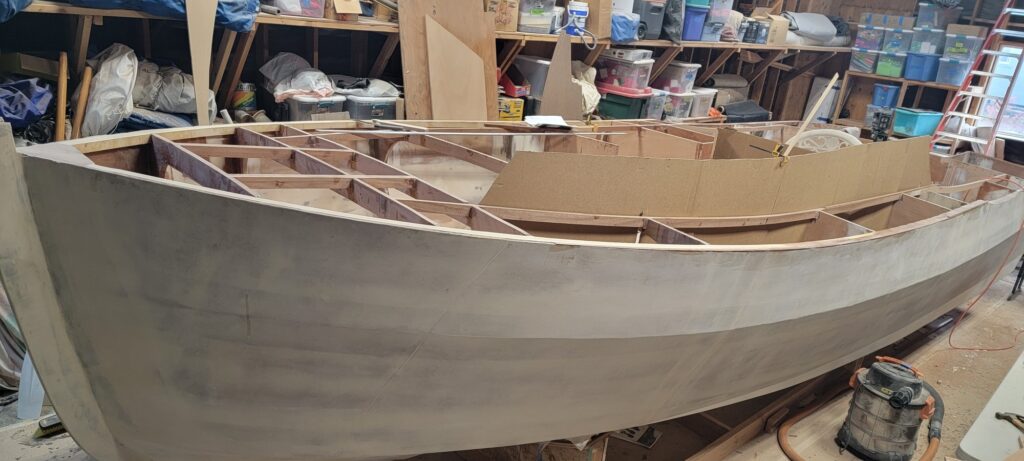
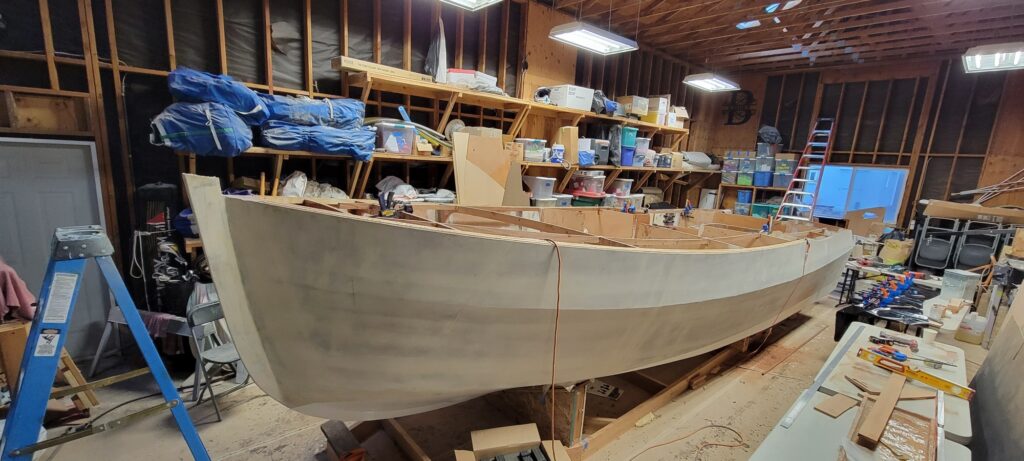
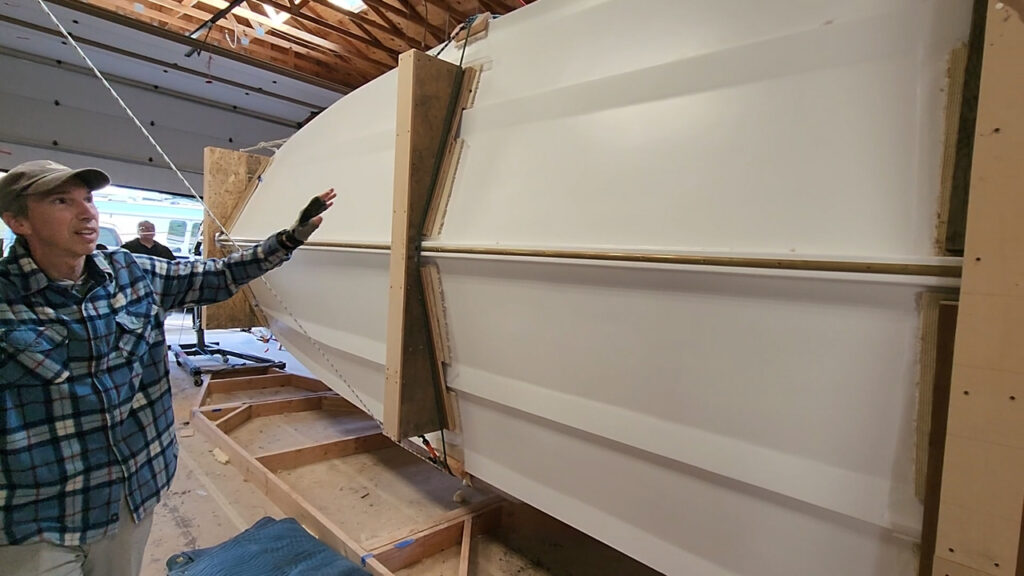
I’m calling her first time done today! Waiting on cushions and a few little accessories, like foot rests, but she’s ready to launch. (update: got cushions so added a pic of them below.)
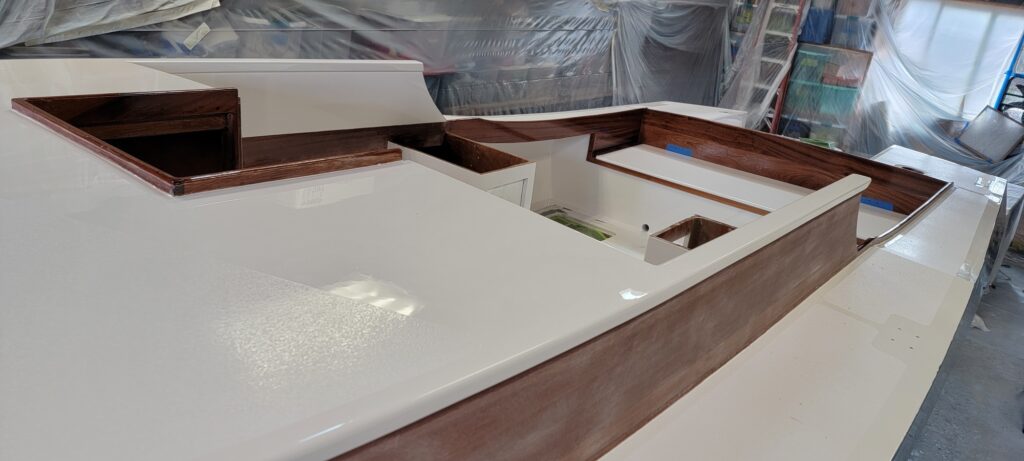
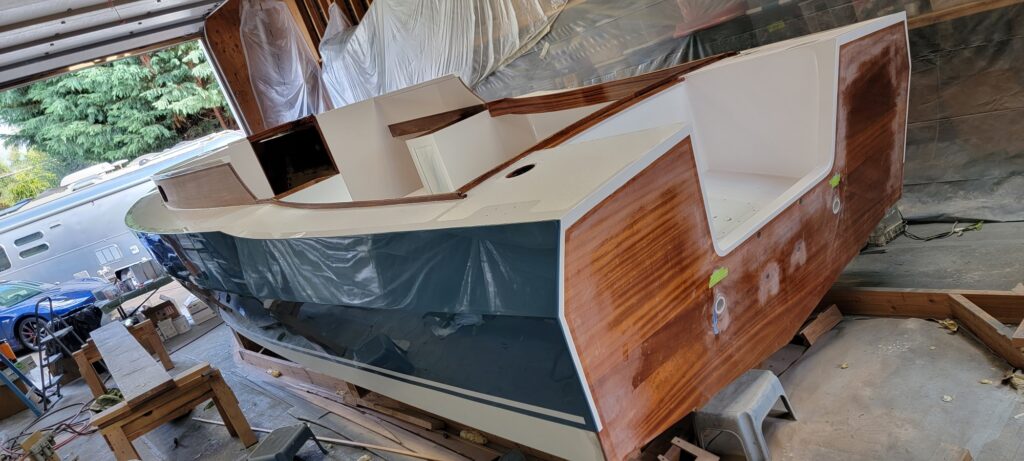
Installed safety glass windshields, fiddles to hold in cabin, co-pilot seat and a few other little loose ends. She needs a good bath, but here she is, 2 and 3/4 years in the making, part-time.
5/1/2024
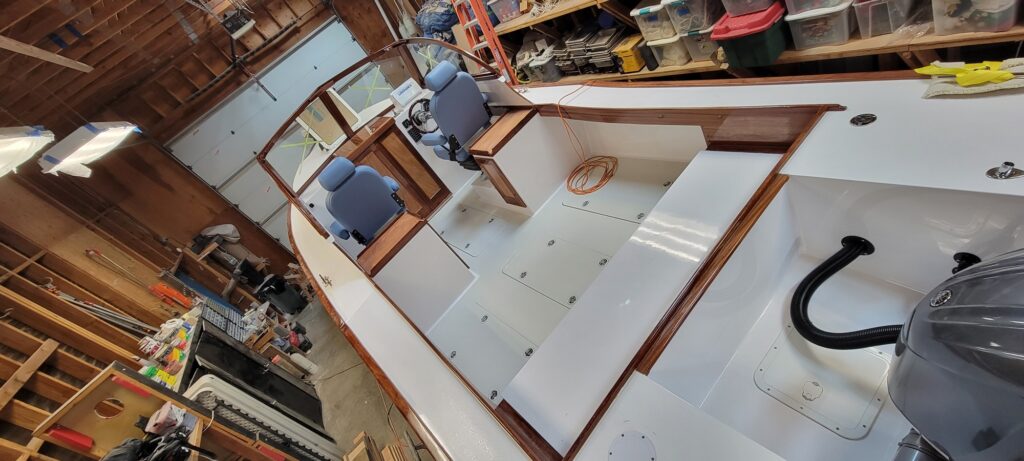
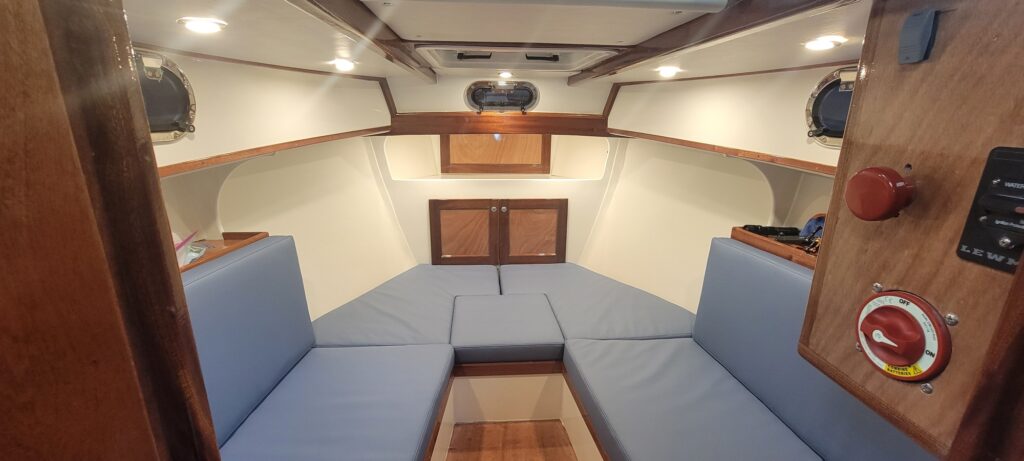
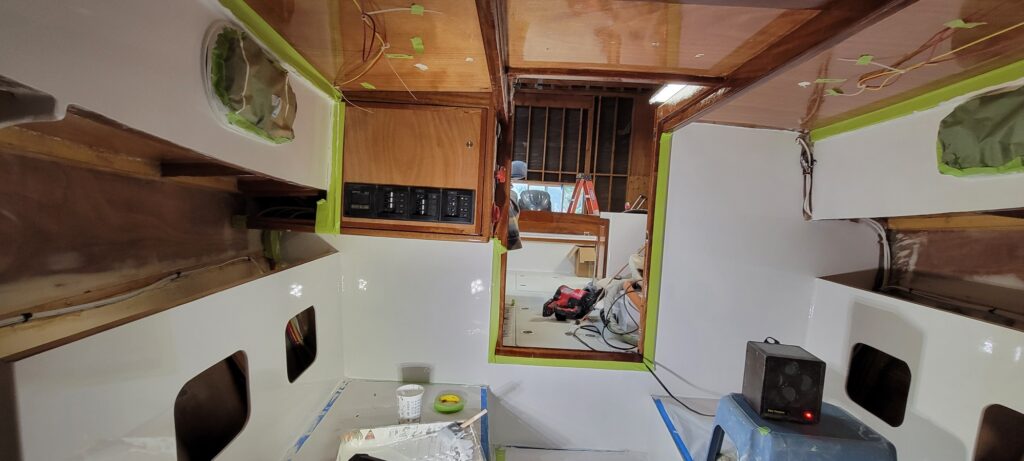
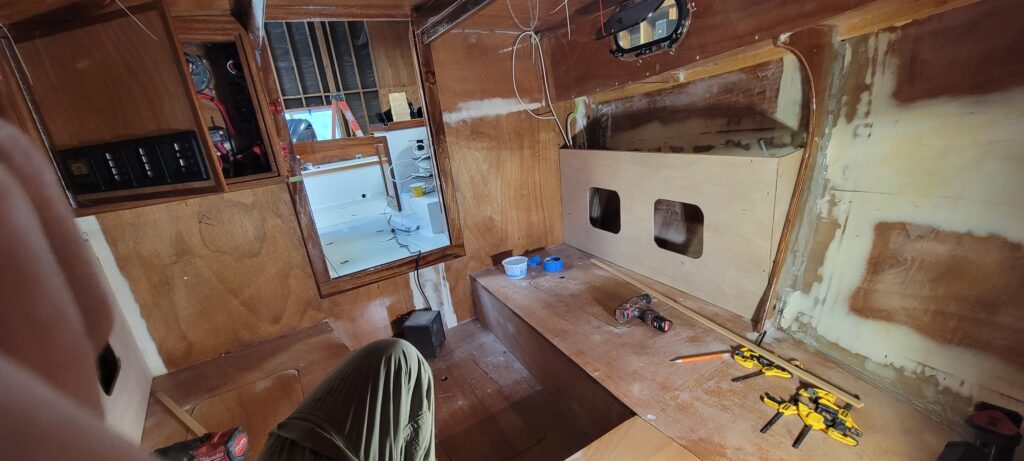
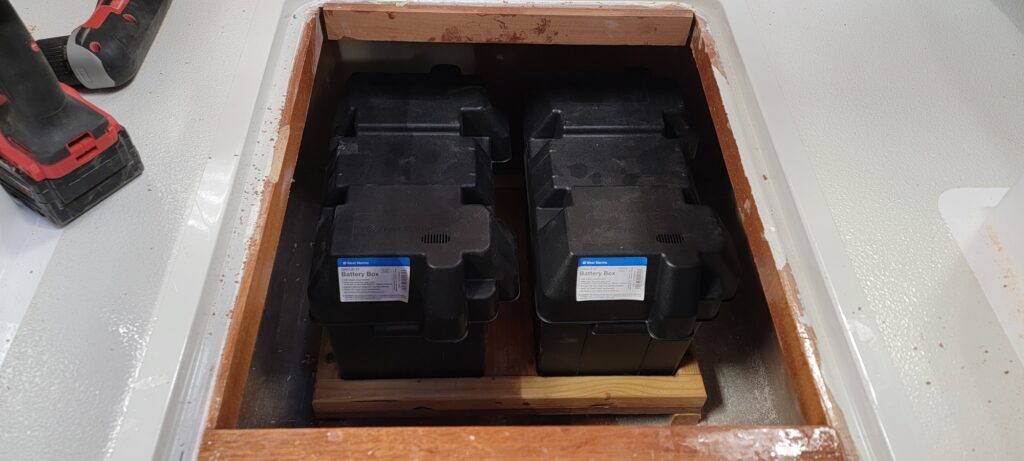
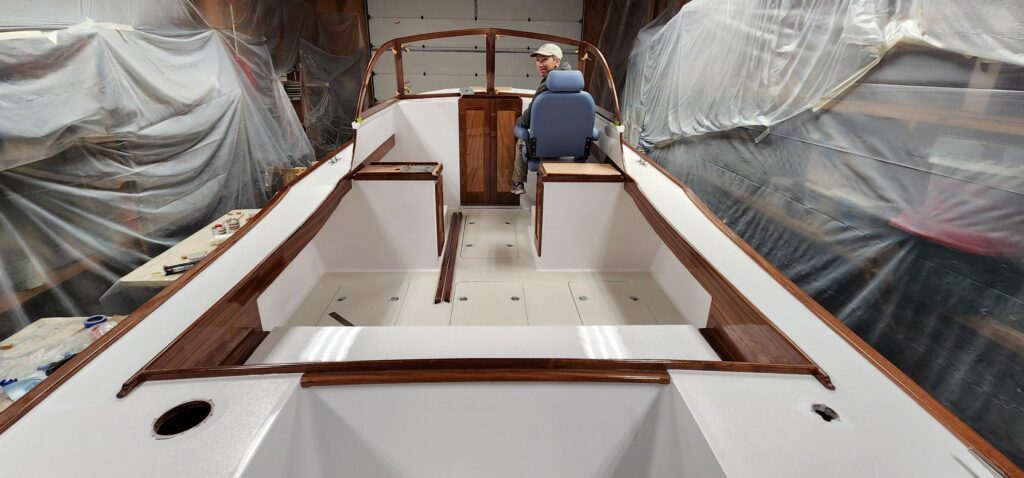
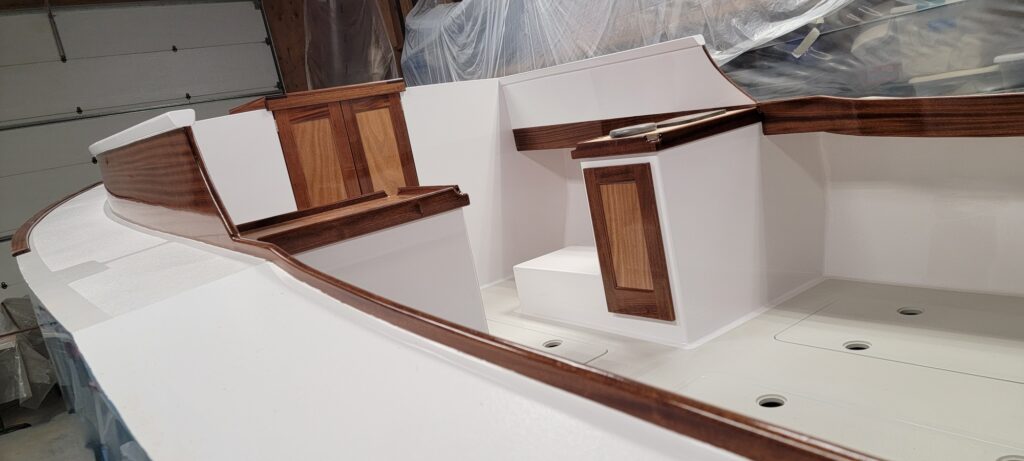
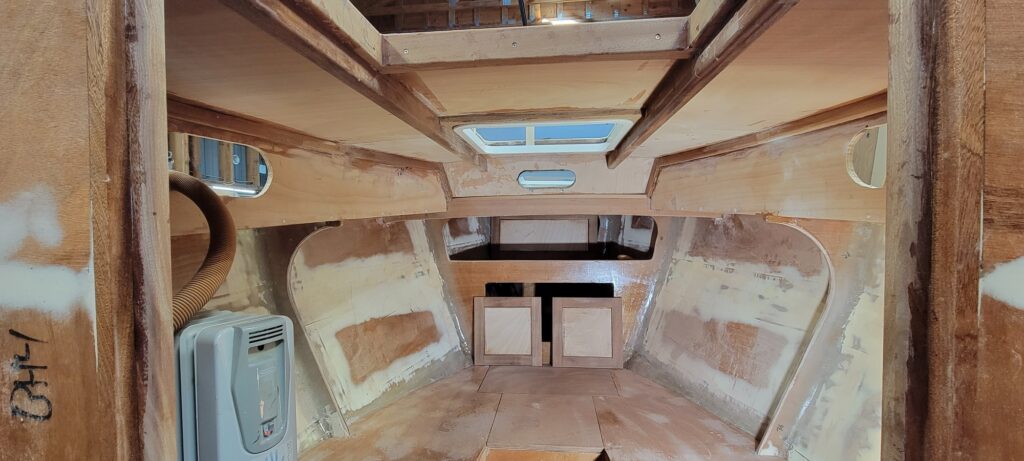
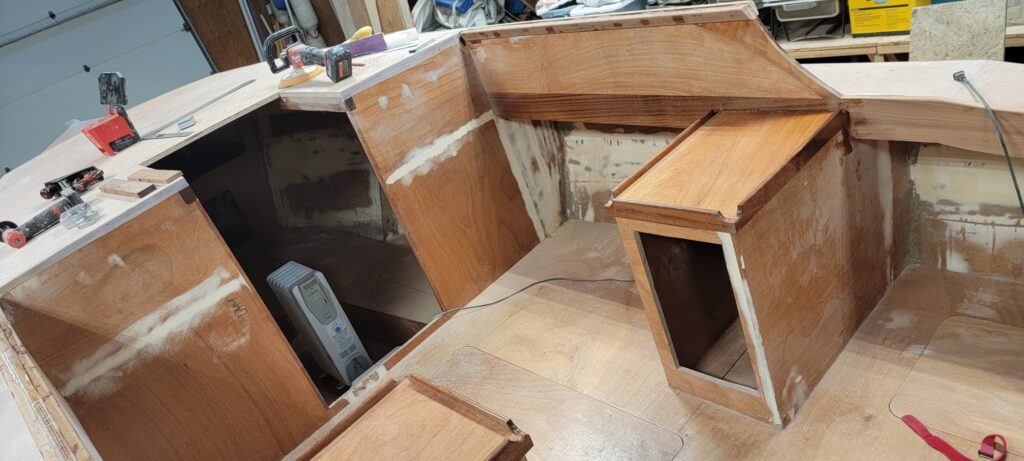
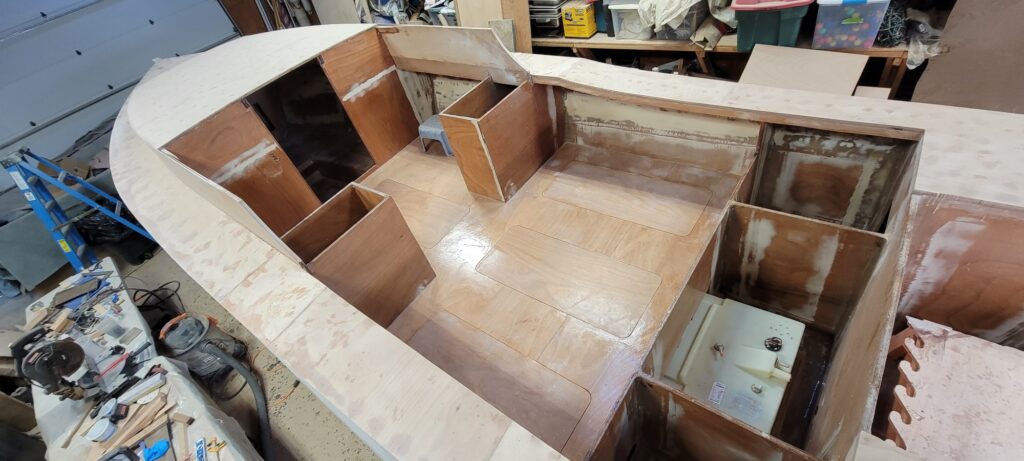
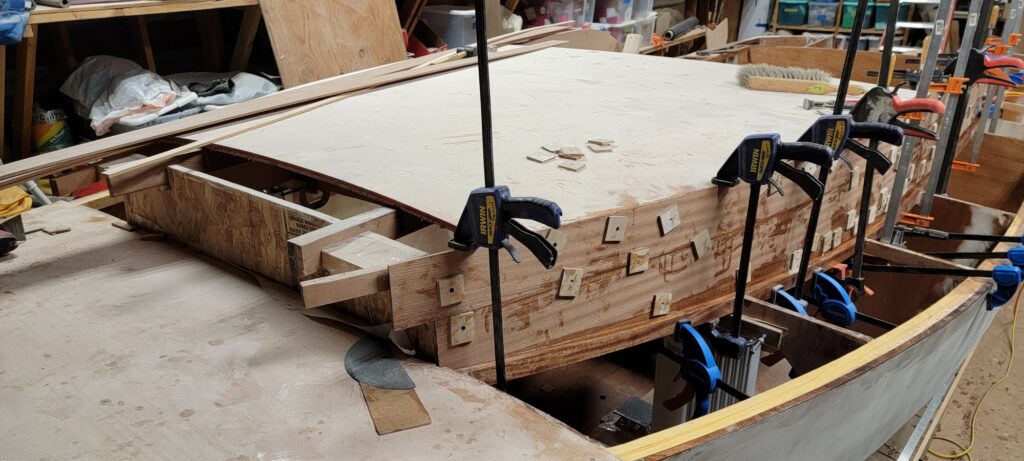
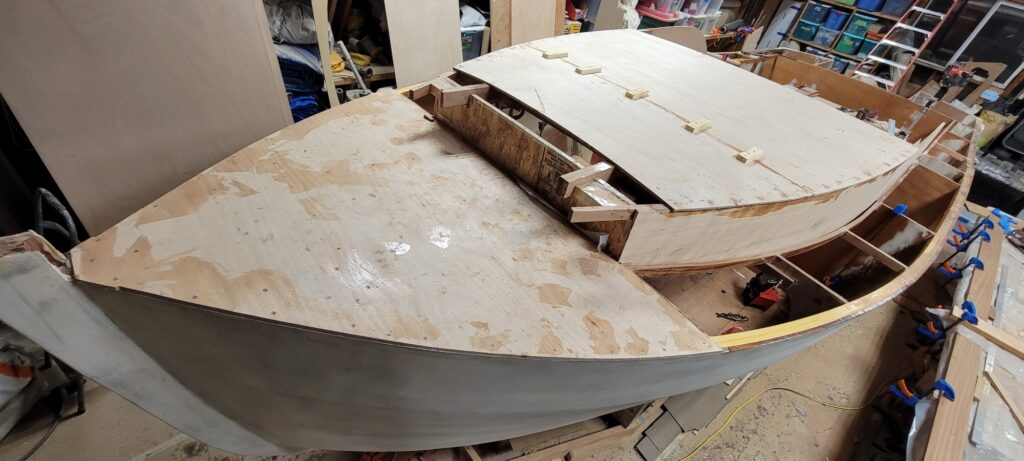
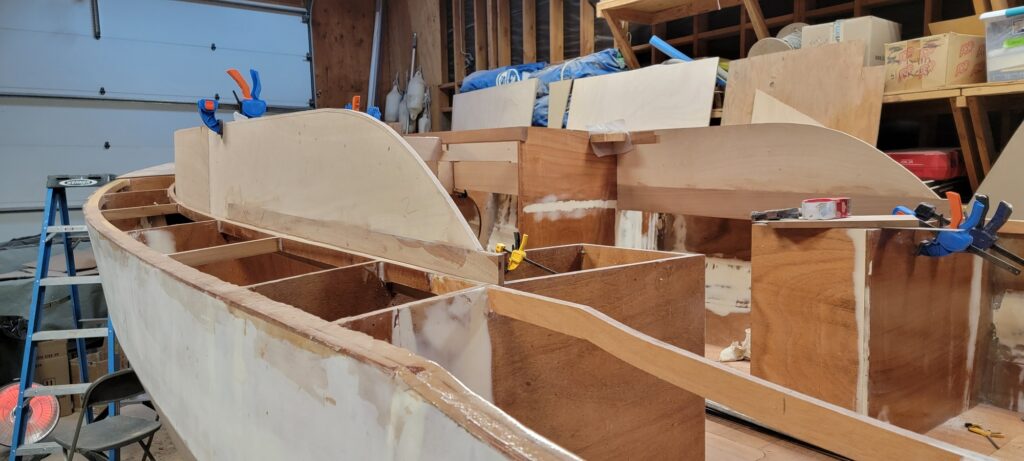
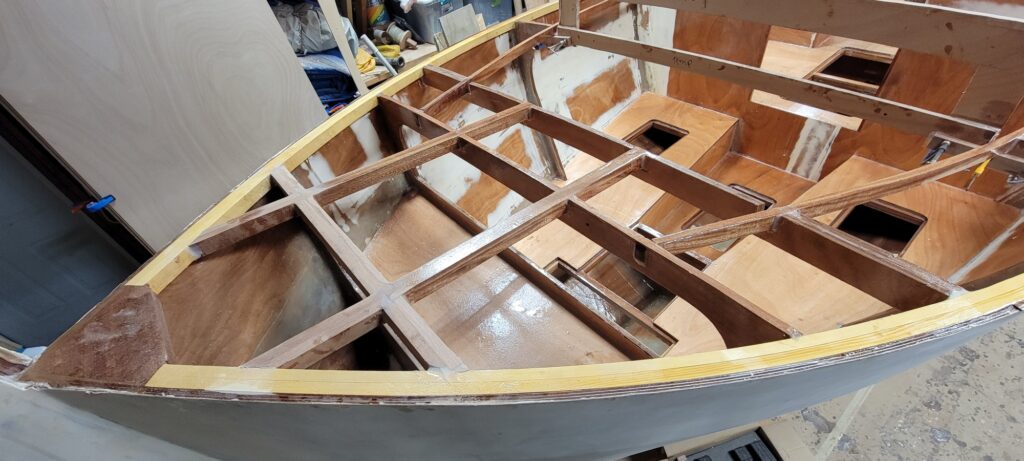
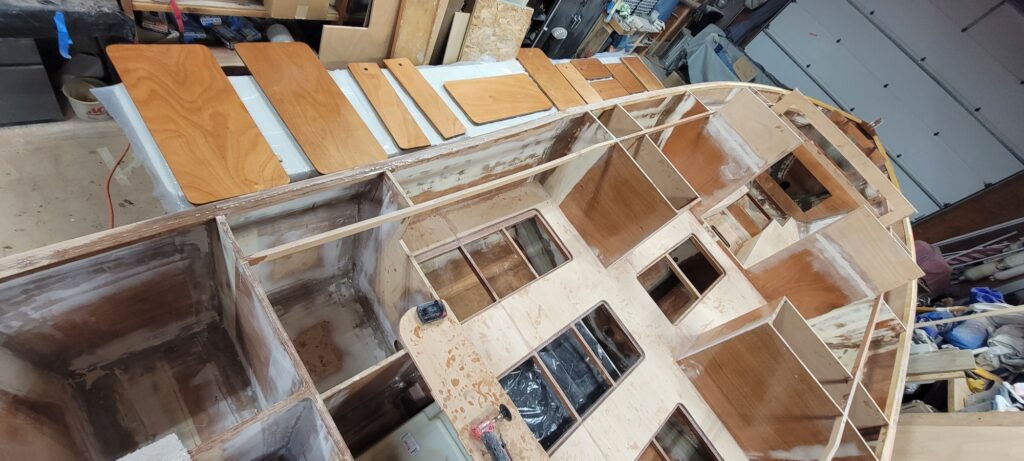
Headliners and side foamed vinyl is installed. Overhead lighting on dimmers. Cabinet doors. Bilge pump hoses and blower hoses all installed and secured. Hull & registration numbers. Keel metal on bow portion, anchor and chain loaded up.. Still have some interior trim and stair step. Cushions are ordered.
4/24/2024
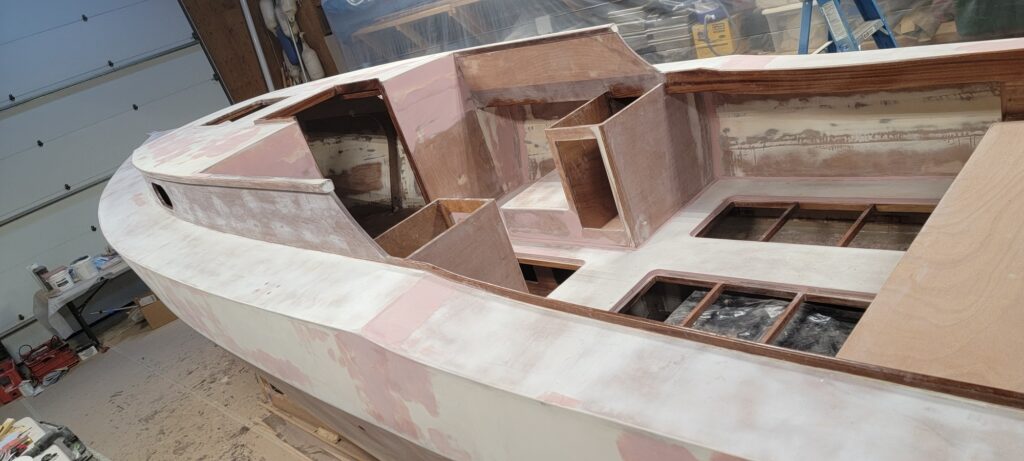
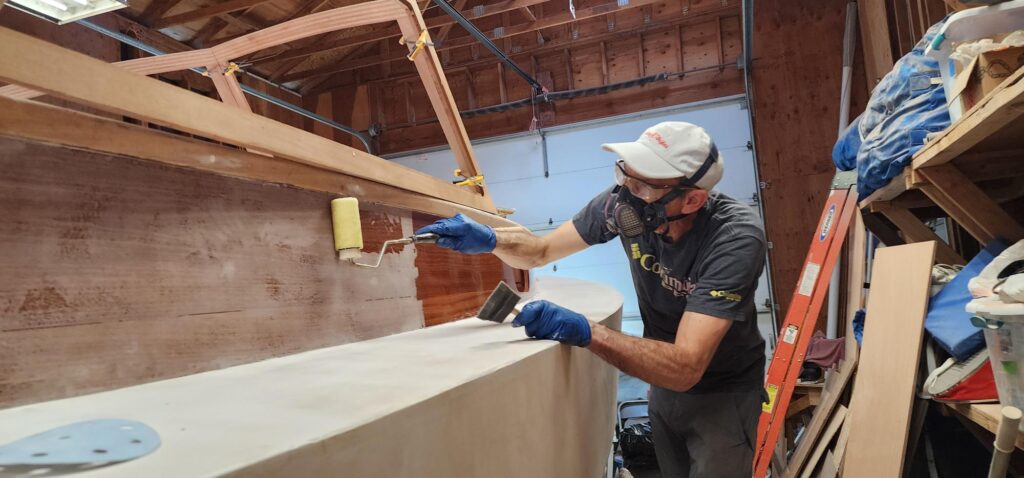
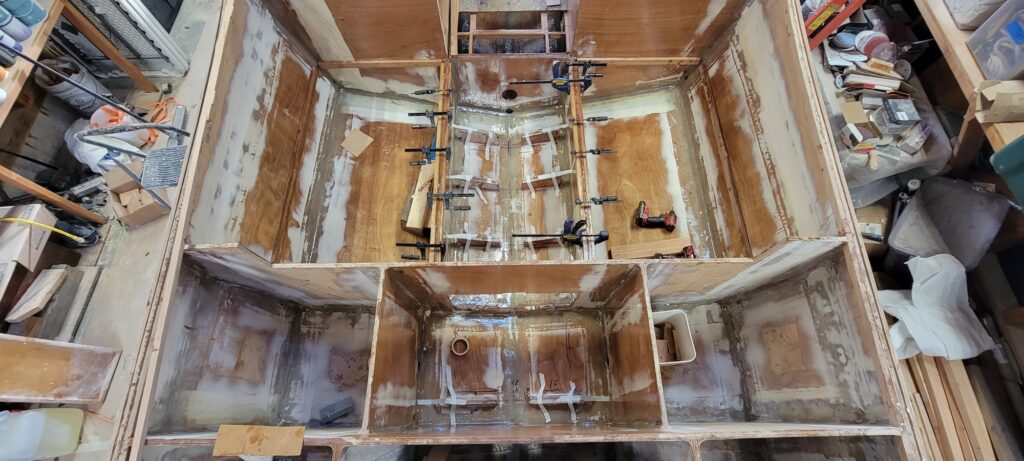
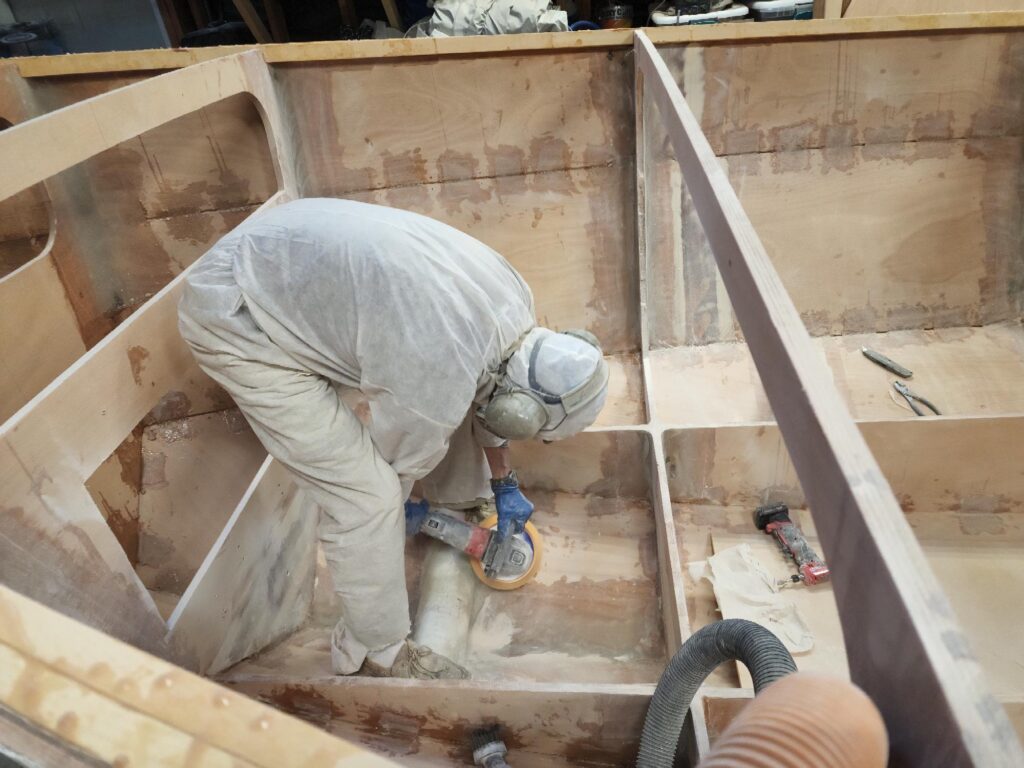
Finished sanding and priming interior for portions that will be painted. First coat of Interlux Toplac on. Used a 1/8″ roller, no tipping. Smooths out nicely. On the unfinished walls there will be 1/4″ foam covered with vinyl. Same on the ceiling, mounted on 1/4″ ply, and velcro attached.
4/13/2024
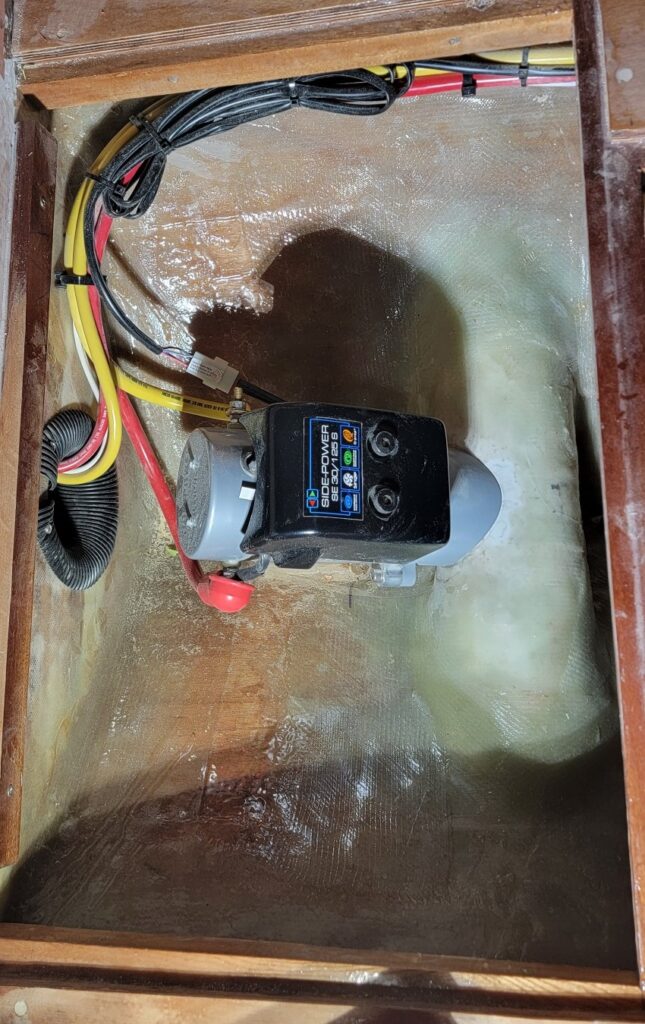
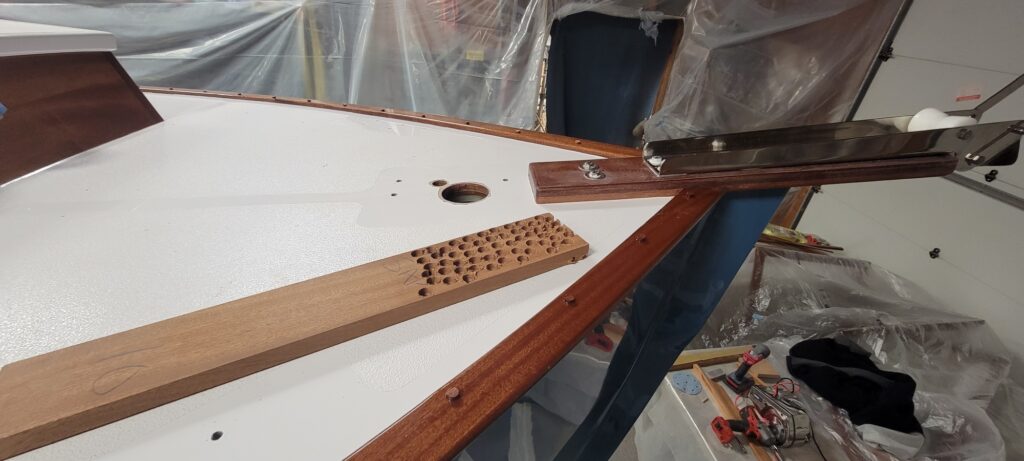
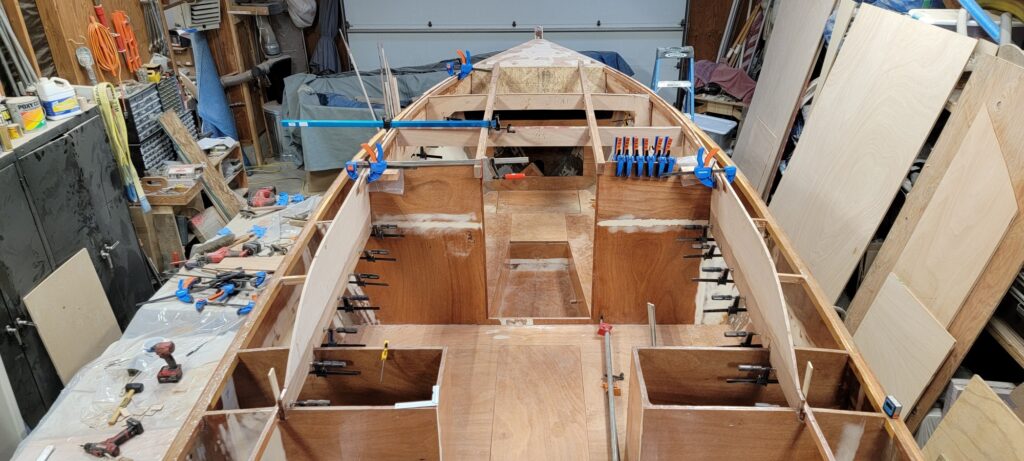
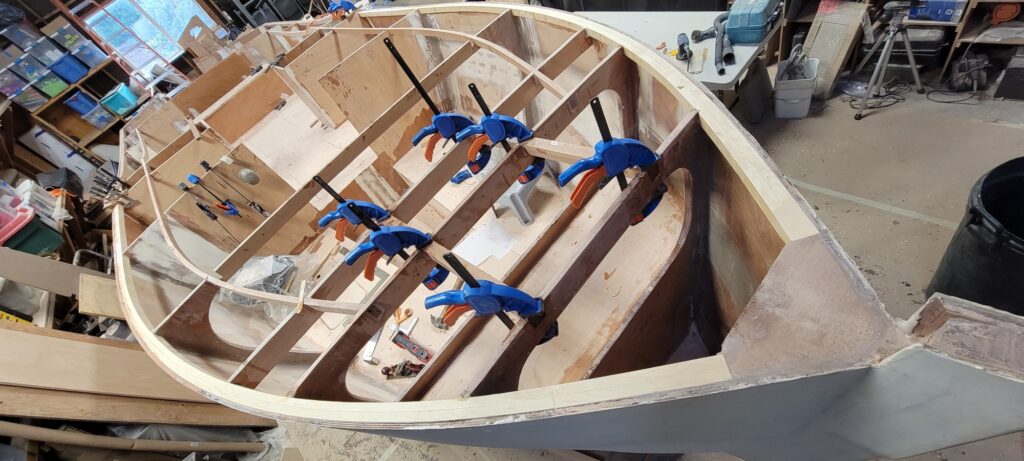
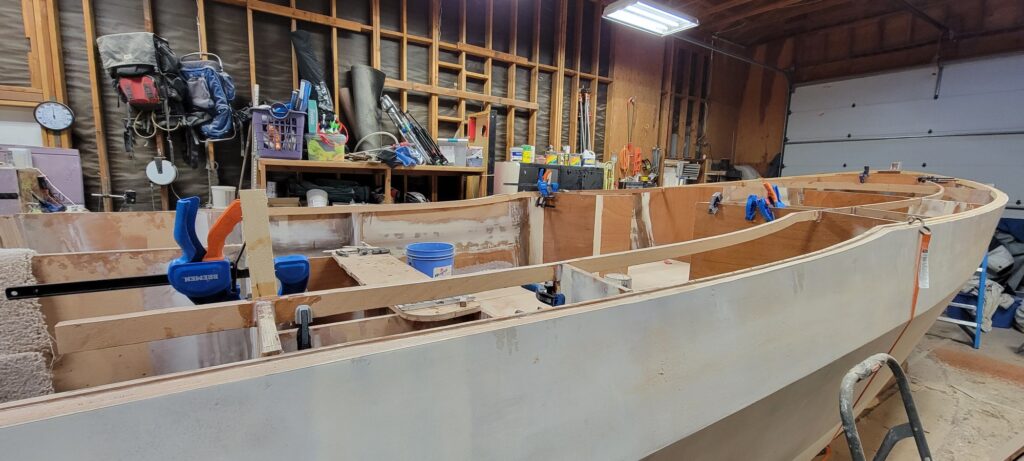
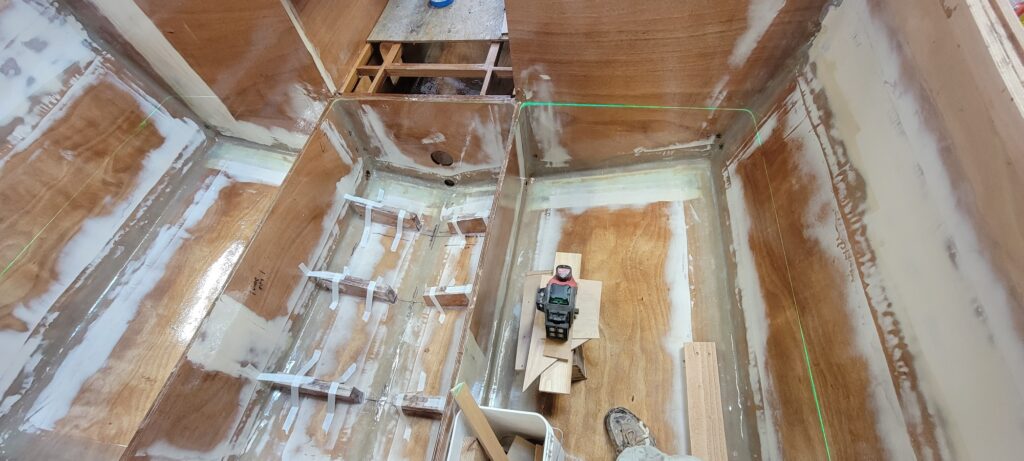
Finished the shelfs and fiddles to hold cabin cushions in place. Bow thruster wired up and working. Note additional large cables going forward – those go to the windlass, also working.
4/8/2024
Prepping to varnish all the brightwork inside.
4/7/2024
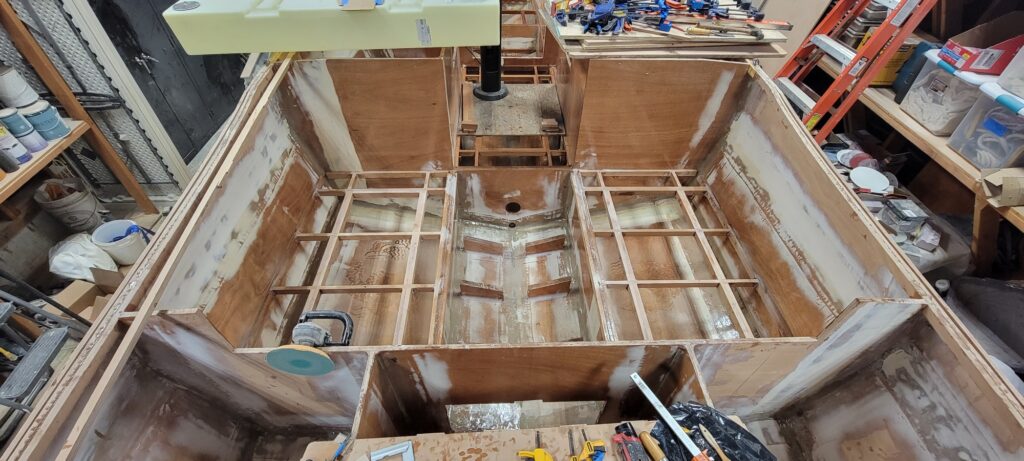
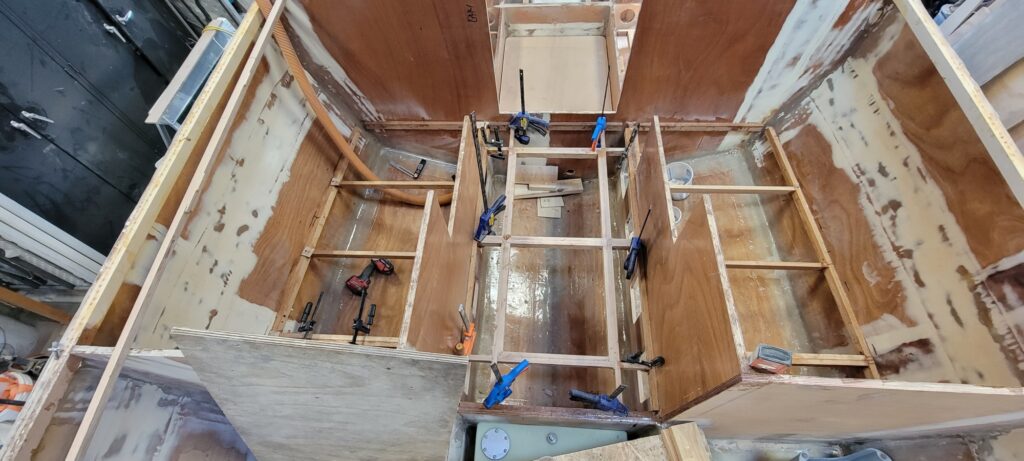
Blower is installed and working. Installed seat backs in aft portion of cabin. These are good for running wires in too. Getting interior ready for ceiling panels – making templates. Got the bow thruster installed and all wiring complete except overhead lighting in cabin. Windlass works.

3/29/2024
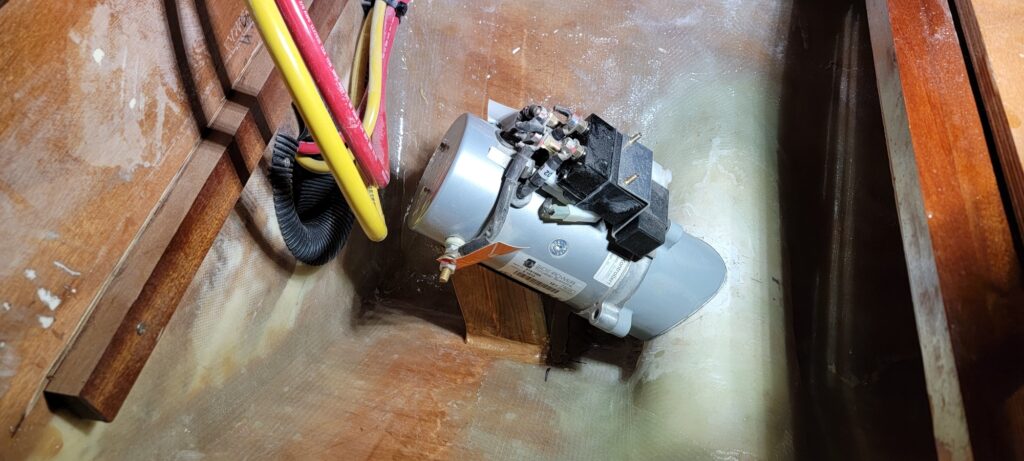
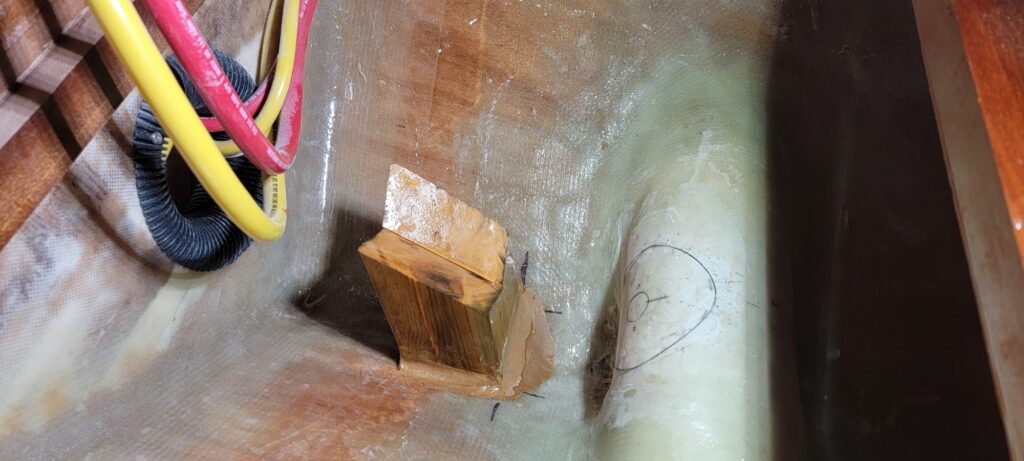
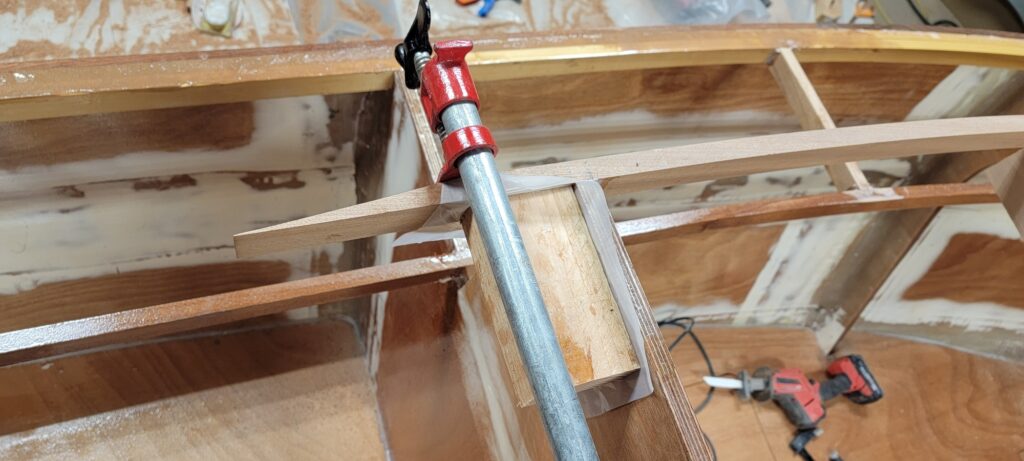
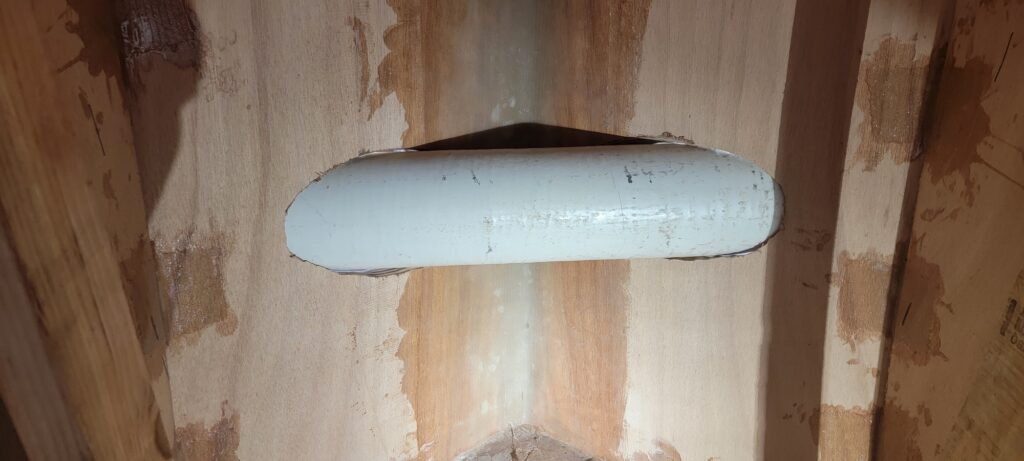
The motor for the bow thruster needs to be on a angle, to fit in it’s compartment, sandwiched between the potty and bulkhead 2. Used a laser to get a center-line and built a block to support the motor. Note the huge wires – this baby can draw 350A!
3/23/2024
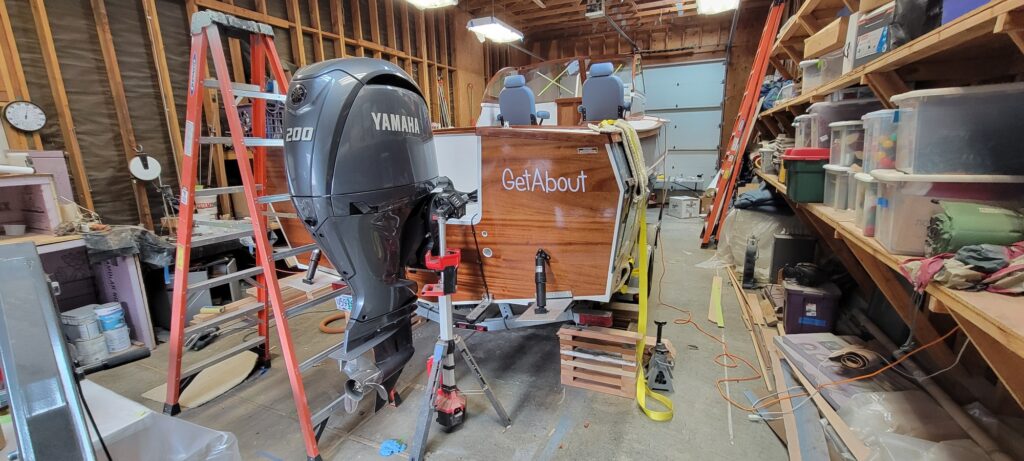
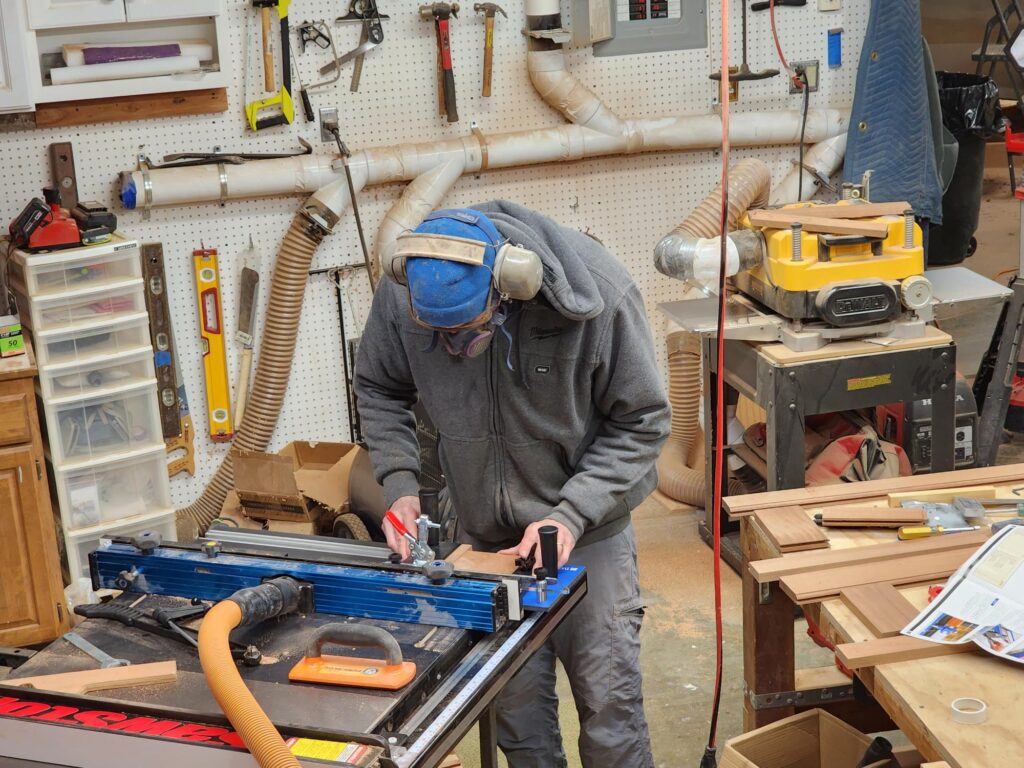
Got the boat back from the motor and trim tab installation. They did a fairly good job except for securing wires and fuels lines, which I improved after. Also got rid of the untined wire they used for the fuel level sensor and replaced with proper Ancor tined wire. Besides that, pretty happy and making progress.

3/12/2024
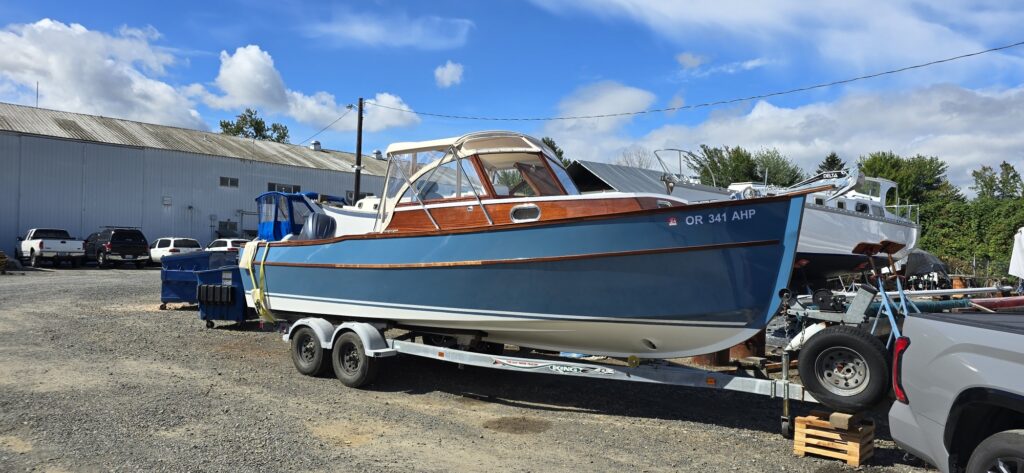
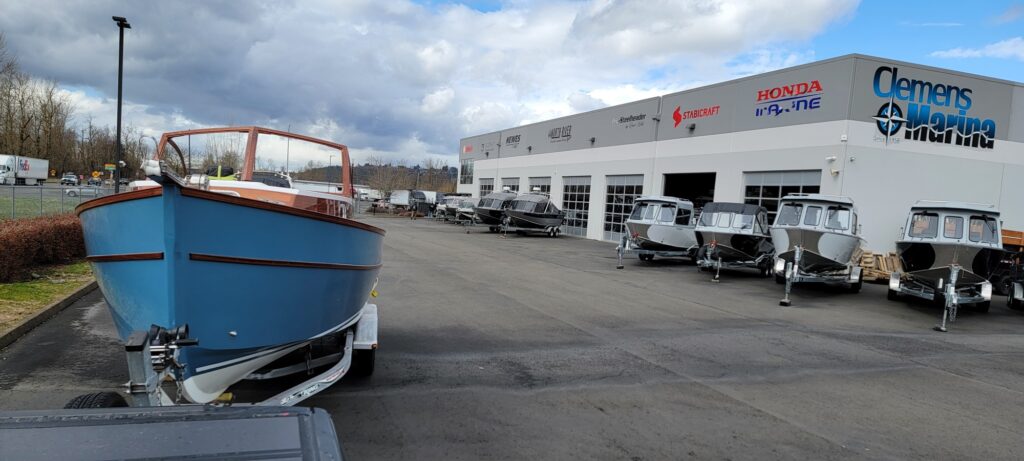
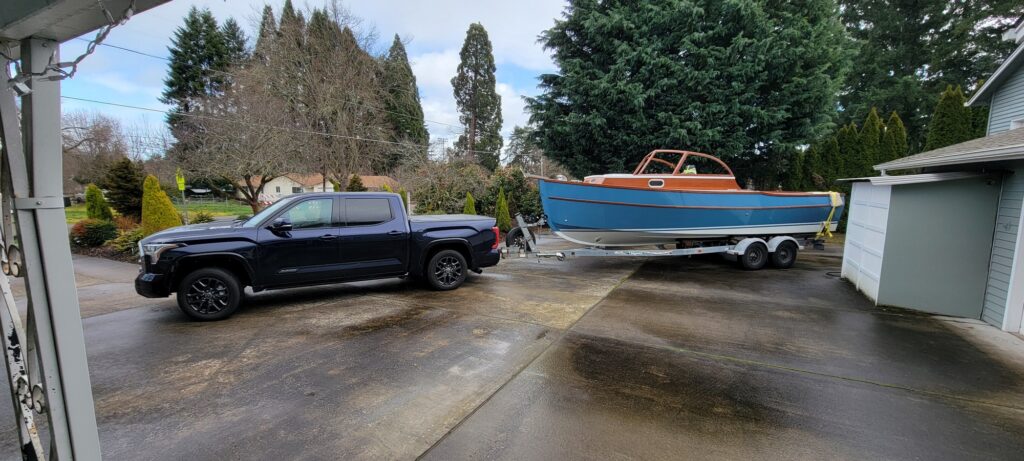
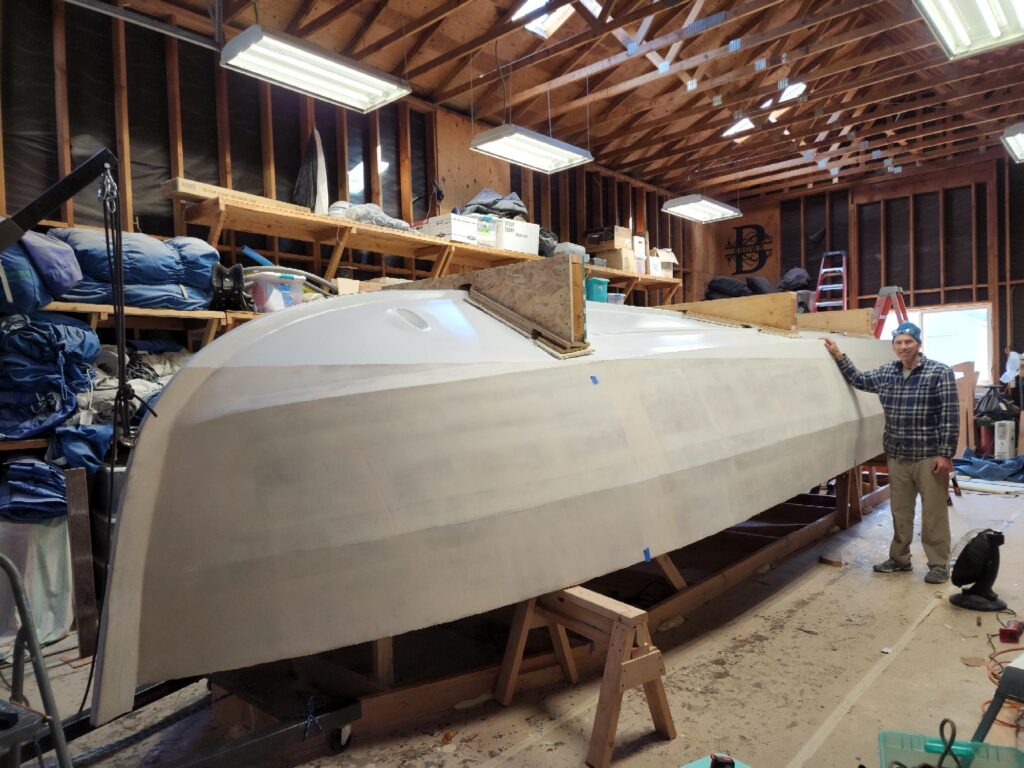
First day in the sunshine (well, at least when it wasn’t drizzling). Trailered well to the shop for outboard engine installation. I stopped by the weigh station before and after, and deduced the boat is in the range of 3500 lbs, perhaps a couple hundred more if the trailer weighs more than 1200 lbs. I’ve never weighed it on it’s own.
3/9/2024
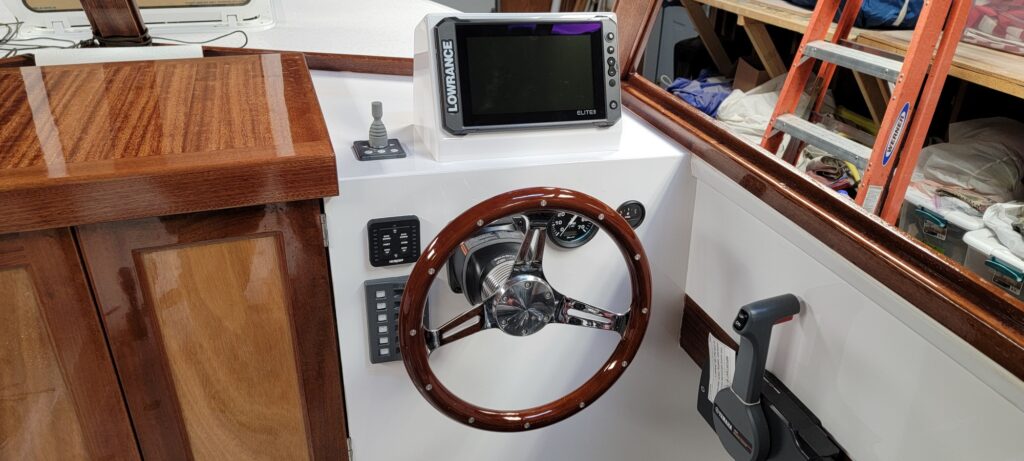
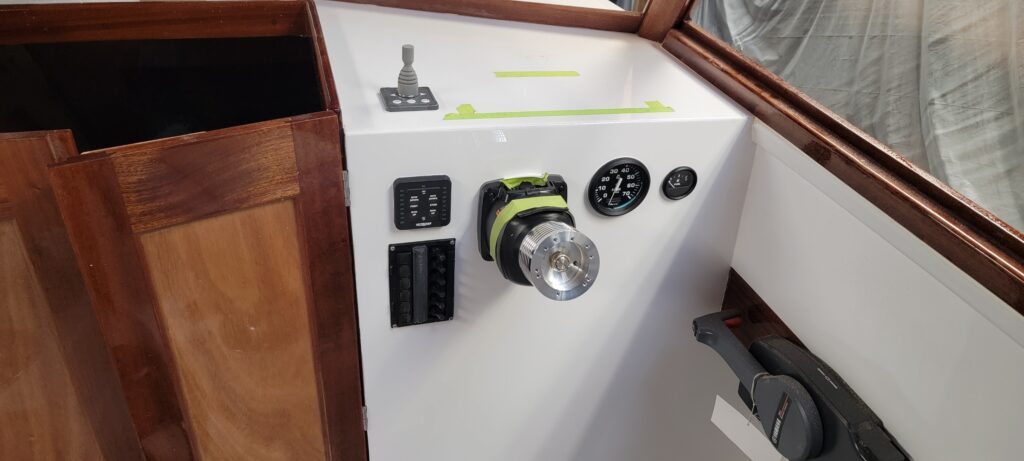
Instruments installed on bulkhead, windlass installed, all wiring needed for engine installation is done, electrical panel cabinet is fit and holes made for main power switch, windlass controls/breaker and cabin lights and varnish is done. Still replacing U-bolts on trailer and tuning the bunks. Most of the bolts had to be broken or cut off to remove. Painful under there – just 3 to go. Plan is to take the boat to the chop for outboard installation this week.

3/5/2024
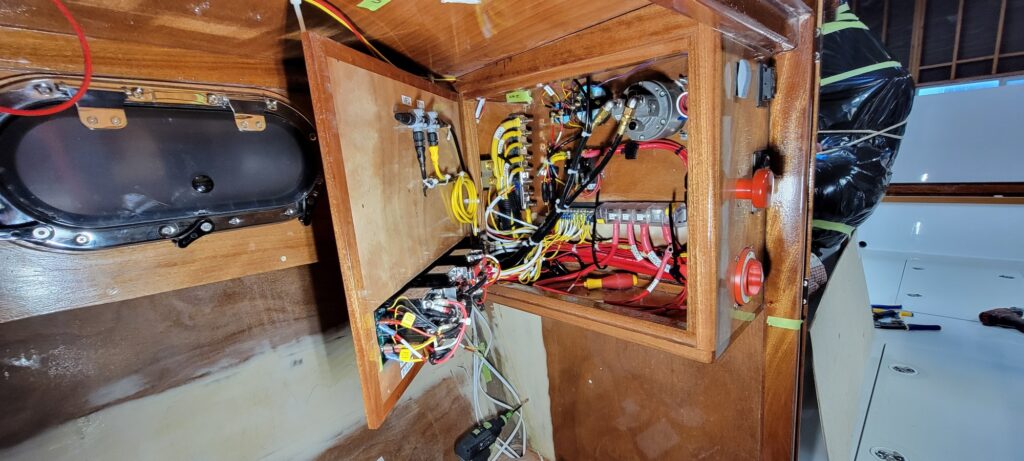
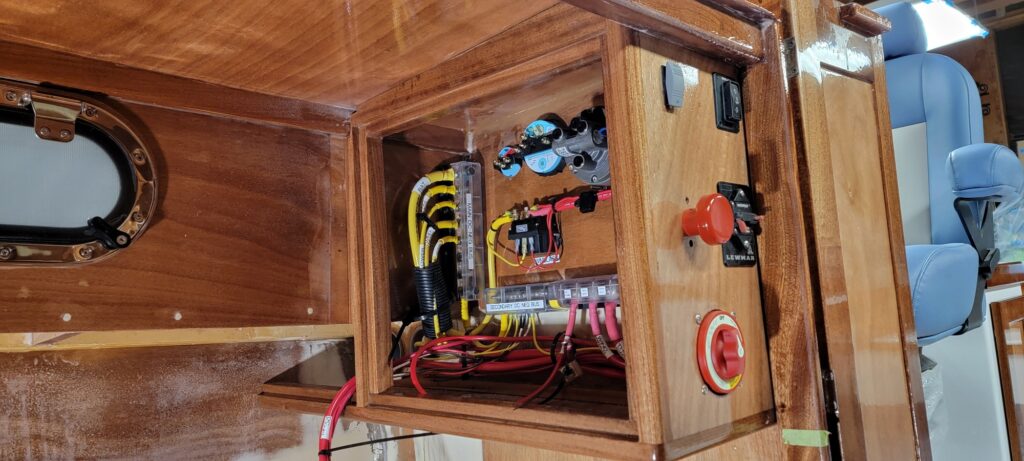
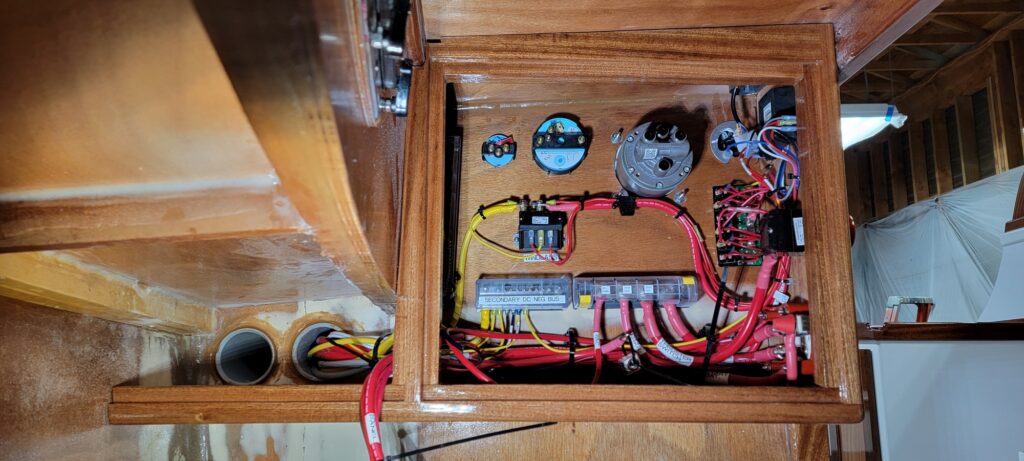
Full swing on electrical. Getting help from Chris Richard who’s got the brains and the tools for it. Got the instrument layout defined and cut holes for everything. Built a cabinet that sits just forward of helm bulkhead and will house the DC panel and much wiring.


2/27/2024
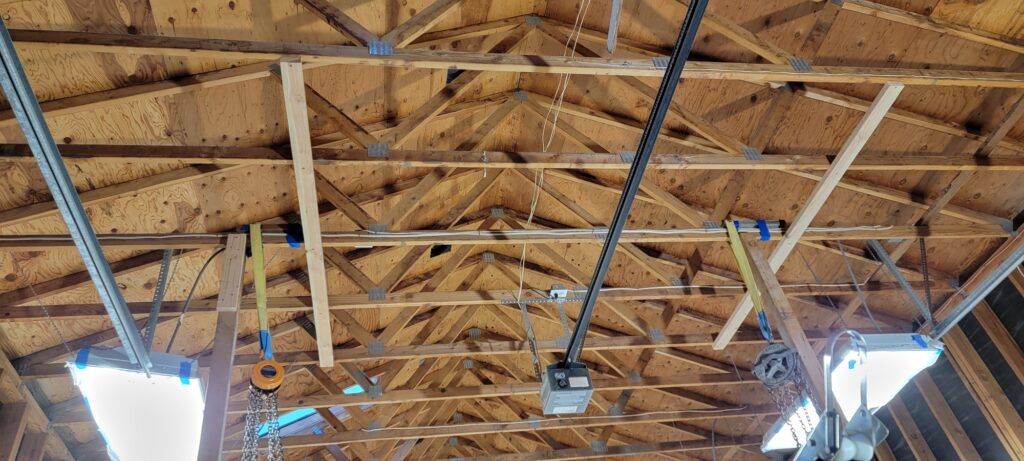
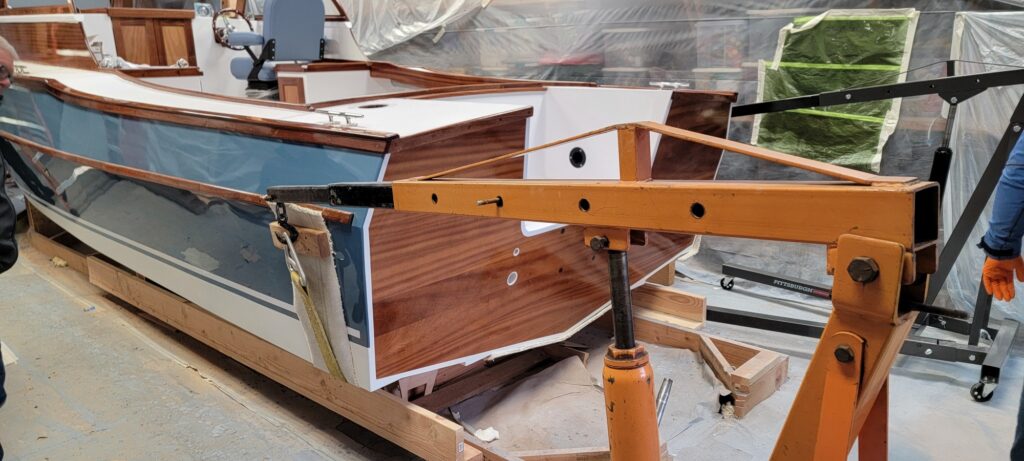
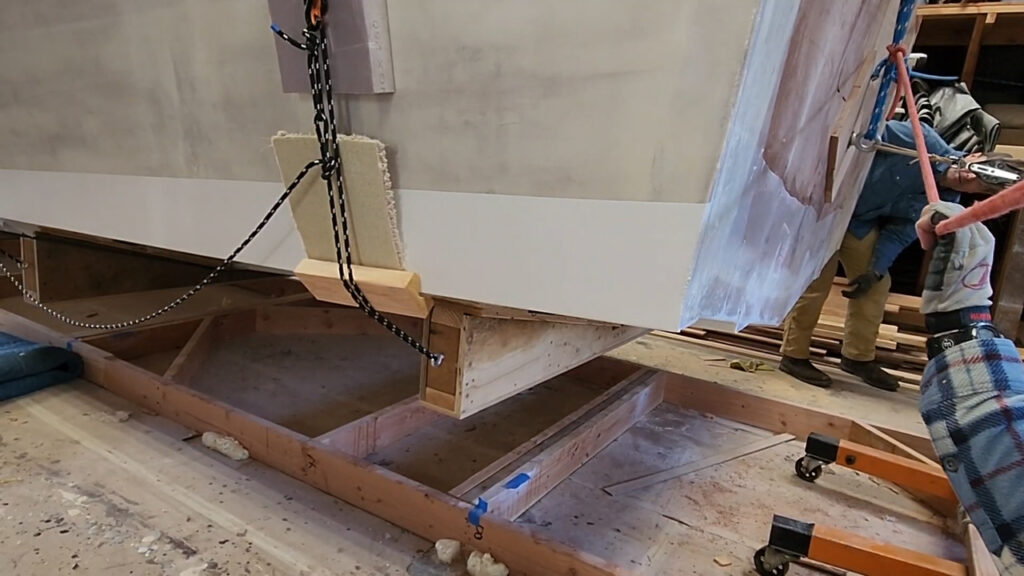
Made all the cribs for nothing, but wanted multiple options. Ended up using slings. On the forward end, used a sling lifted by chain hoists hanging on the roof trusses. Of course trusses are not engineered to hold the load of a boat, so they were supported by 15′ 4×4 posts, and a 8′ 2×4 crossways on the lower truss members to tie 5 trusses together for extra stability. Worked like a charm. 7-Minute Video of the Process
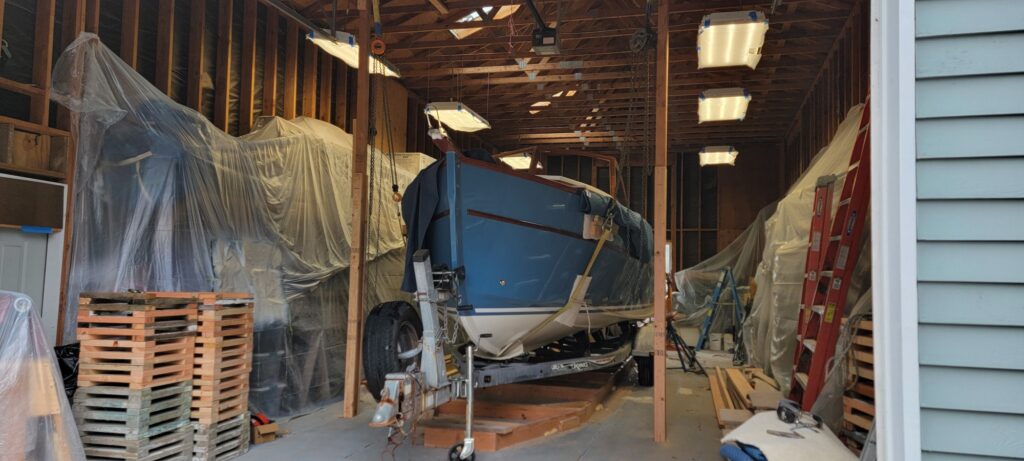
At the aft end, the boat overhangs the trailer by about 12″, so we used a sling supported by 2 engine hoists. Once we lifted the boat off the cradles, I unscrewed and removed them, but the building frame was built narrow enough that the boat trailer could just roll right over it.
2/24/2024
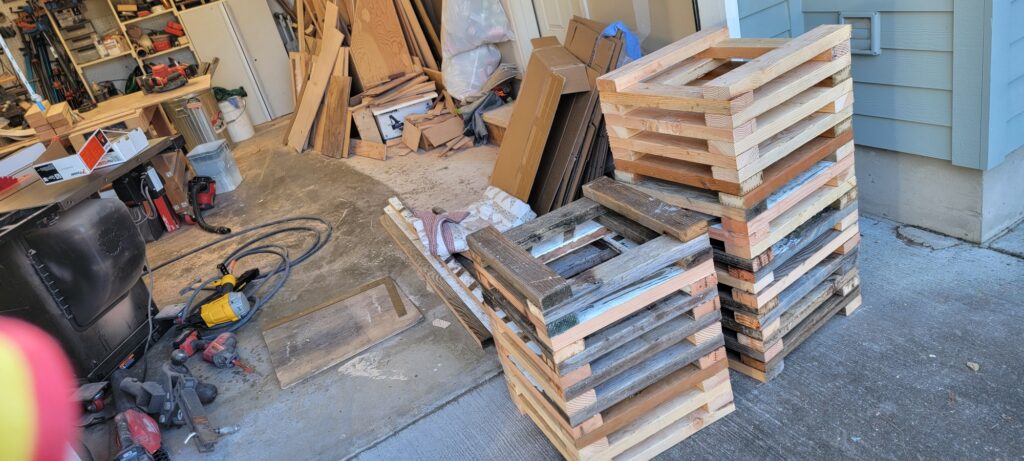
Preparing to put her on the trailer. Made up a bunch of cribs (have 12 total) to help with the process. More on this in a few days.
2/7/2023
Getting ready for engine install carries many loose ends to get done. I’ve installed 3″ conduit fore/aft under the side deck for wiring and hydraulic lines, battery platform, engine controller (can see conduit under it in the picture), etc. Just goes on and on. About ready to put the boat on the trailer and trying to figure that out. Have an electrical plan and ordered most of the parts for it.
12/18/2023
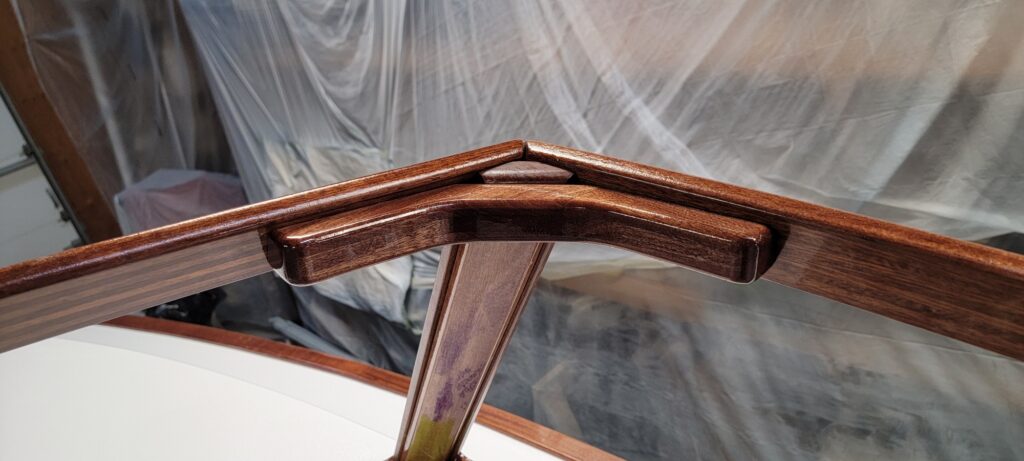
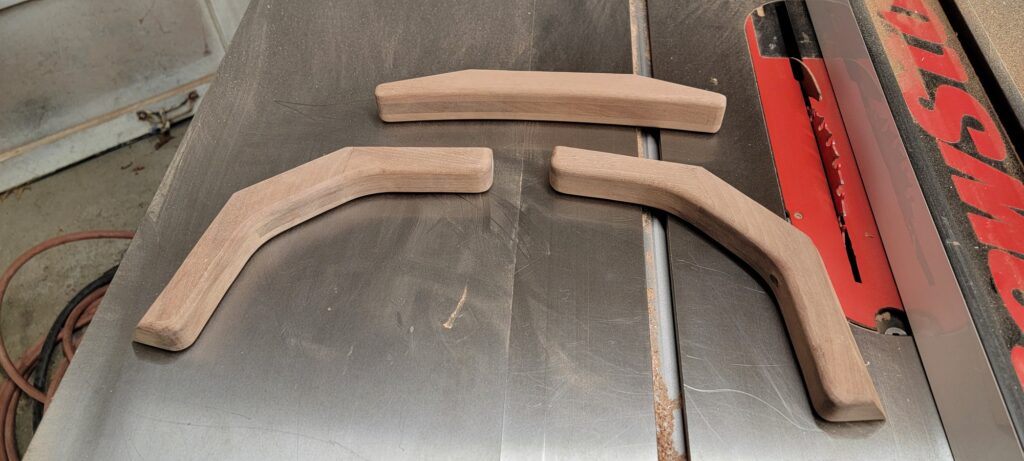
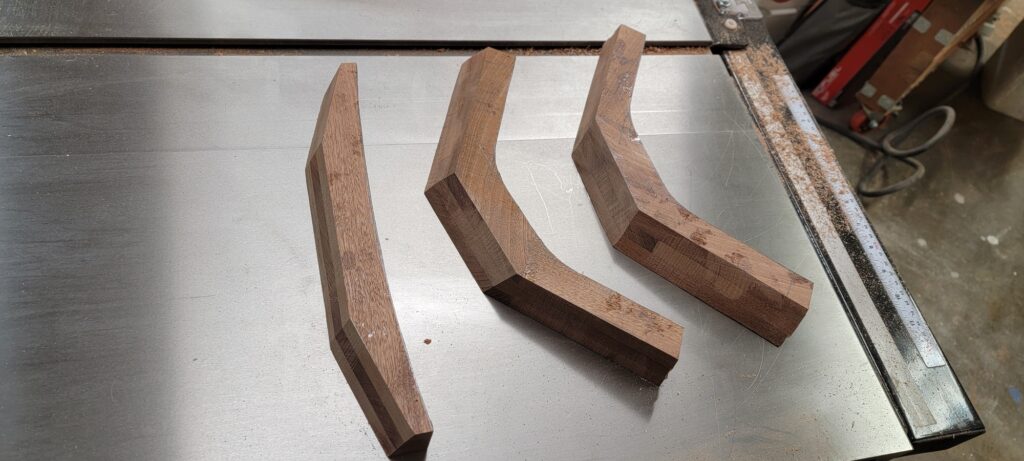
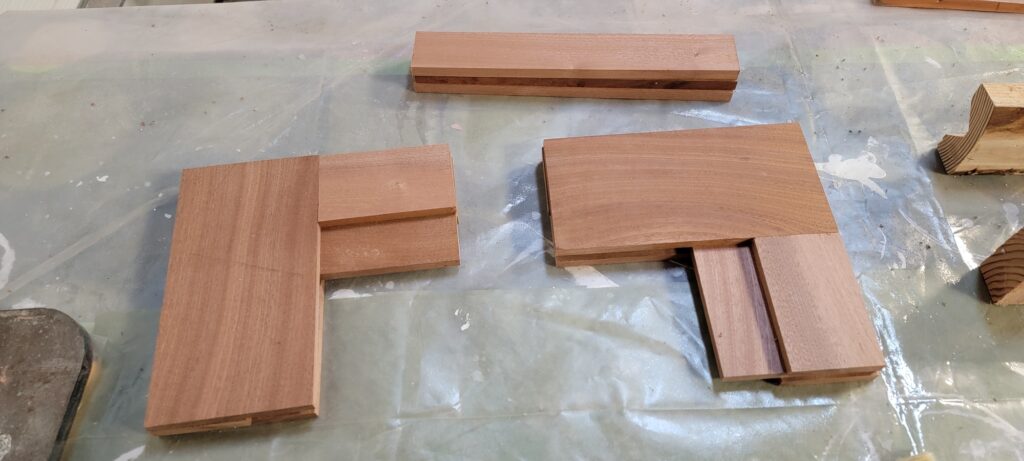
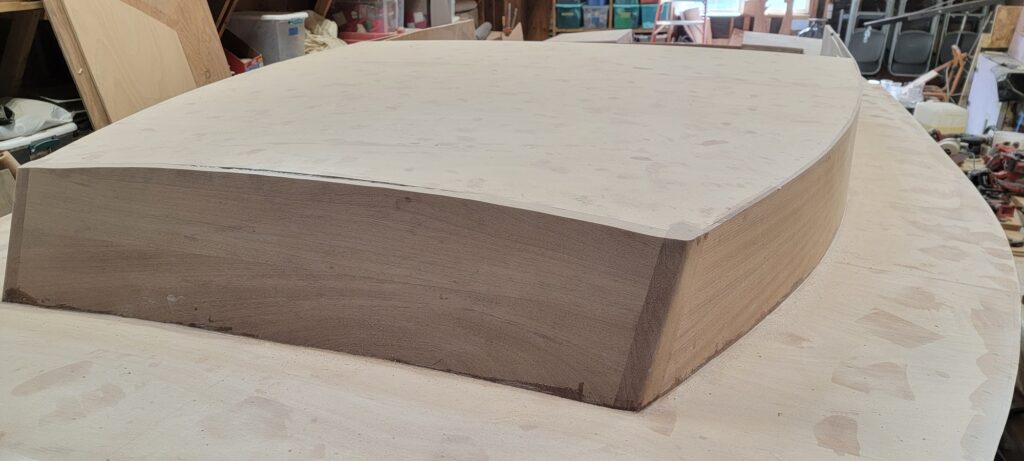
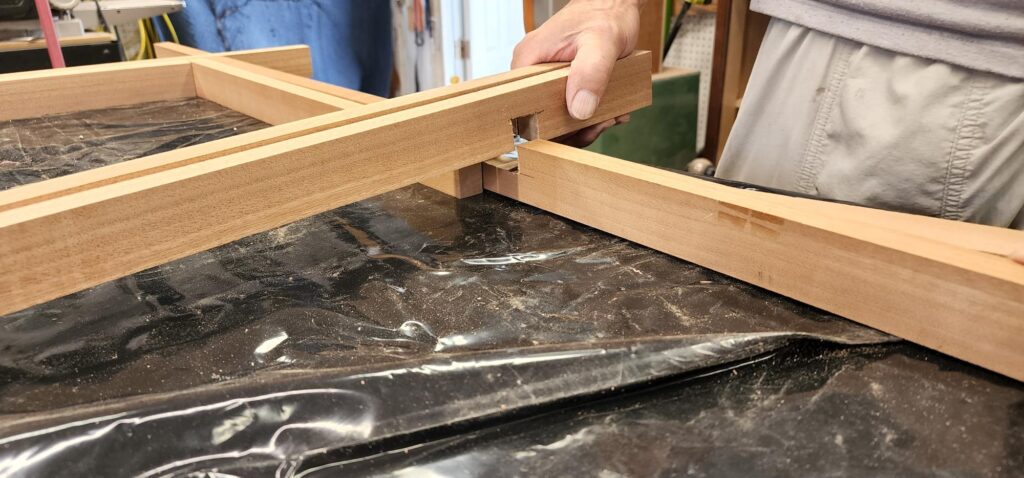
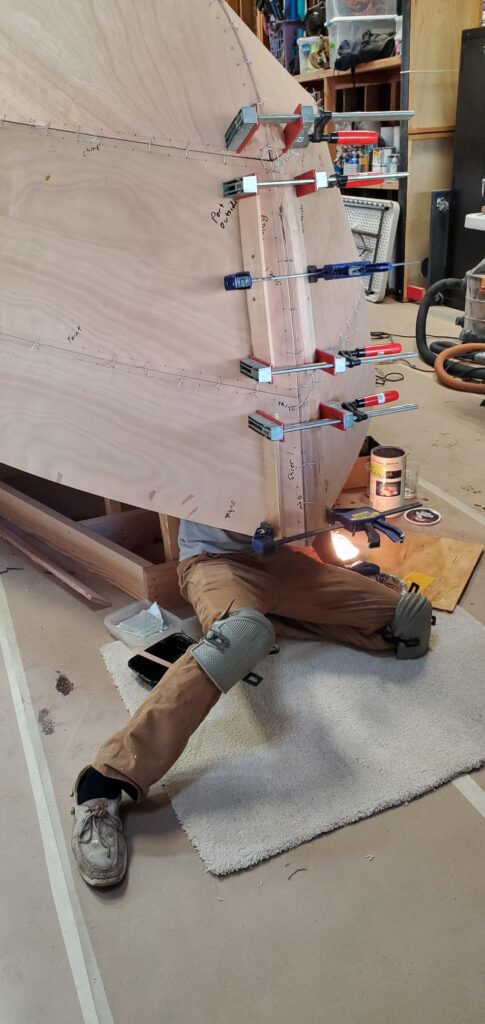
Concerned that the windshield frames needed some reinforcement where they connect together, I decided to laminate some sapele knees. This should be much better. Were some of the trickiest pieces to fit with compound angles on every side.
12/6/2023
Varnish on rails is done. Check.

12/4/2023
Working on random things in between varnish coats on rails. Tilt Helm installed.

12/1/2023
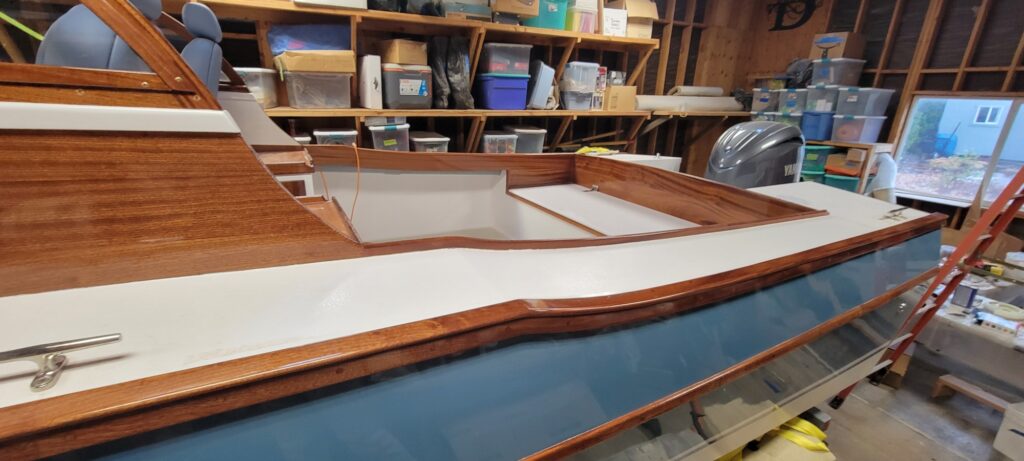
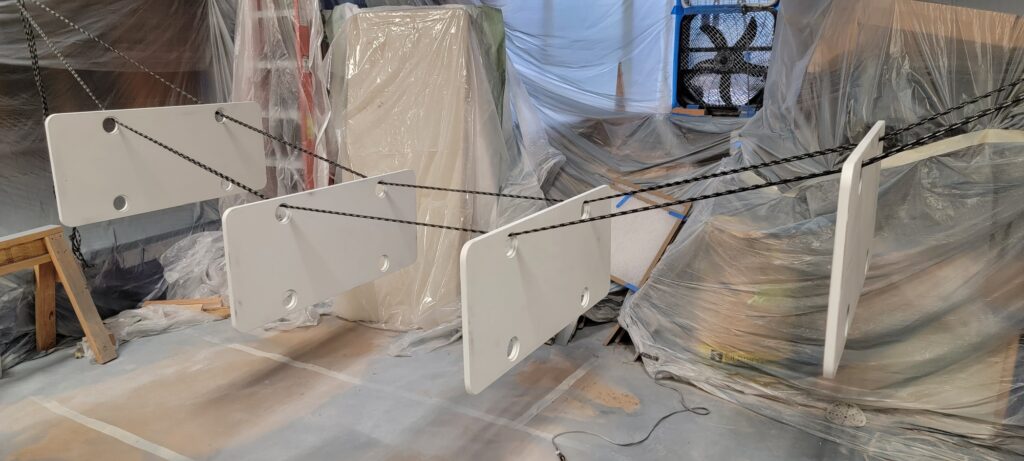
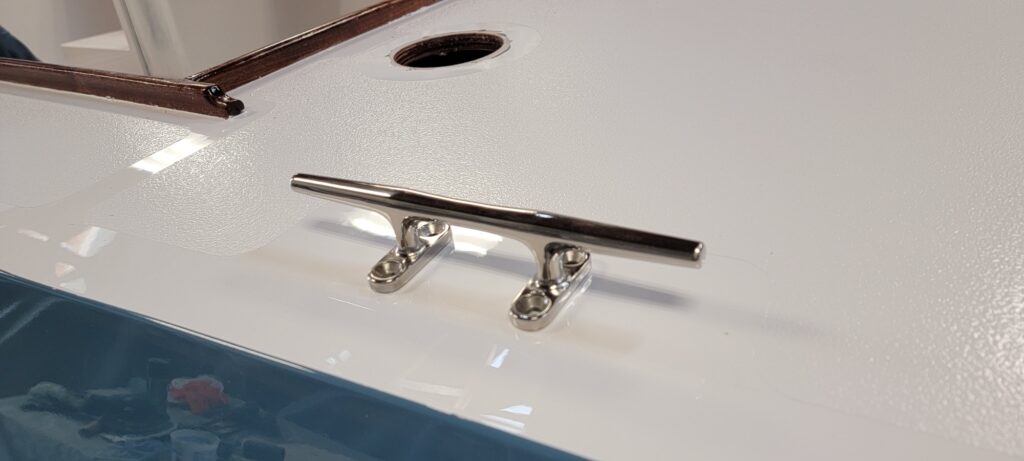
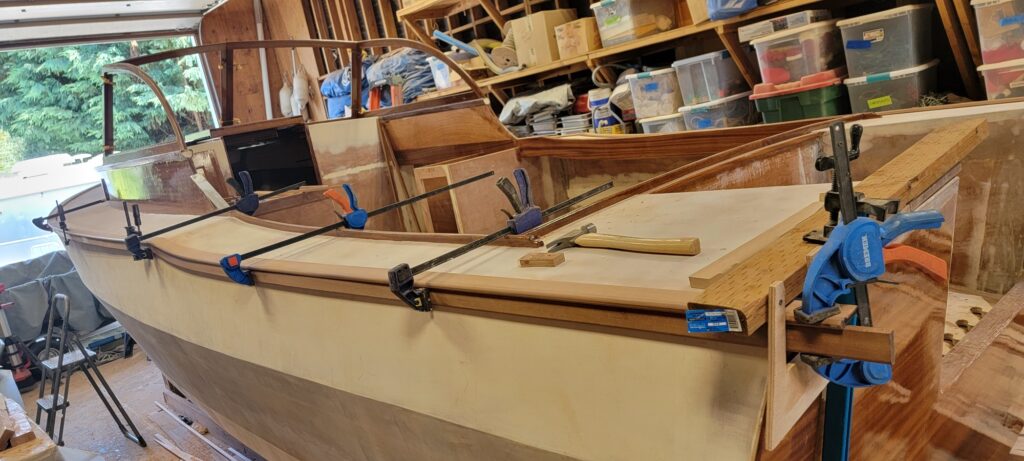
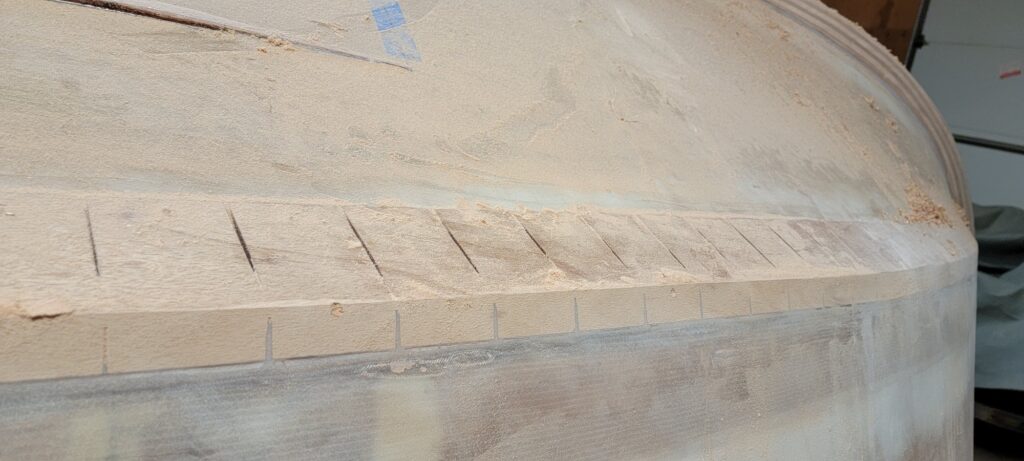
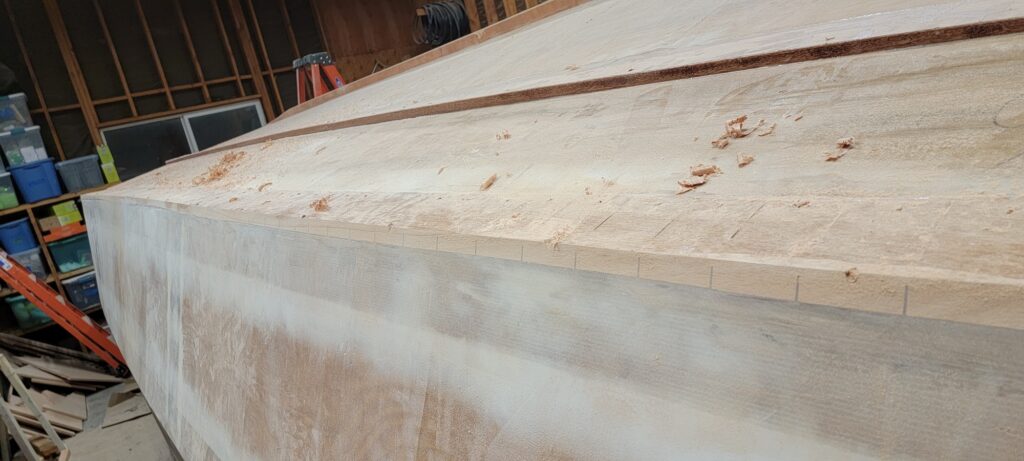
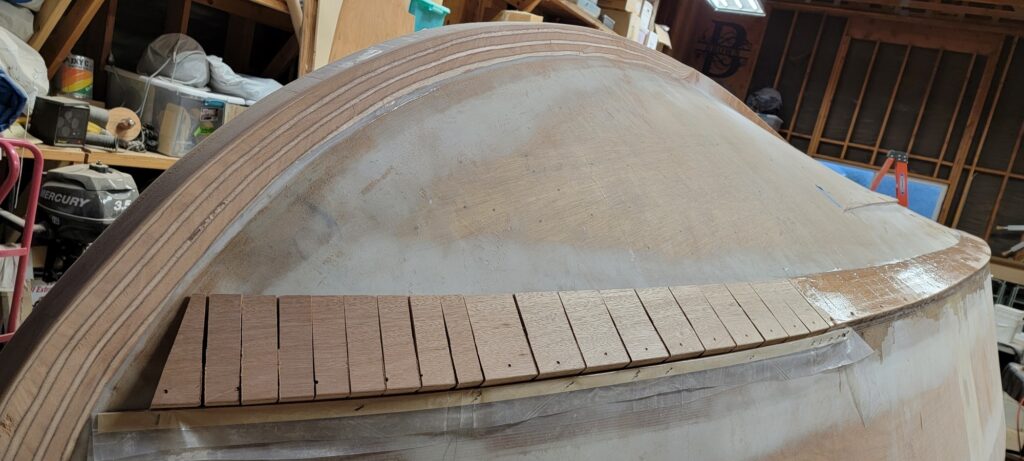
Chine rails on on and plugged, still have to trim plugs, and then sand and varnish additional coats on all the rails. Cleats (10″) are installed.
11/20/2023
Sheer rails are on.
11/18/2023
Bow sprit and anchor roller are on. Used Sikaflex to attach cap rails with #8 SS 1 1/2″, 6″ OC, and glued in bungs with varnish to not be too permanent.
11/13/2023
Fit the cap rails – nice that both sides fit perfectly to the bow sprit with 45 degree cuts. This assembly biz is tedious and some of these cuts are scary, but it’s fun to see all the pieces coming together.
11/11/2023
Working on a bunch of assembly things, not much worth showing pics of. Built bow sprit and got holes in it and deck, aligned with anchor roller, installed window frames, seat pedestals and one seat to help figure out location of engine controls, cockpit deck hatch latches, painted bottom paint on bottom of transom, installed splash well hatch, etc.
I like how the deck hatches came out, but am concerned that the SS latch handles will be slippery when wet. Not sure what to do about that.
10/31/2023
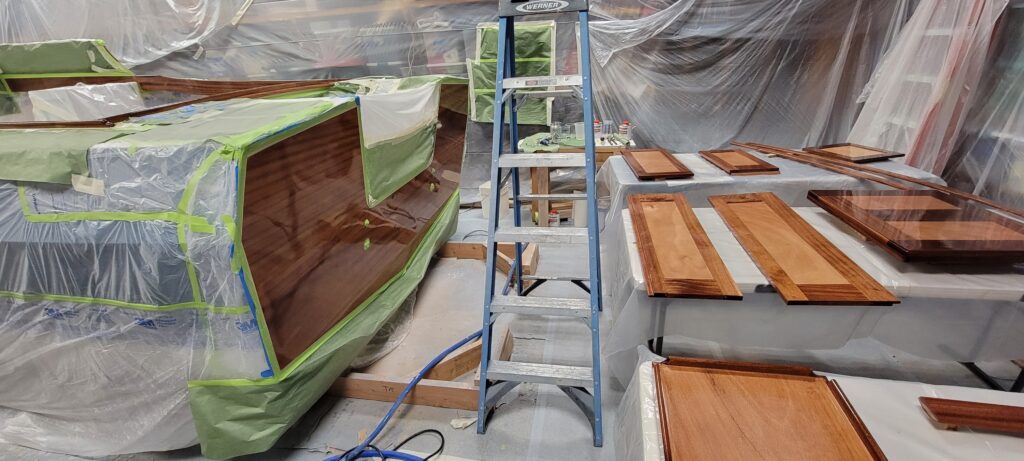
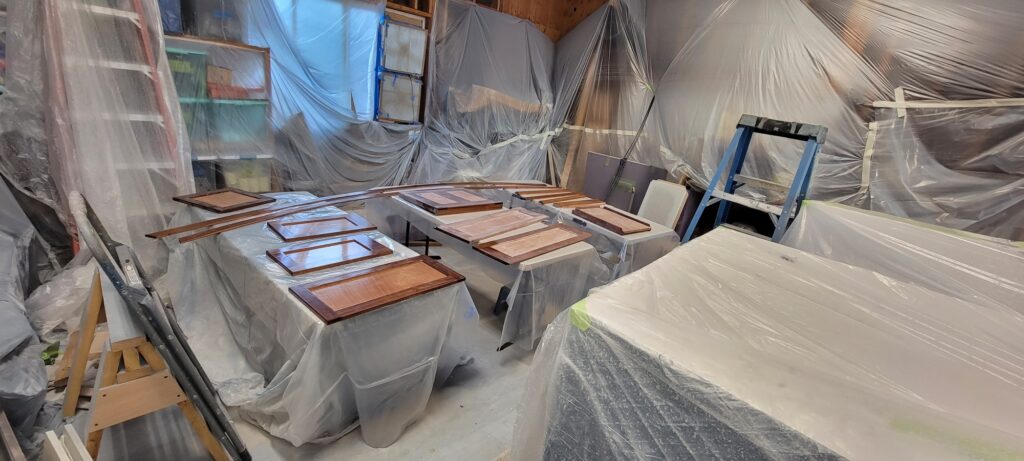
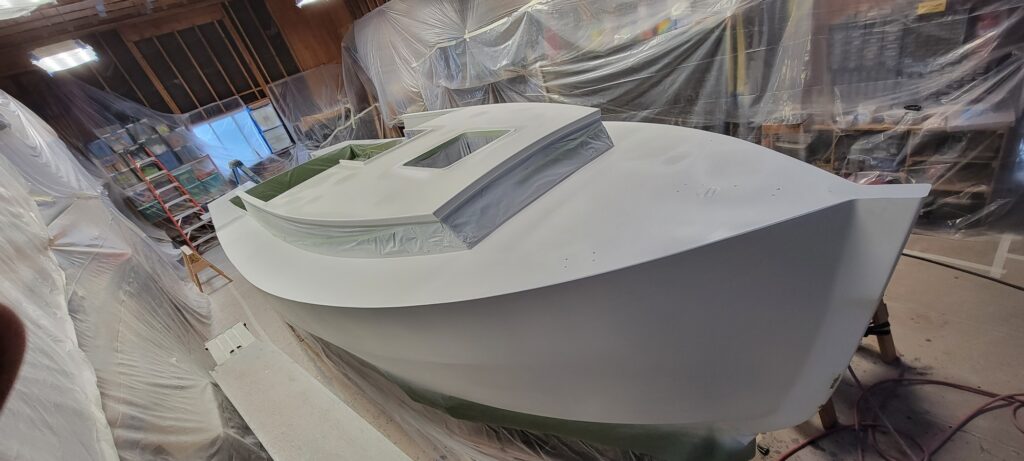
Happy Halloween. Finished varnish and peeled off the paper. Starting to see what she will look like! Some assembly required now. Installed a few doors today and found some laminate in a close-enough color for the cabinet tops and got that cut out.
10/16/2023
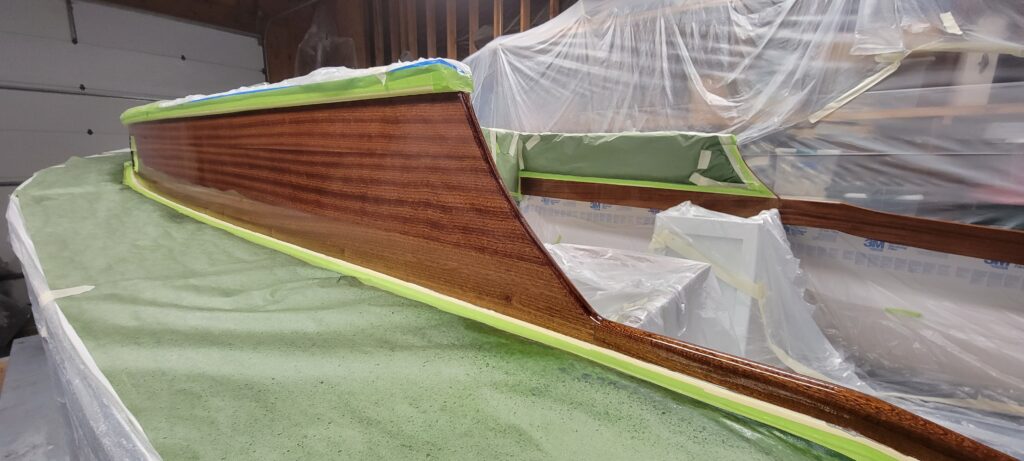
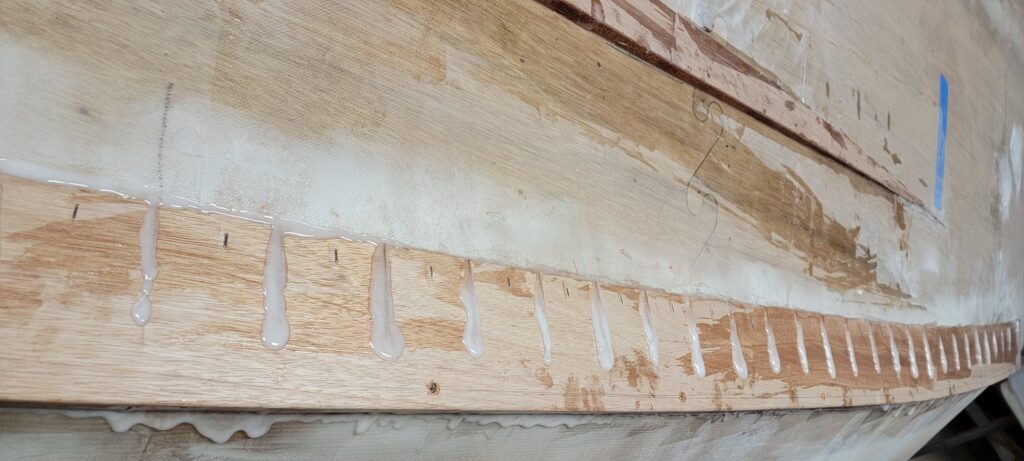
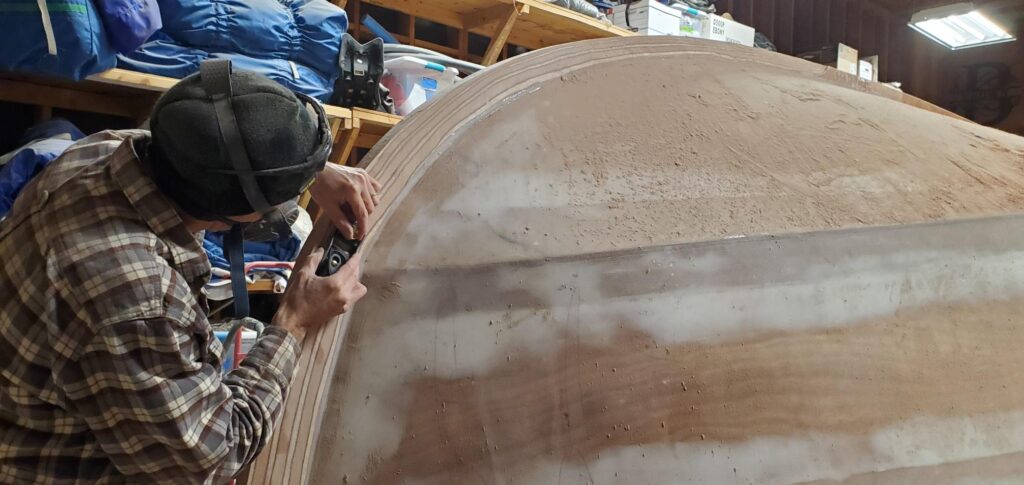
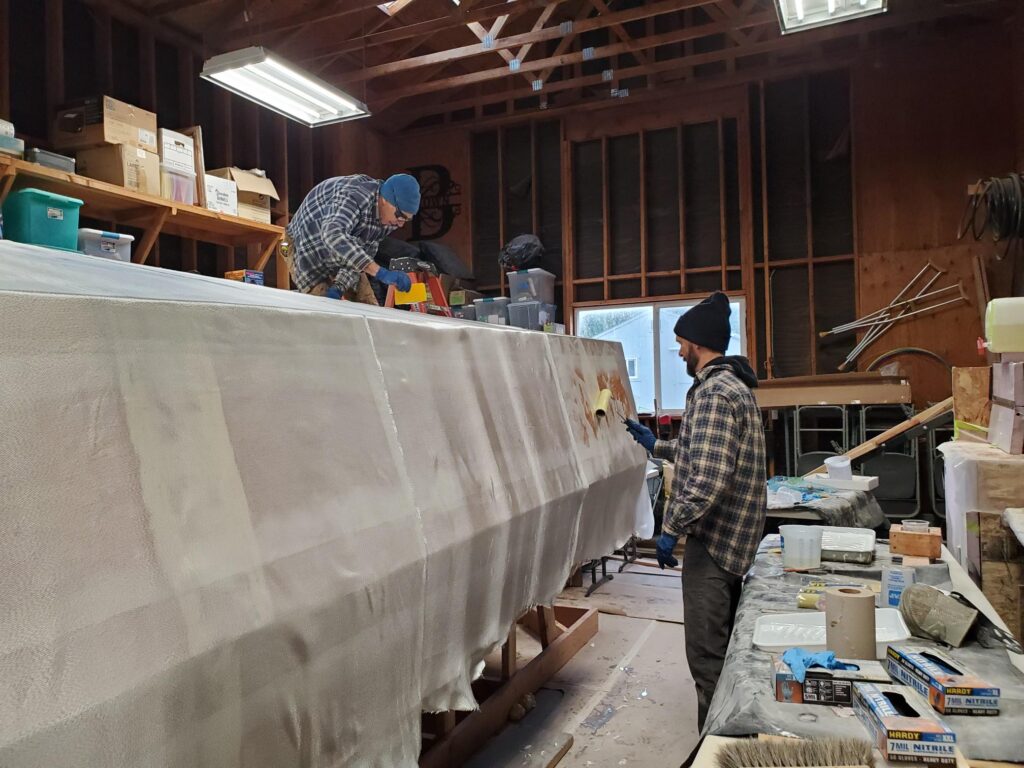
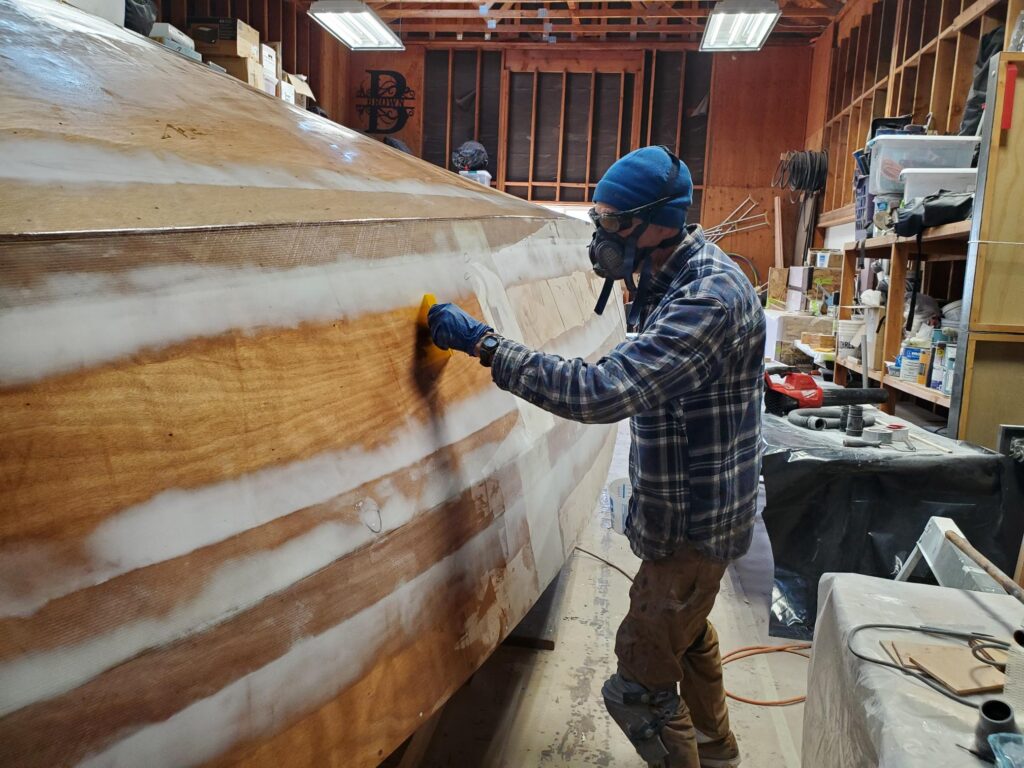
After sanding all the encapsulated brightwork to 320g, and masking everything else, I sprayed the 1st coat of Awlgrip Allwood with 5% spray reducer using 1.3 nozzle on a lphv sprayer. Happy with result – flowed out nice, no drips. I’ve never sprayed varnish before – this is new territory. 1 coat down, 7 to go.
10/6/2023
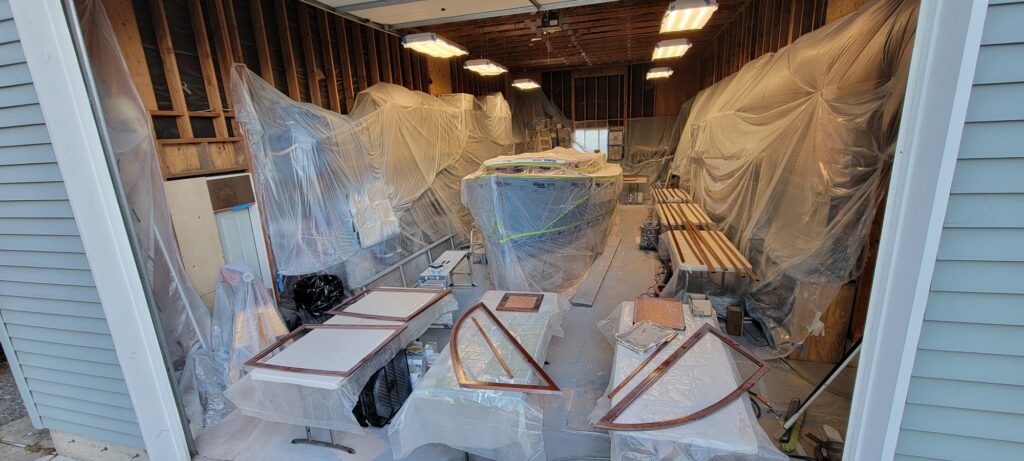
Back to sanding all the brightwork, 9 tables worth plus what’s on the boat – Prep to spray varnish.
10/5/2023
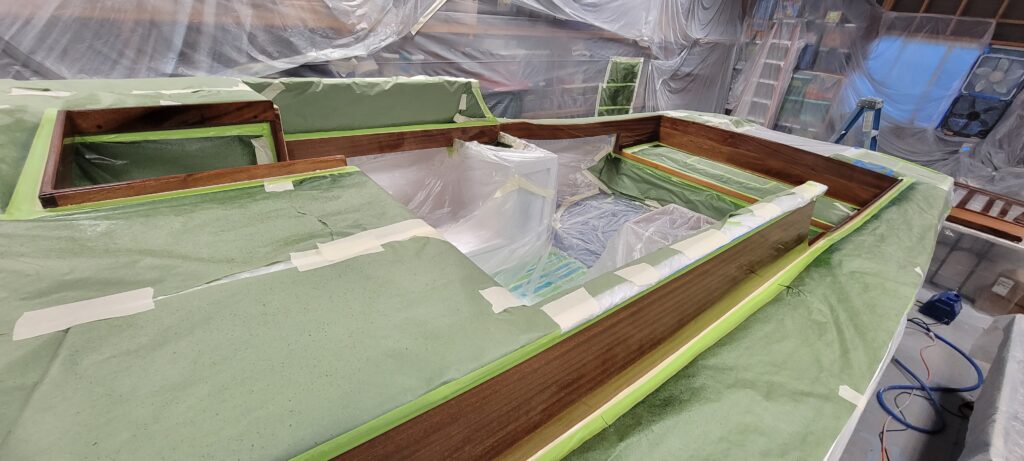
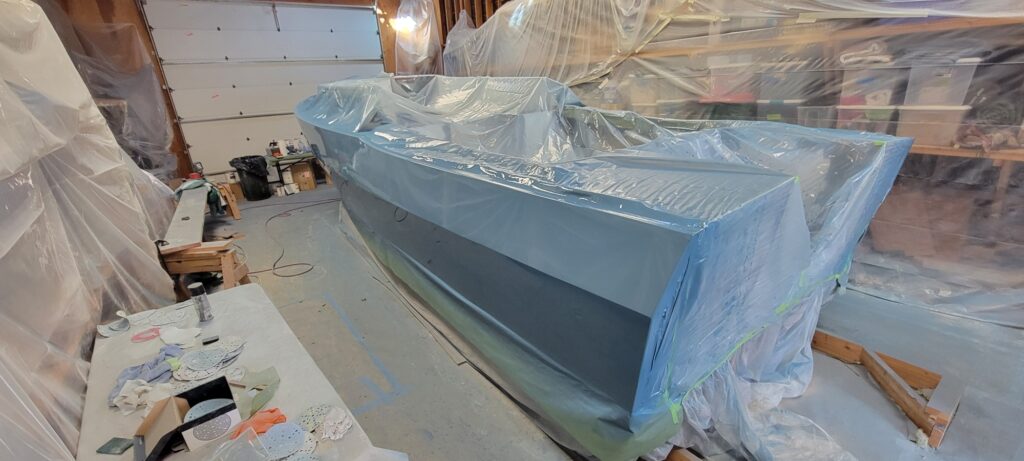
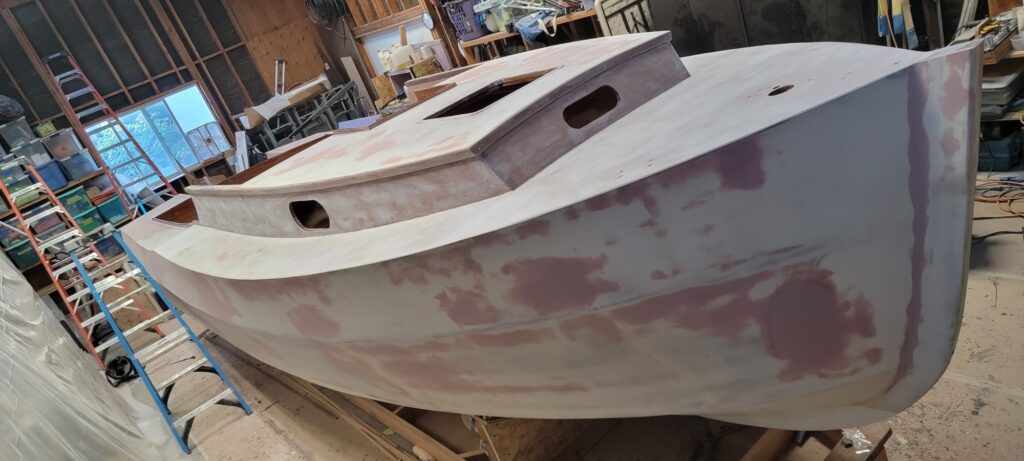
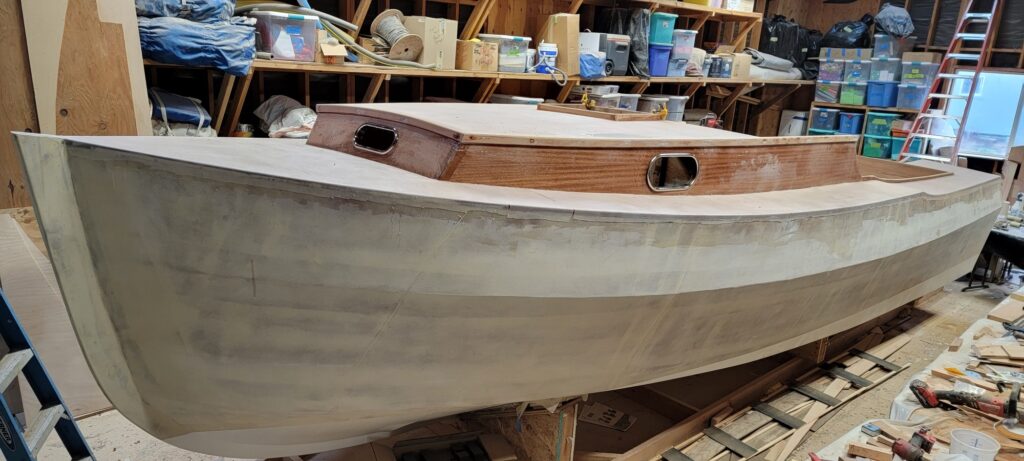
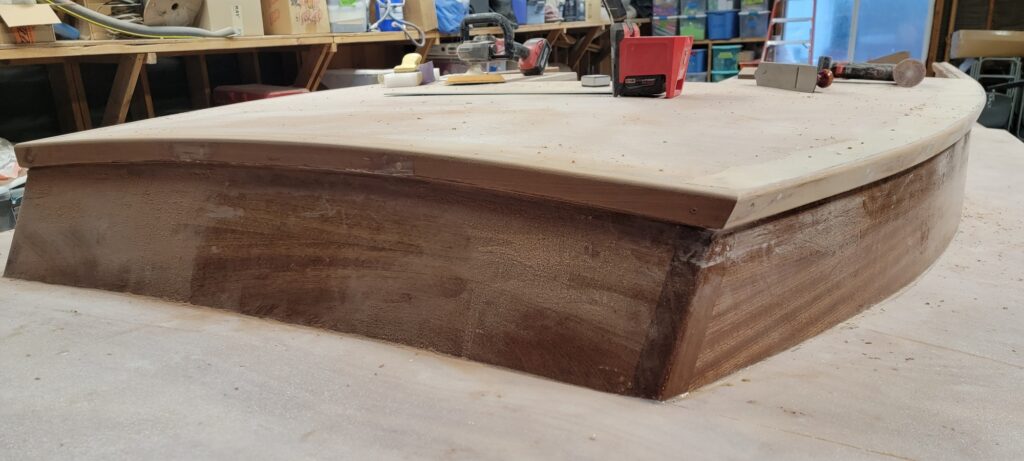
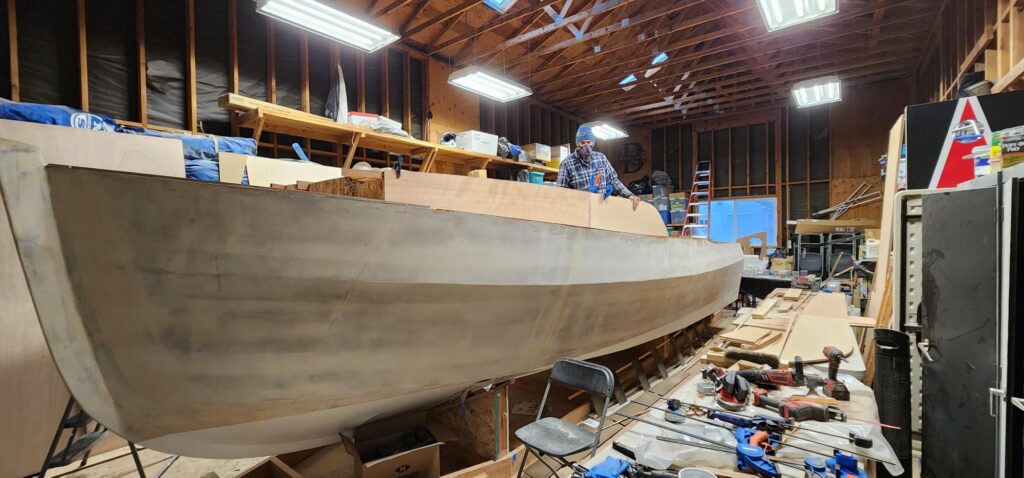
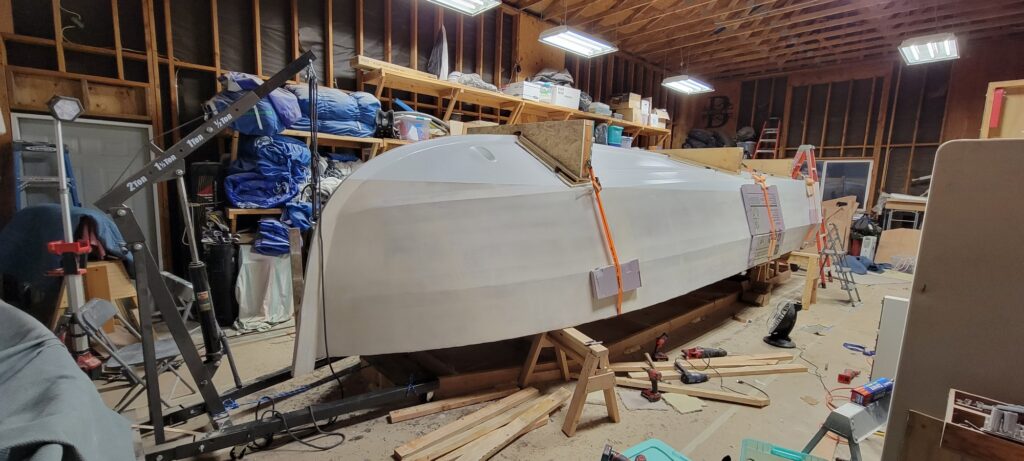
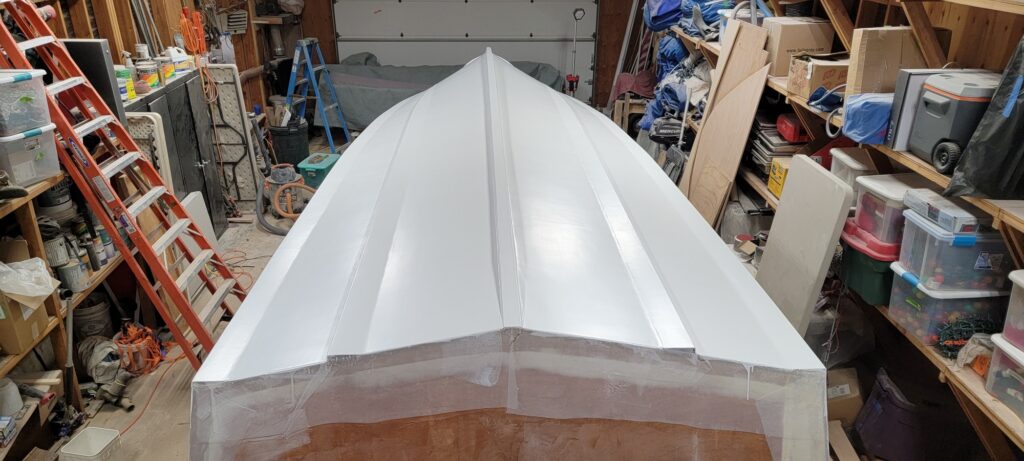
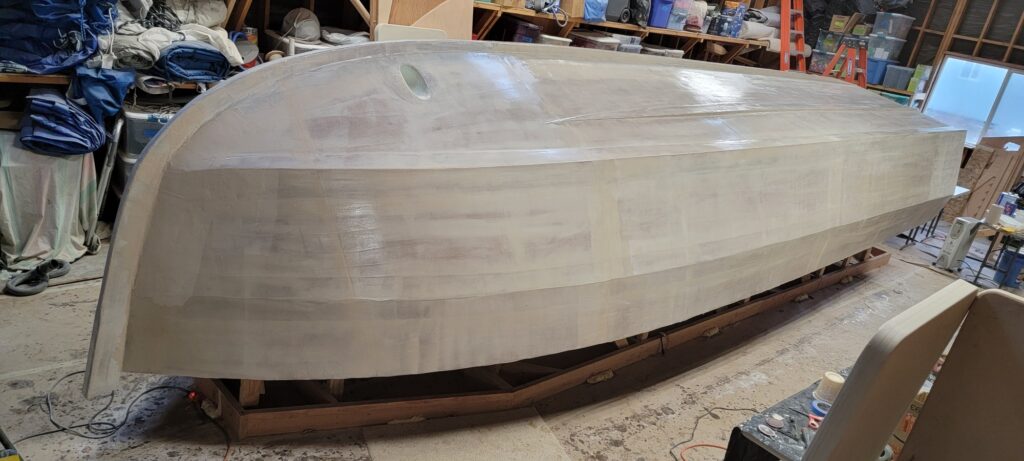
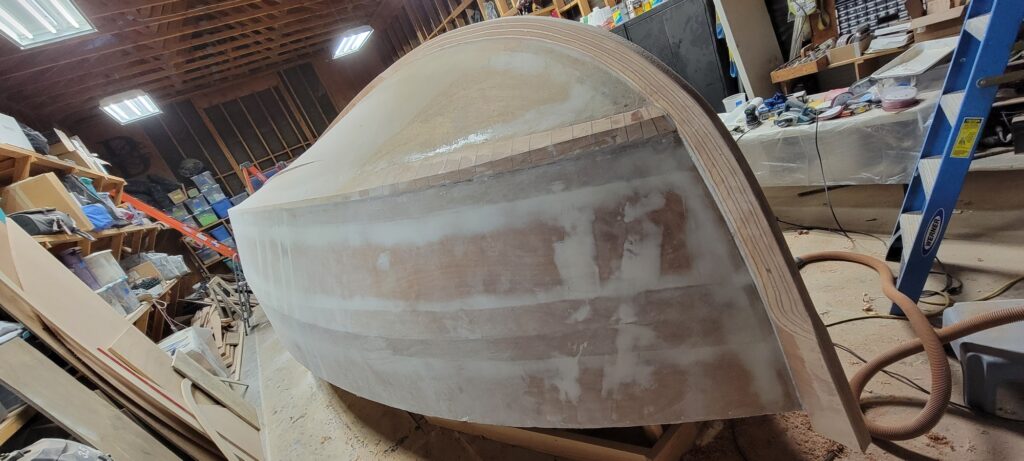
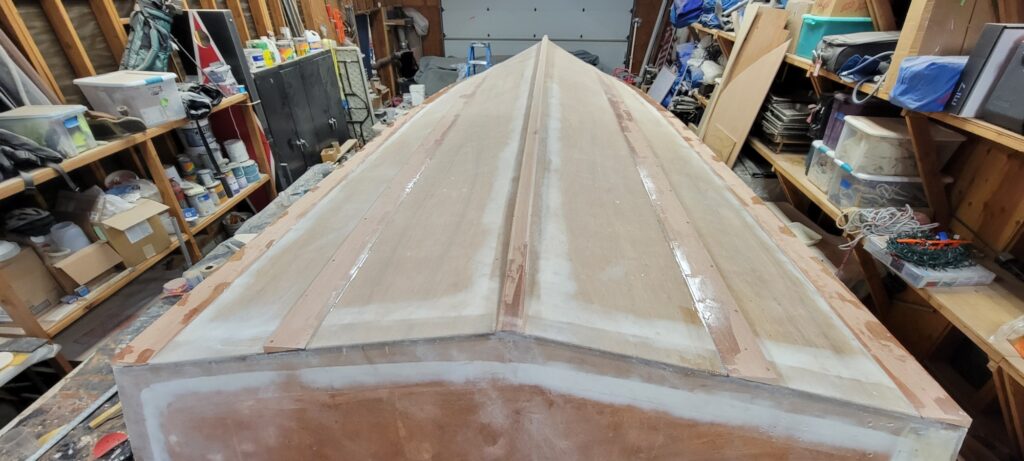
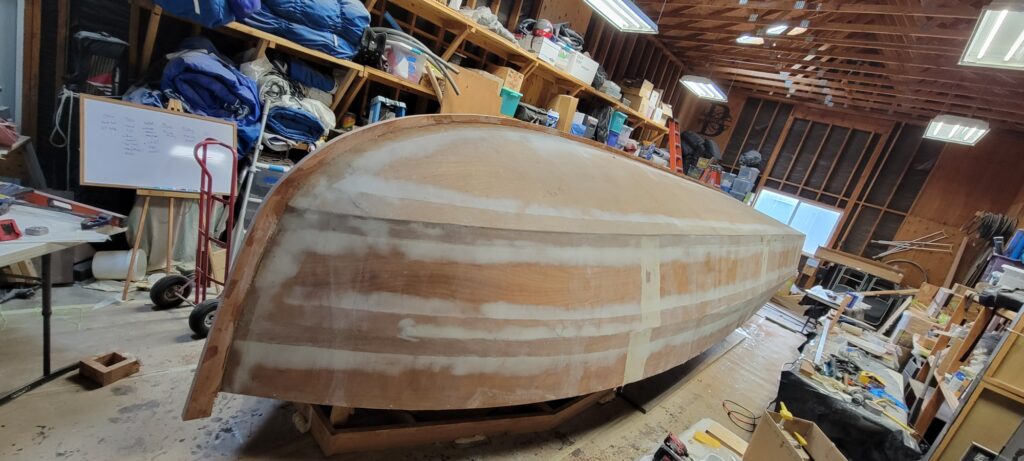
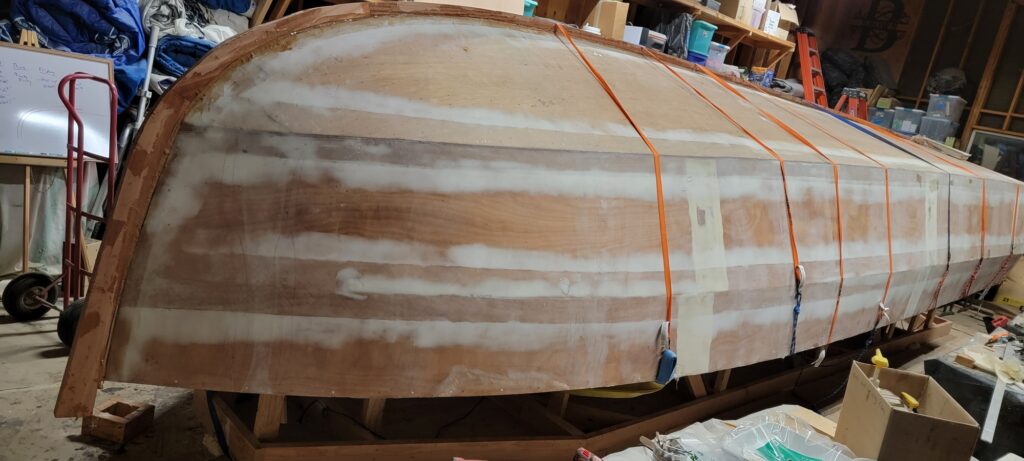
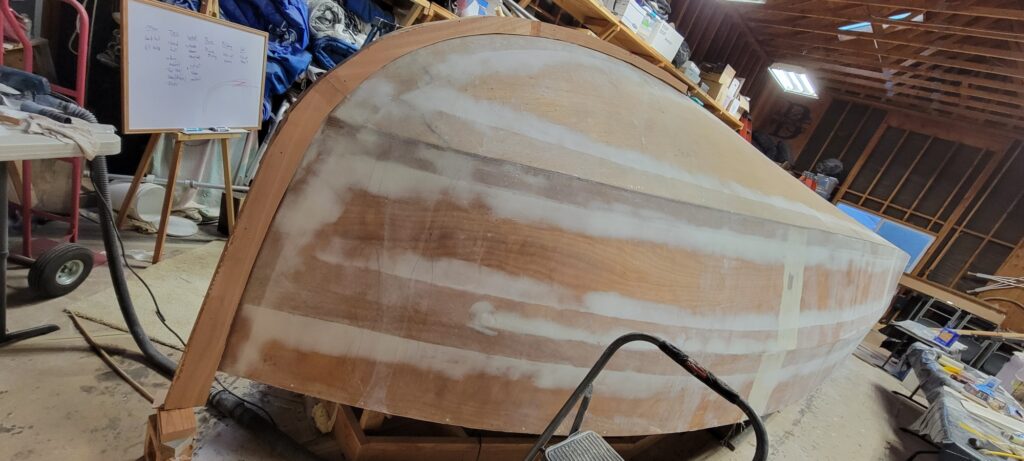
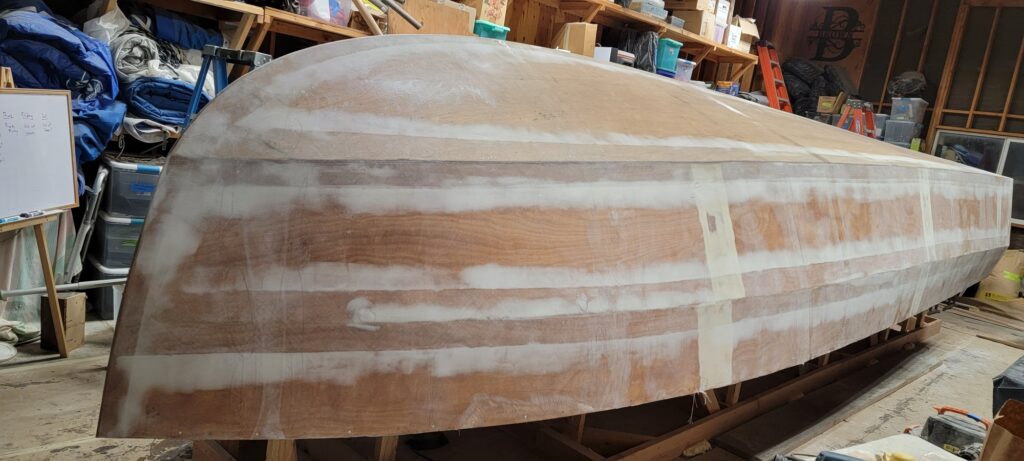
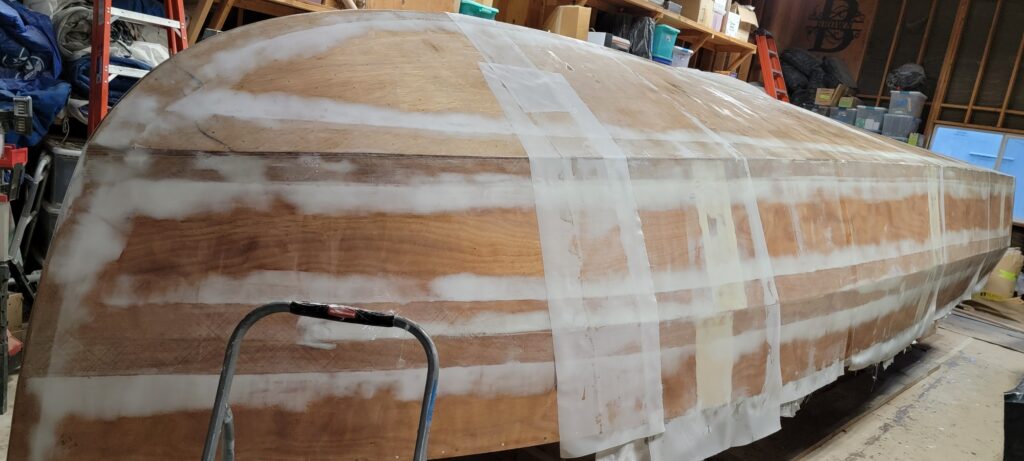
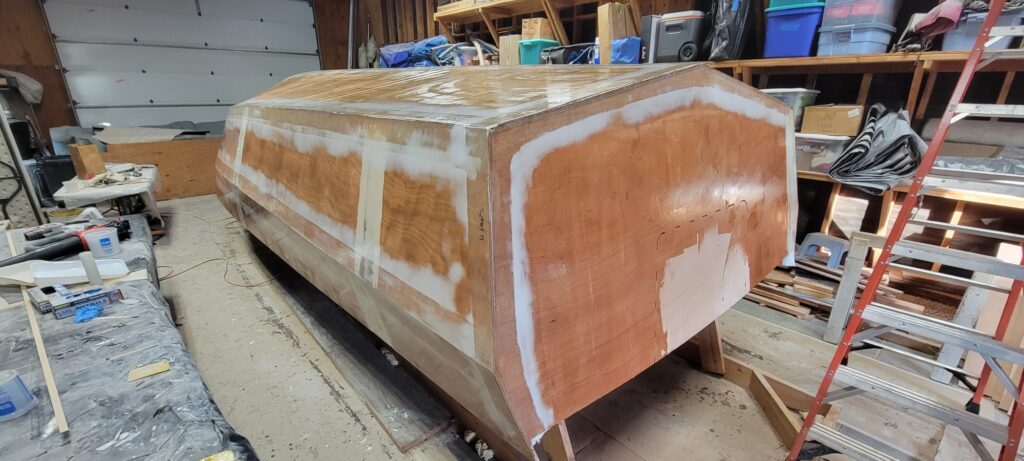
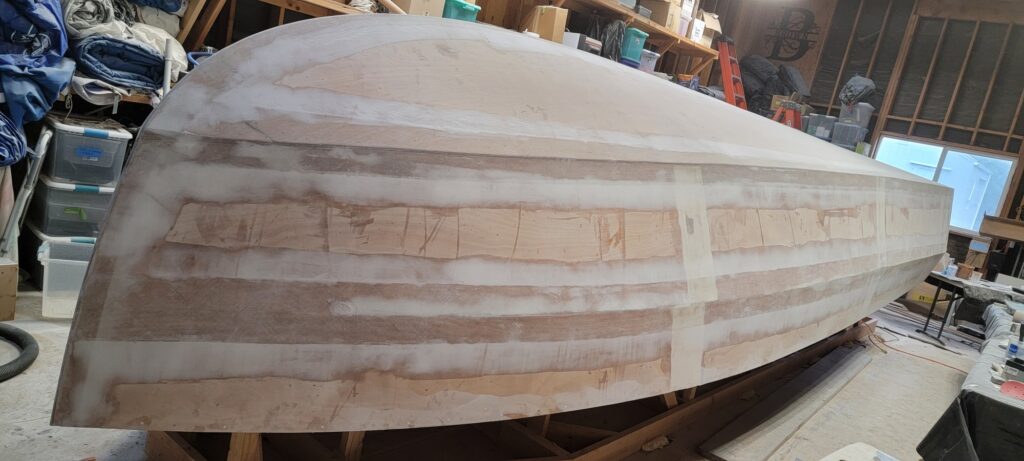
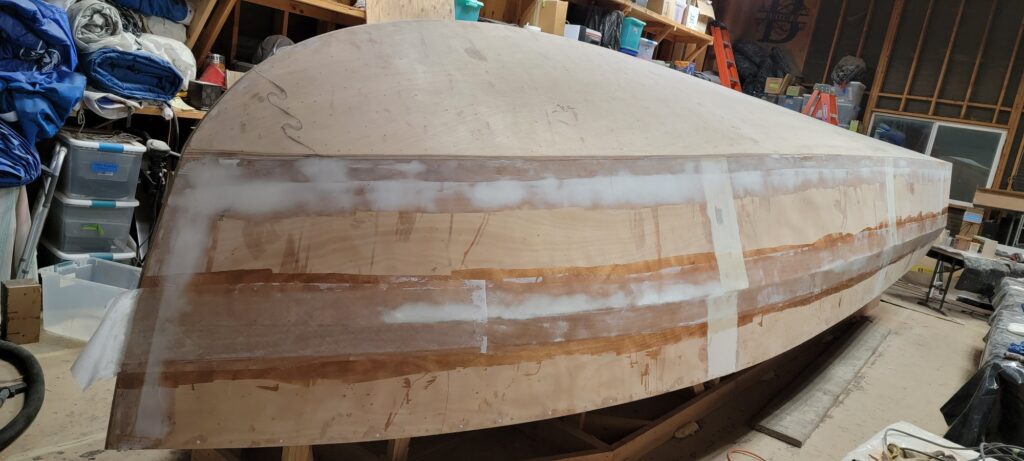
Painting is officially done – milestone! The cockpit sole was the last thing, including its non-skid. I’m scarfing up the chine rails now and then will be masking entire boat and prepping all bright surfaces for varnish application by spray. Okay, perhaps it’s technically not varnish – I’m using Awlgrip Awlwood Clear finish.
9/26/2023
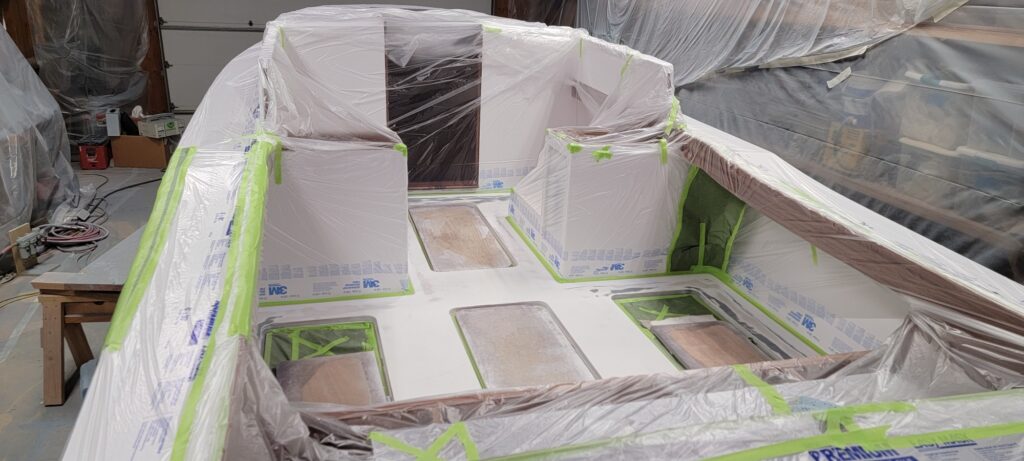
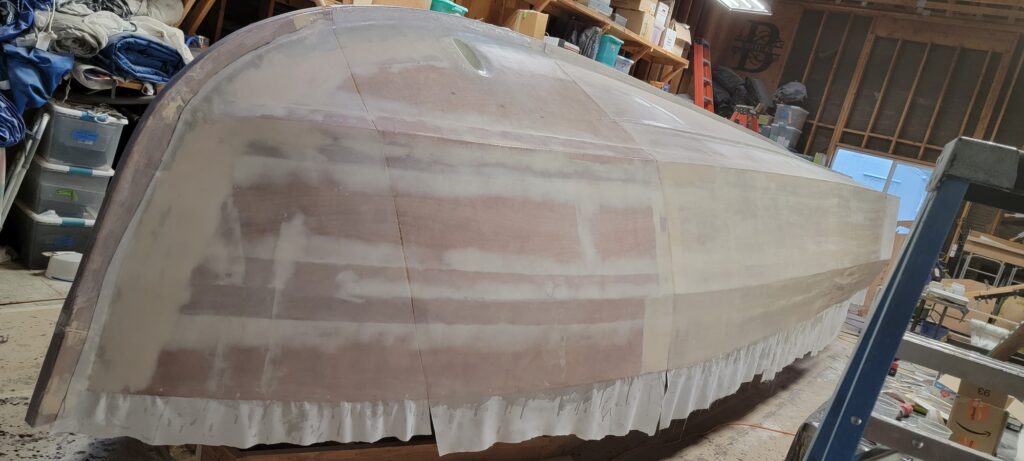
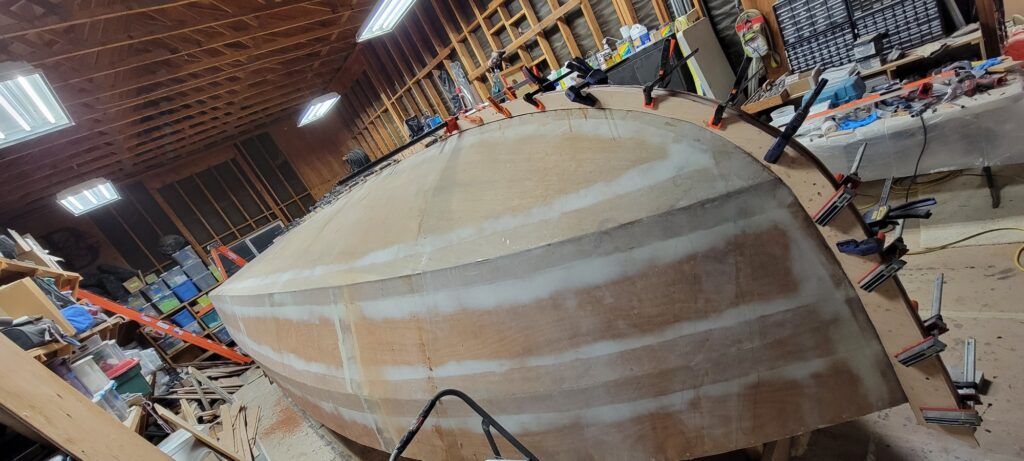
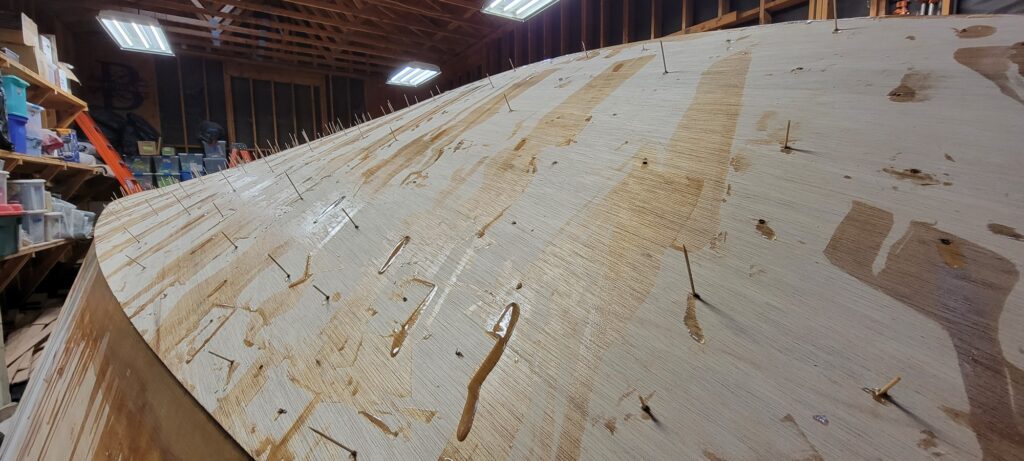
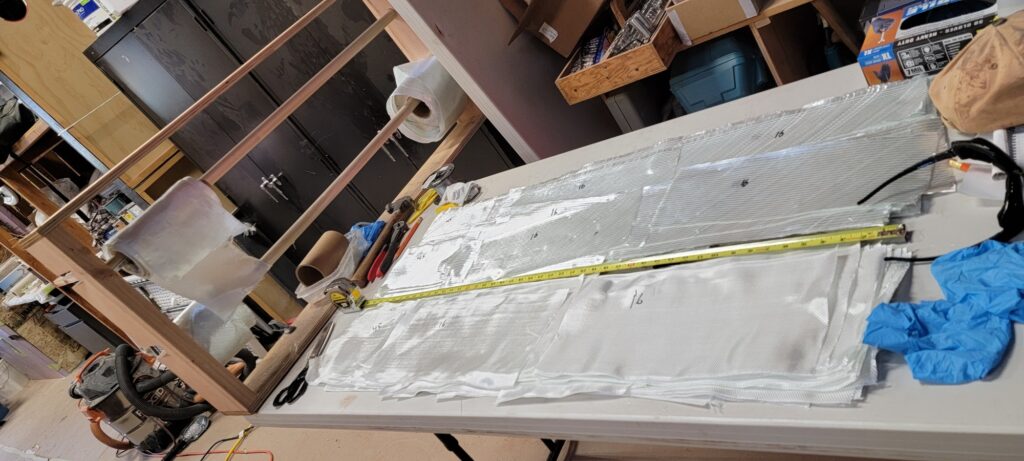
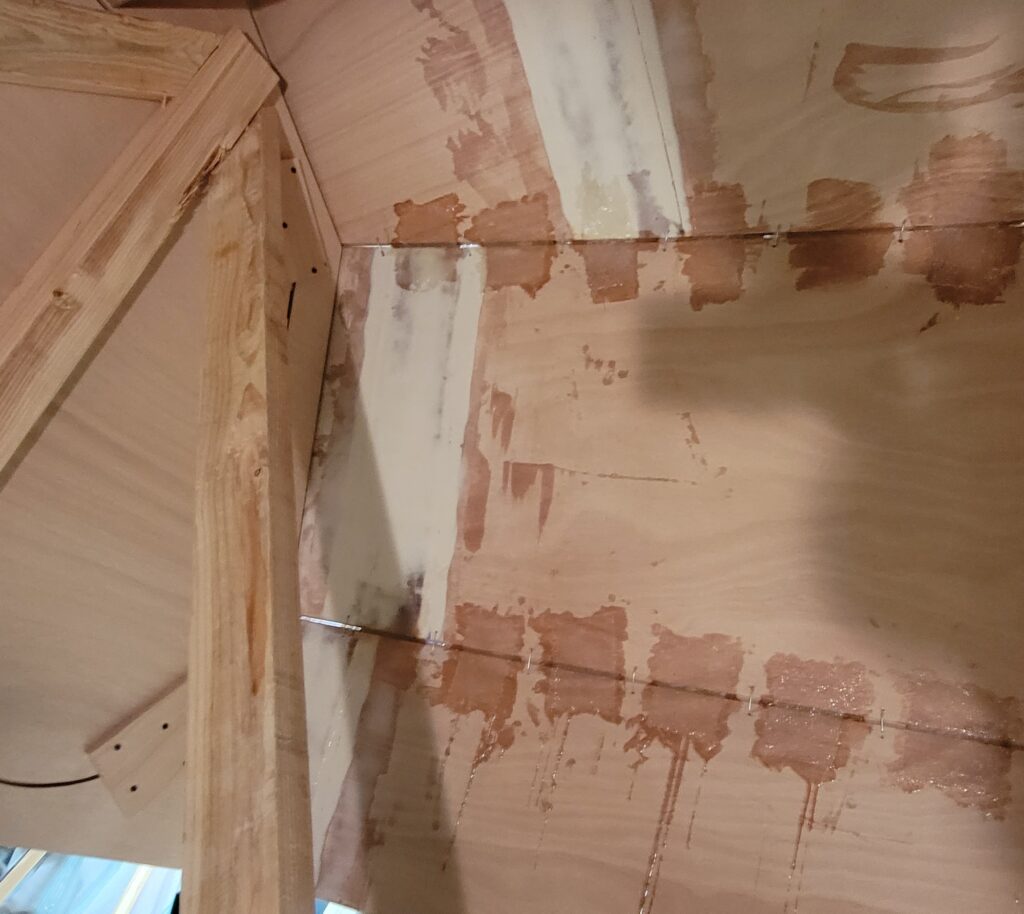
Non-skid on decks and cabin top is done, paper and plastic was peeled off and re-masking yet again for the last painting to do, which is on the cockpit sole (floor). The Stars and Stripes blue looks a different color from every angle. Really cool – I like it! Note that the deck is left smooth around hardware and along cabin top and deck edges – non-skid is everywhere else. Note also that none of the bright wood areas are varnished yet – most are encapsulated with epoxy that will be sanded smooth before varnish.
9/15/2023
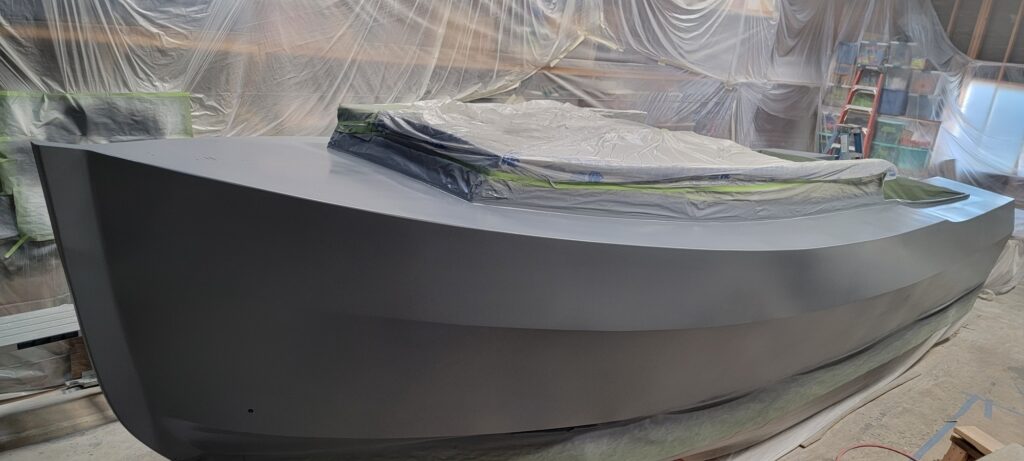
Snow White applied to cabin top and cockpit vertical surfaces and helm seat platforms.

9/13/2023
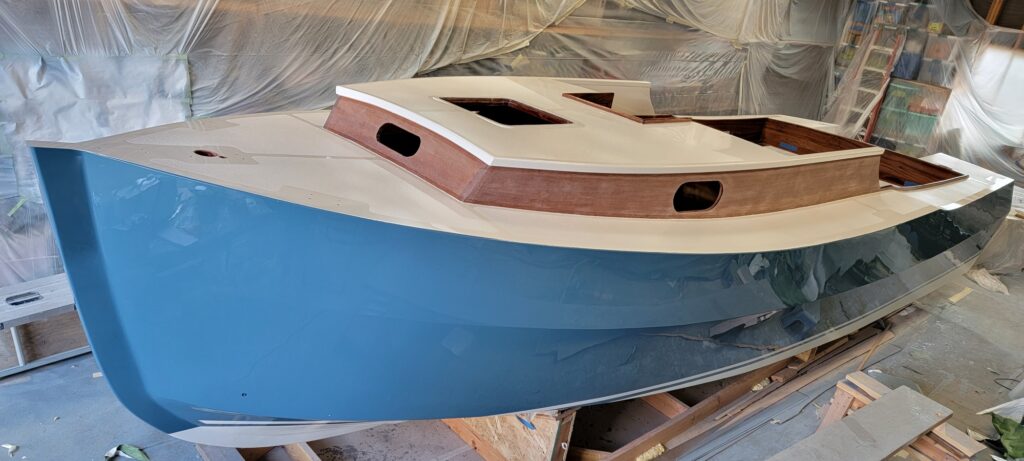
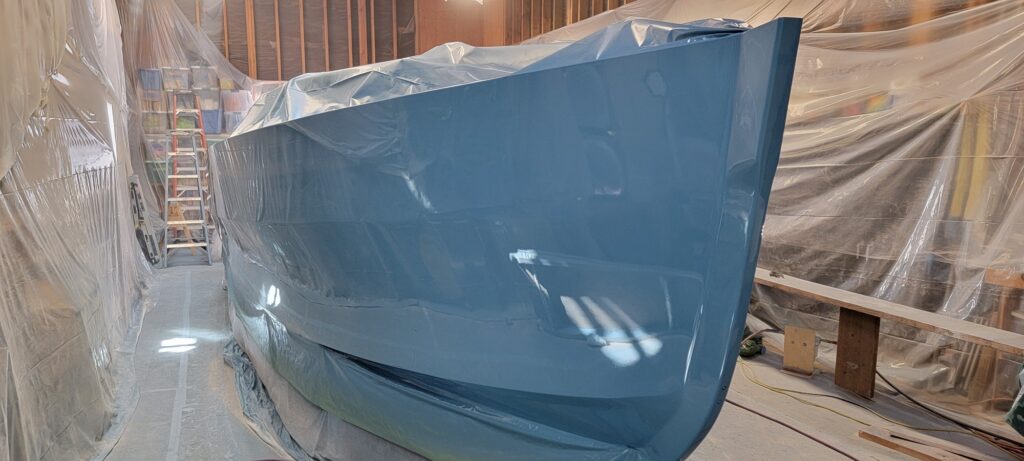
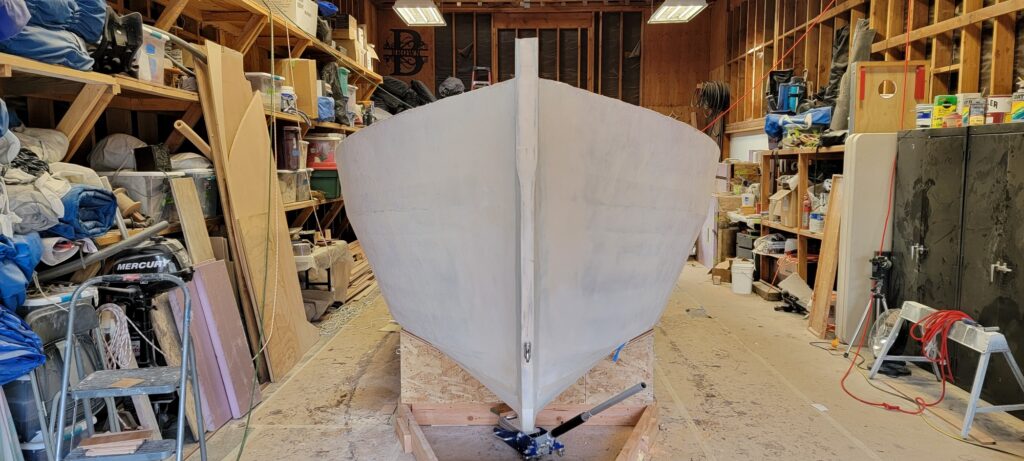
Awlgrip 2000 in Stars and Stripes Blue was applied by spray in 4 coats. It’s an amazing color – looks different depending on the angle and lighting. We love it! Funny though how reflections from the plastic on garage walls makes it look like plastic is on the boat. It is not. Next step, mask for cabin-top and cockpit.
9/11/2023
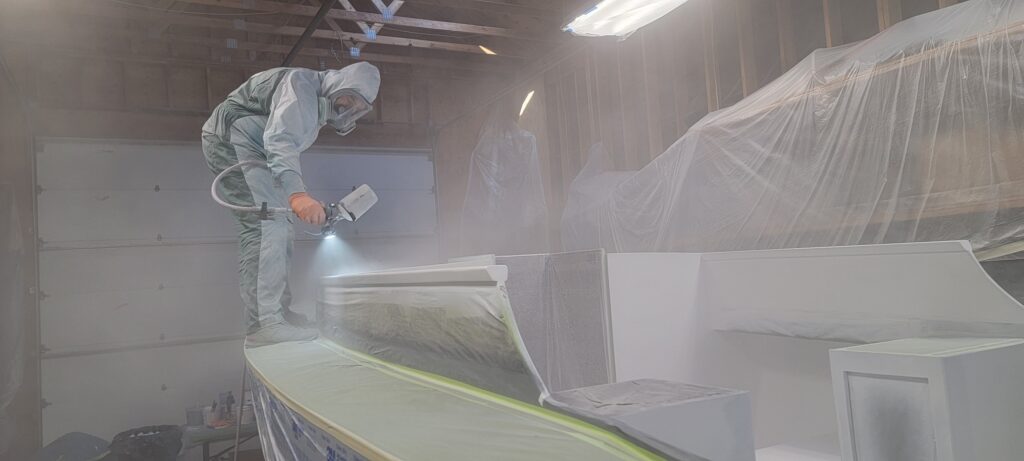
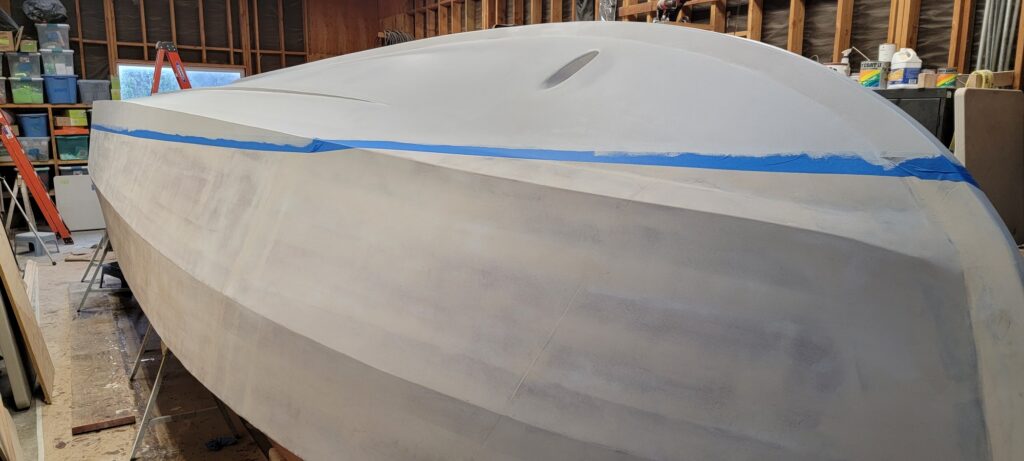
Applied last coats of primer in gray, because that’s the color we had.
9/8/2023
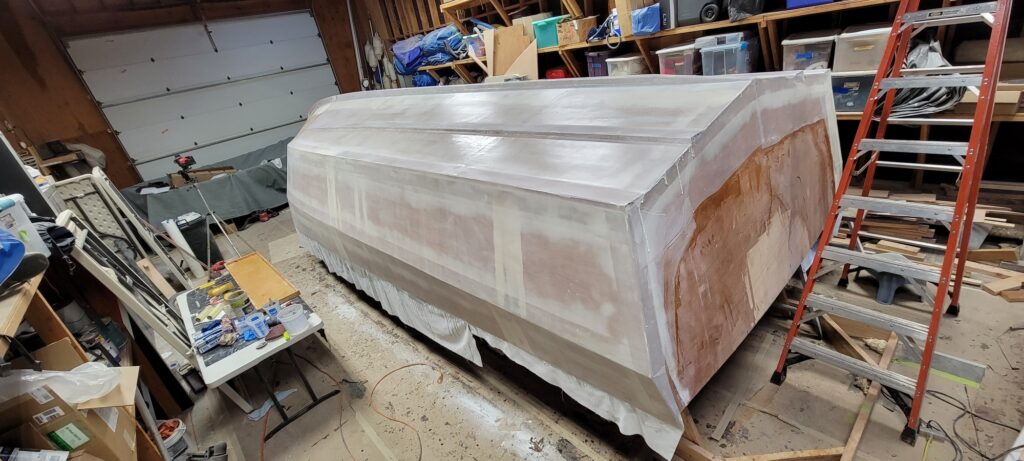
First coats of primer are on entire boat. Used black dry coat powder all over and sanding entire boat today. (these pics were before sanding) Real paint starts this coming week! Using Awlgrip 2000.
9/6/2023
Primer will need to be applied over 2 days as the entire boat can’t be reached for multiple coats without stepping on fresh paint. Day 1 down. Three coats of Awlgrip 545.

9/2/2023
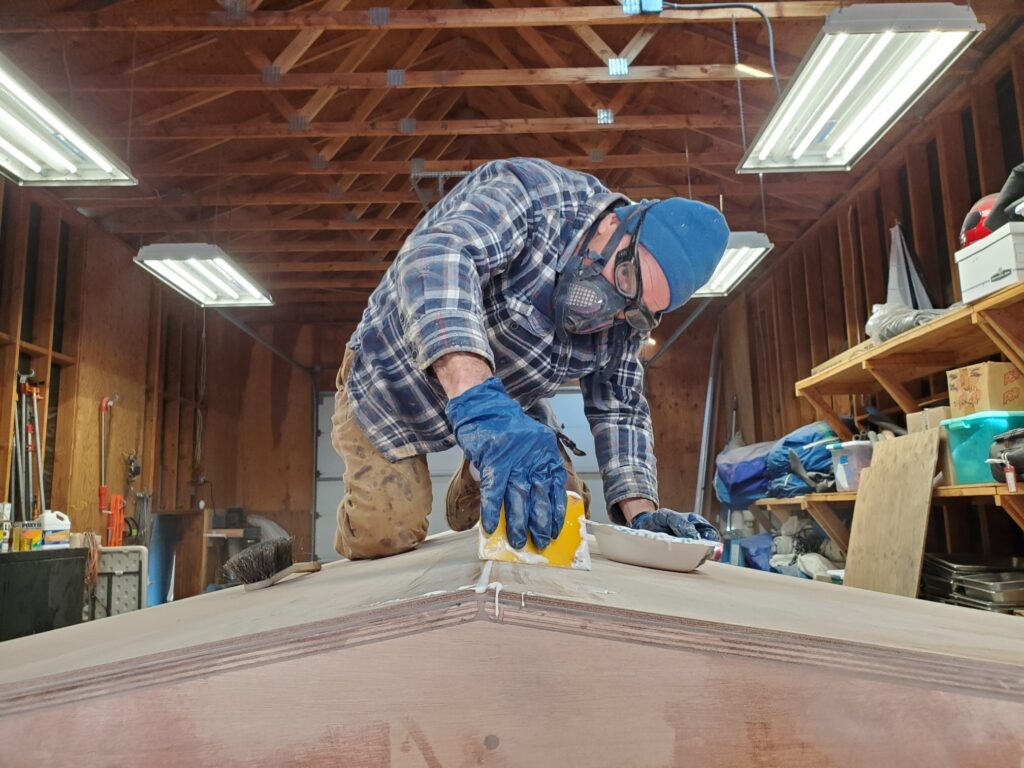
Fairing for paint is officially done. Well, it will be hard not to touch it right up until we start spraying primer. Helm seat platforms are done. Splash well drains are in. All the holes for various hardware are potted. Working on cleaning/dedusting the garage and putting plastic up everywhere.
8/25/2023
Platforms for helm seat pedestals. 5 layers of 12 oz biax in corners over a thickened epoxy fillet. Laminated a 7/8″ thick top, and made 1/2″ fiberglass/epoxy backing plates built-in when the seat pedestals will attach. This lid will be glued and screwed in place to cleats (not shown in pic). Will be quite strong.
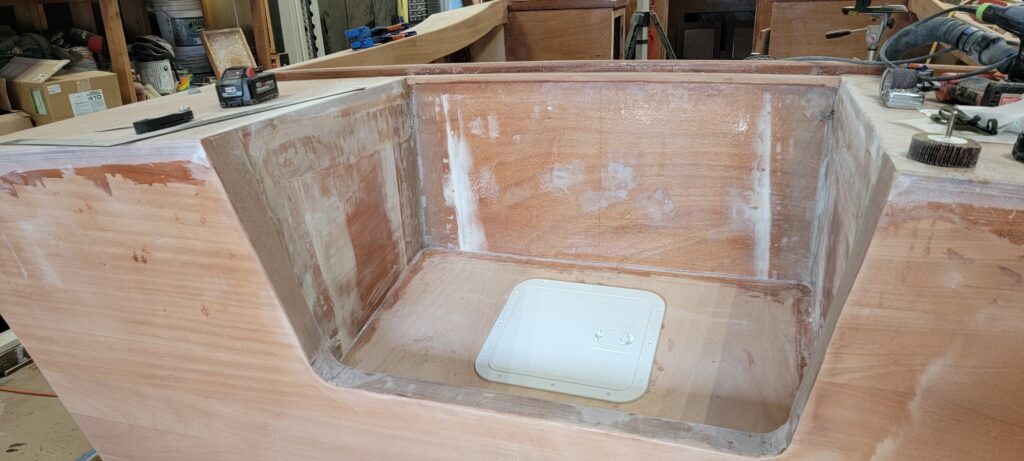
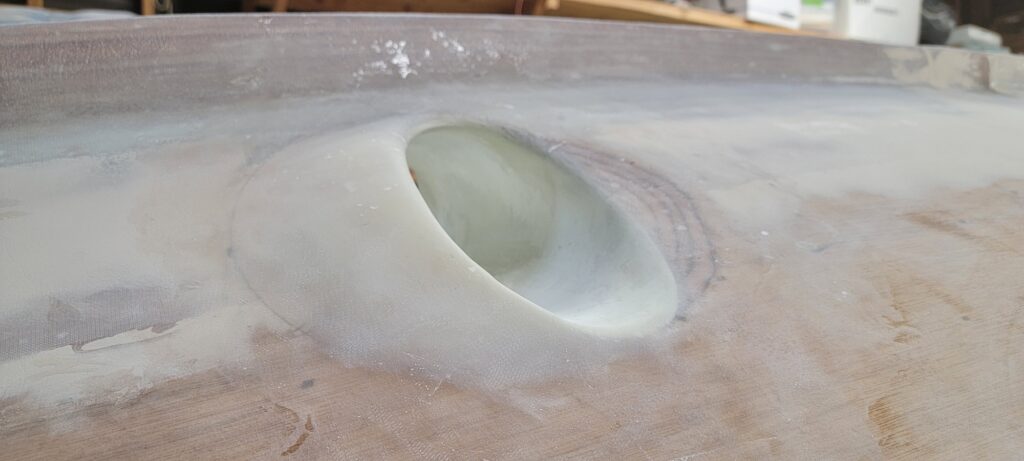
Drilled some 2 1/2″ holes in transom for cockpit drains. Got them in place, exiting just below the splash well aft cleats without muffing the transom. Scary cut – whew.
8/19/2023
A friend, Chris Richard, is helping with final prep for paint by fairing with Awl-Fair. Hull, top deck and cabin top are ready for primer. I’m learning a lot. Working on cockpit area.
7/28/2023
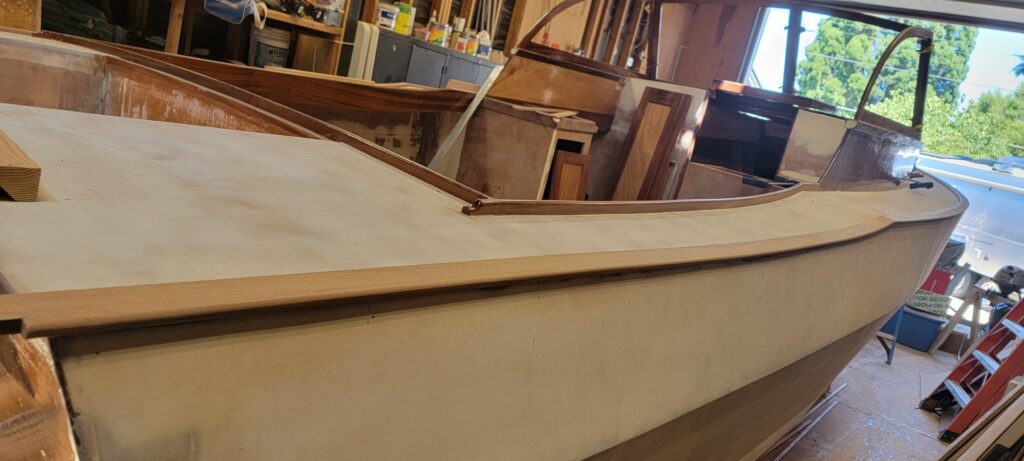
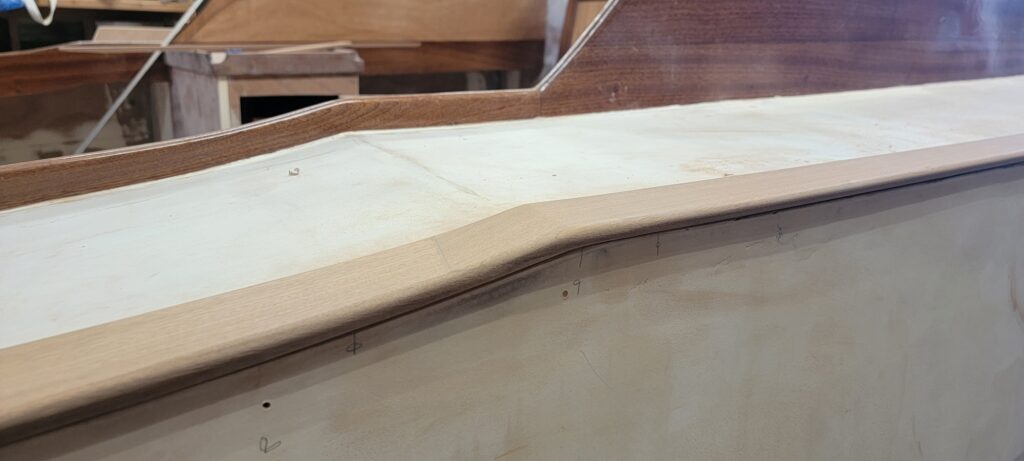
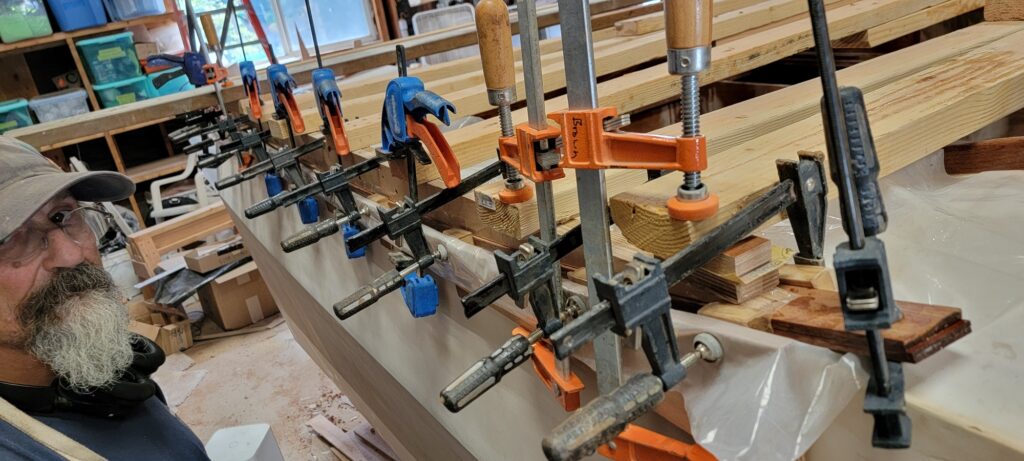
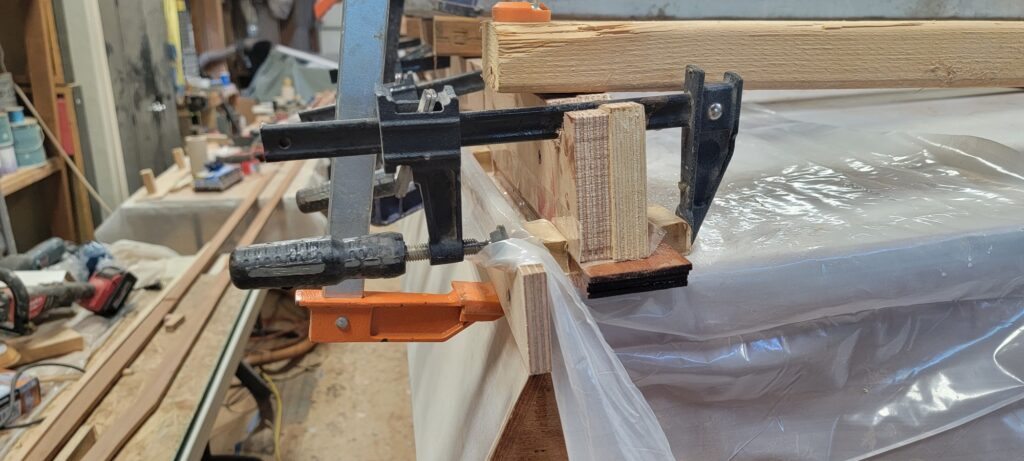
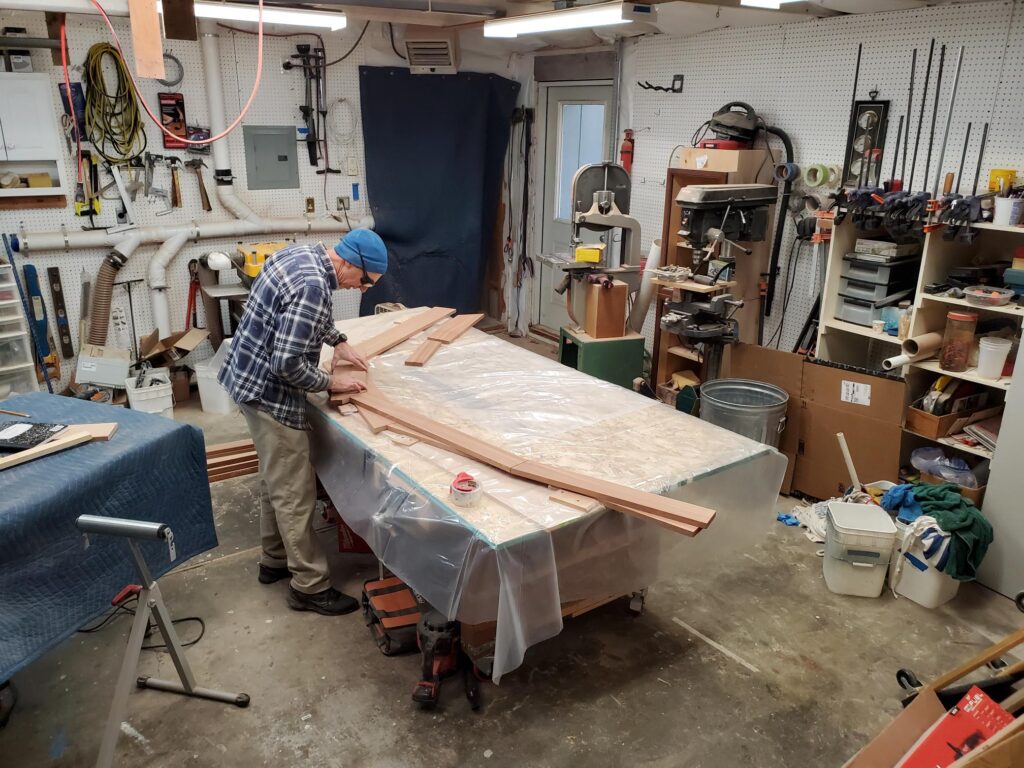
Glued up the cap rails, including at scallop. Sanded up and routed edges. Mock fit with gunnels. Glad I used 1/2″ material, instead of 3/4″, but need to figure out how to attach once the hull is painted.
7/26/2023
My brother Jim was in town for a family reunion so I got to put him to work after to help me with rails. We built the 27 foot long gunnels at sheer, that follow the scallop just aft of mid-ships (will add a pic later). Then laminated up the cap rails for the scallop back to transom with 4 layers of 1/8″ sapele. Cap rails forward are cut rather than bent and segments are doweled and epoxied with a simple diagonal butt joint on 20 degree angles. These cap will be rounded and hang over the gunnels by 1/4″.

6/29/2023
Sanding, encapsulating, sanding, encapsulating.. Getting close to ready to paint everything else. After paint, all this bright work will later get sanded and varnished. And, still have chine rail, gunnels and toe rails coming.

6/16/2023
Sanding, encapsulating, sanding, encapsulating..


6/6/2023
Two months without work on this Surf Runner as I was prepping for, racing the Pacific NW Offshore in our Beneteau First 35, and getting the boat back to Portland from Victoria BC, about 300 miles away.
Got some sanding in – so much to do – and put an encapsulation coat on the cabin sides, rolling and tipping, keeping the wet edge.. I plan about 5-6 coats of epoxy on all the raw, to be bright, wood, and then I will get the rest of the boat painted. Then I will circle back to do a final sanding on the epoxy and get the varnish coats on.
3/28/2023
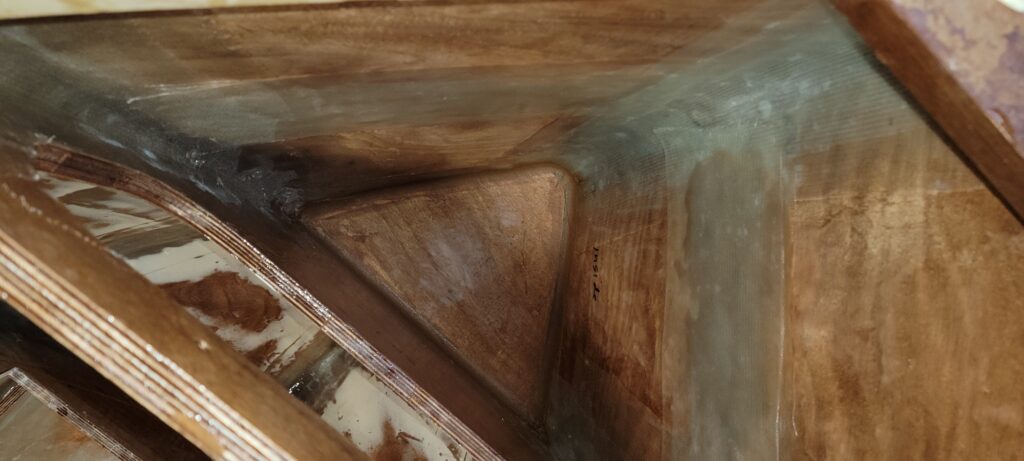
Got dynel on the cockpit sole. Decided to do it right over the hatch covers. Stuffed painter’s sheet plastic in the cracks first, and then used a dremel to remove the hatches after, and flush trimmed with router. Worked well.


3/25/2023
Routed rabbets for window glass and laminated the trim pieces for covering up the glass edge (over rabbet). Lots of sanding, filling, fairing and started dynel in the cockpit sole.
3/10/2023
Dry-fit of the window sides.


3/9/2023
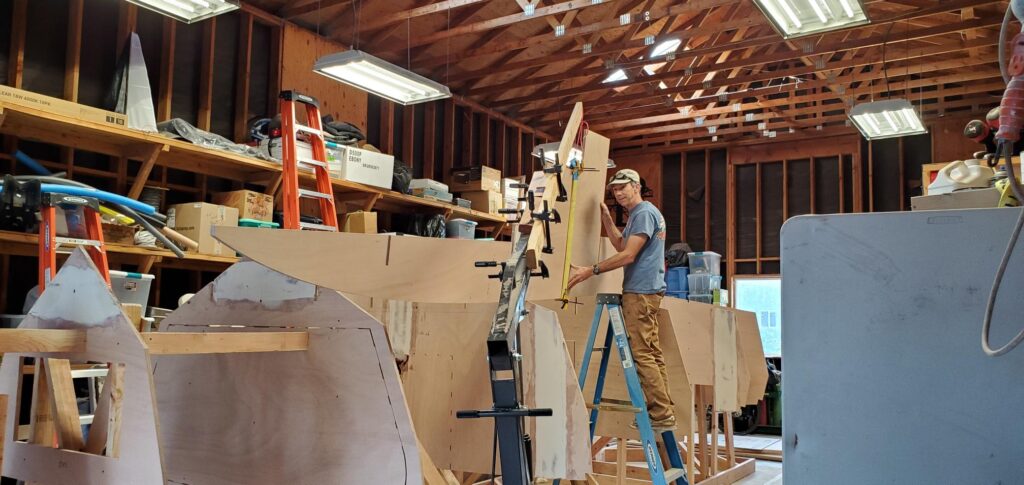
Got front windshield frames dry-pegged together. They were a lot harder than I thought and took a few brain cells with compound angles on most cuts and working to a curved deck surface and curved, laminated, top frames to match the style of the sides. They are completely symmetrical to simplify the glass template.
2/27/2023
Have been doing a lot of sanding. Not much to show. Started laminations of the side window frames.
2/4/2023
Installed the splash well with access port. Ran 22″ 2x4s through the planer and covered with cellophane tape to press over wood_flour/cabosil thickened epoxy on the sides of the transom opening to get a side straight and smooth surface over the triply-laminated transom. Plan to have one bilge pump below and another one midship.
1/30/2023
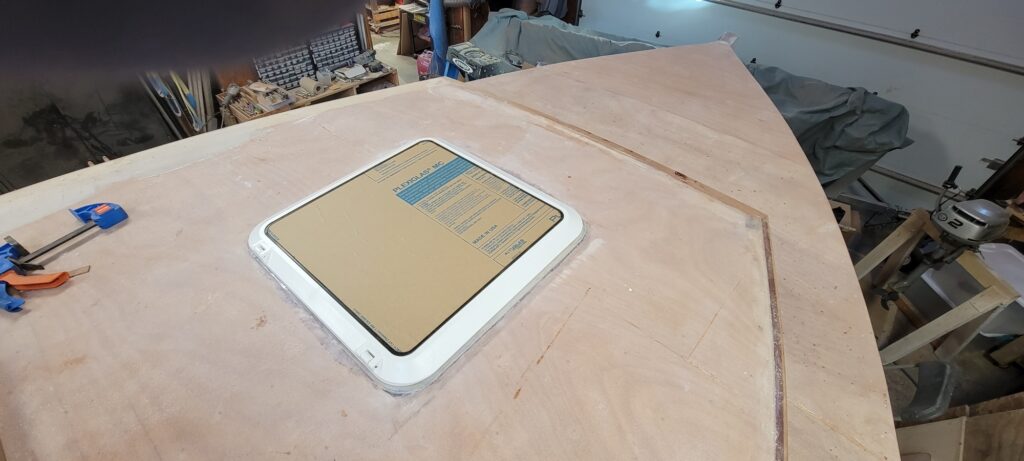
Installed the forward hatch, framing the inside with sapele. As the cabin has a crown in it, I made a level “gasket” of sorts out of cabosil thickened epoxy that the hatch will be seated on. Went with a white hatch as 1. that’s the color of cabin top and I don’t want it sticking out as a feature, and 2. our local chandlery had it used, but brand new on consignment for half price. Also put 1/4″ veneer on the forward arching beam inside cabin.
1/24/2023
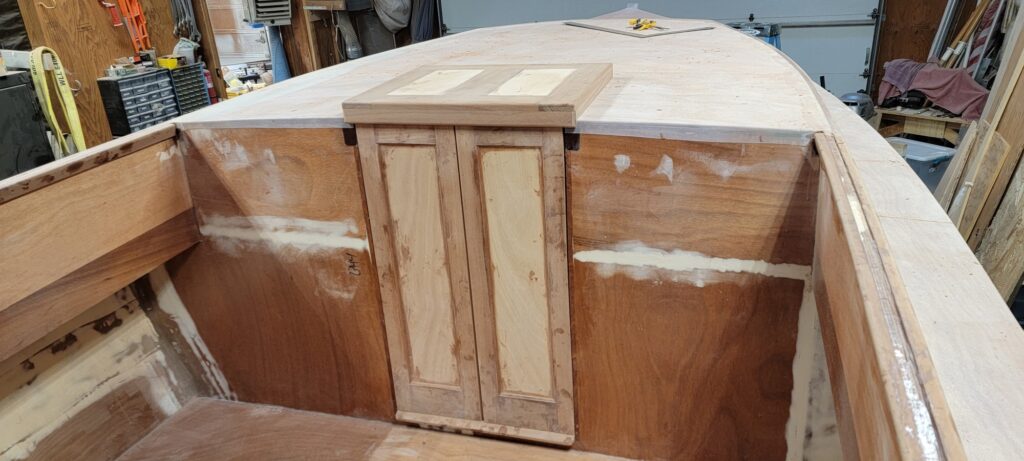
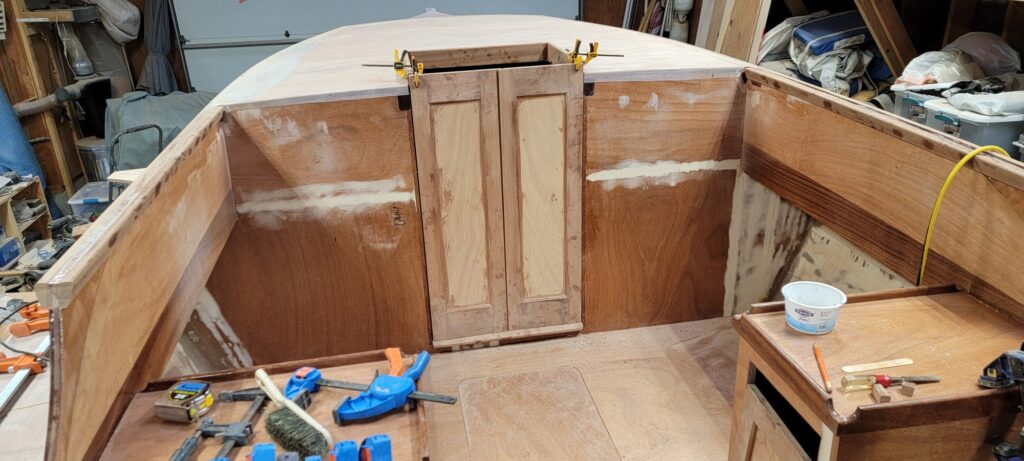
The companionway lid is done – left it flat on top so it doesn’t collect water. The front hangs over the tops of doors as a locking mechanism. Also built cabinet doors for the interior with the same style.
1/21/2023
The doors are done except for hinges and finish. Built the lid that goes over the companionway. Cut holes for windows. Looking more like a boat – I like it!
1/17/2023
Constructing doors for the cabin entry and outside galley cabinets. Installed companionway door jams, threshold and lid supports.
1/13/2022
Christmas holidays and cold weather for epoxy work has slowed me down. Cabin trim is on. Windows are ordered. Cabinet tops made (not attached) and door holes cut out.
12/21/2022
Got the aft side and bench coamings in. Credit due to Bob Deringer, who is building a Pelicano (18 I think), that I got the coaming design ideas from.
12/19/2022
Encapsulated the deck and cabin and sheathed with dynel. Why dynel? Because I had got a deal on a roll and didn’t have enough glass, so used what I had. Sam calls out dynel anyway, but I’m going to plank the deck, so it won’t matter anyway. Just wanted a barrier there to help waterproof and strengthen. Started working on framing for the aft bench and coamings.
12/13/2022
Got the deck trimmed, holes filled and am prepping to glass.
12/10/2022
The 2nd layer of deck is cold-molded on.
12/6/2022
Got the rest of the deck (both layers) cut out. Spiling made for a perfect fit.
12/5/2022
Sanded up the cabin sides and laminated the cabin front (1/2″ ply, 1/4″ sapele). The corner pieces tying the sides to front took some of the most complicated joinery I’ve ever done, considering all the angles, etc. attaching to curved surfaces. I used biscuits to align the 5-sided corners to front and sides while gluing. Straps worked nicely as the only clamps I used. Just before gluing I rounded the inside and outside corners.
12/1/2022
Cold-molded the 2nd 3/8″ layer of cabin top on and cold-molded book-matched 1/4″ sapele on the cabin sides. Used thin staples as sparingly as possible, but when they are removed they are barely noticeable if at all.
11/28/2022
First 3/8″ layer of cabin top is on. I didn’t screw it to the beams to avoid messing with the nice fair shape of the camber (added some screws into the beams the next day, while cold-molding the 2nd layer on – that’s done now).
11/26/2022
The first 3/8″ layer of cabin sides are glued in place. Note the built-in sapele coaming in helm area that will extend aft throughout cockpit.
11/22/2022
Cut in the cabin top beams. Decided to raise the front ends of the beams by 1/2″ which will add more camber to the front of the cabin and gives another 1″ of head room there. Spiled the cabin sides, using cedar battens top and bottom connected with 1/8″ masonite rectangles hot-glued on, to make a pattern. Scarfed some 1/2″ ply together for the sides and cut out using the pattern. Was happy that the one pattern worked for both sides. 🙂 Cut out the coamings for helm area.
11/19/2022
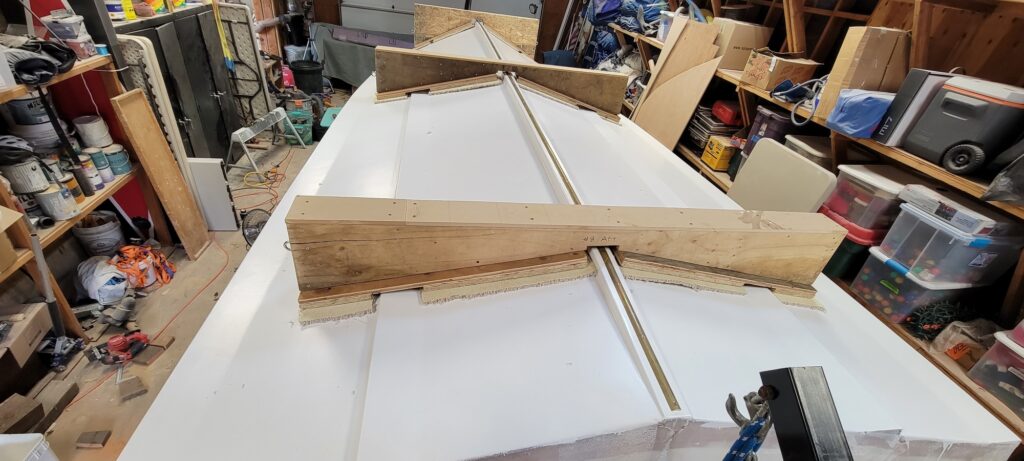
Fitted the cabin top carlins. Tricky biz to make sure the bend is the same on both sides. Really had to bend the sapele. I wrapped wet towels around them for a couple days while clamped in place to add a bunch of prebend. Note there are several temporary BHs to keep everything in place. The forward and aft ends of the cabin top carlins are held in place at the correct angles with some blocks. The aft ends of these carlins have a scarf taper as these will continue aft later. Laminated the cabin top beams 1 1/2 x 2 1/2″ sapele (and will be finished bright) but have not cut them into the BHs yet.
11/16/2022
First 9mm layer of Foredeck glued and screwed on.
11/11/2022
Noticed on the Study Plan for SR that Sam has a hardwood doubler on BH1 so I added one along with some additional longitudinal deck beams in anchor chain locker to beef things up.
11/8/2022
Encapsulated everything.

11/7/2022
Extended Bulkhead-4 in height to define the aft end of the cuddy cabin, and added a temporary beam on BH-3. Started encapsulation of everything above the sole that is not already coated in epoxy. Everything under the sole is already encapsulated. There are a lot of hatches for access – 11 so far.
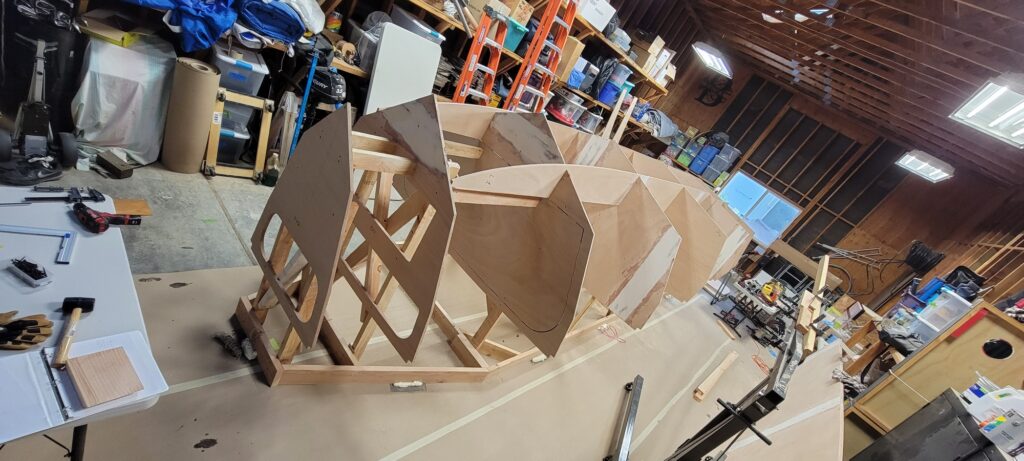
11/3/2022
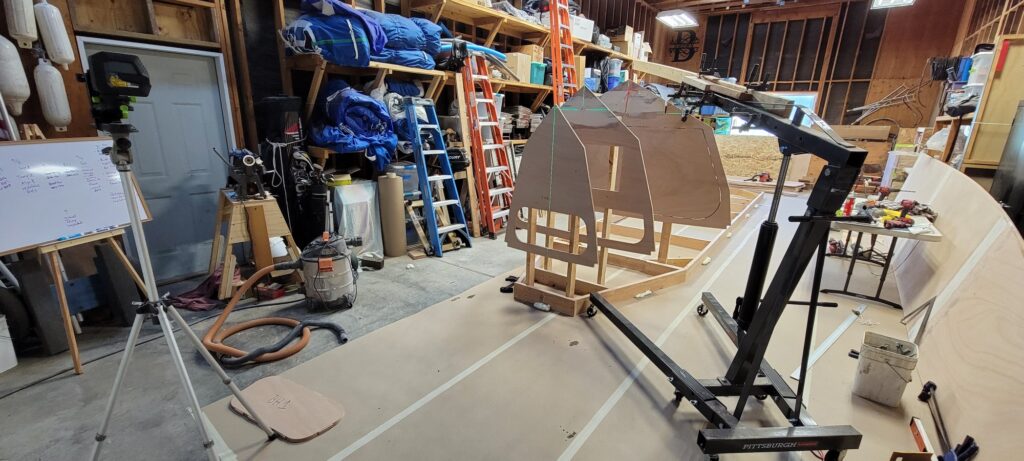
Foredeck beams are all in and fair. Did a little more fairing on the sheer in general. Mocked up the cuddy with cardboard to figure out height (Have not determined the shape at the aft end, along the sides of the helm area. We also don’t want the cuddy to be too tall – I’m raising it 10″ at the forward end and 14″ at the helm bulkhead. By default I’ll keep the camber pretty much like the stock Surf Runner deck, as we like a lower profile look and won’t be able to stand up inside anyway. Just need a bit more headroom for moving around inside. As mentioned, the SR wasn’t designed with a cuddy, so I’m kind of making it up as I go at this point. Having a pretty good time at it.
11/1/2022
Got the Shear and deck beams all fair, making sure that I liked the crown at the foredeck and that plywood will lay over it nice (no compound curves). Glued in the shelf between BH1 and BH2. And then was able to glue in the longitudinal deck beams.
10/29/2022
Decided to go forward with my own plans for deck and cabin. (Since the Surf Runner by default does not have a popup cuddy cabin.) Guessing that some of this is left to the builder anyway. Got the deck carlin locations defined, scarfed together including the scallops at aft to match the sheer, and glued in.
10/22/2022
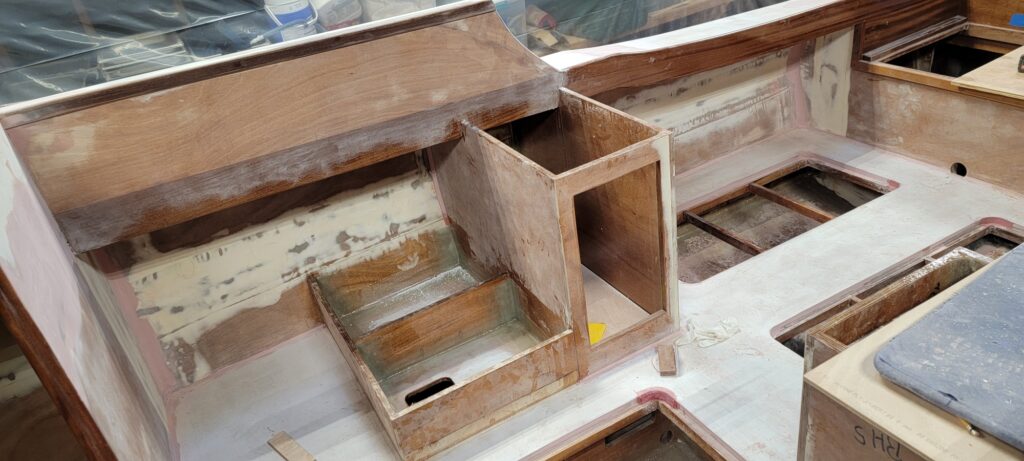
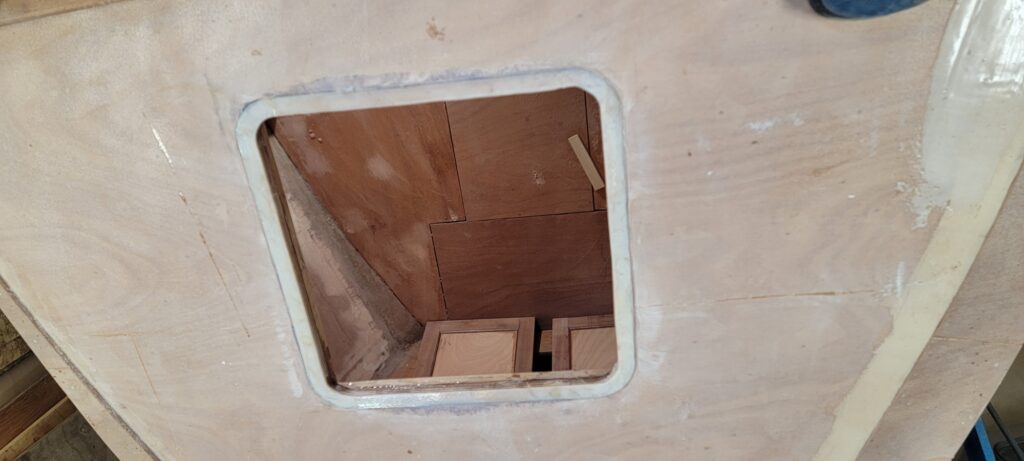
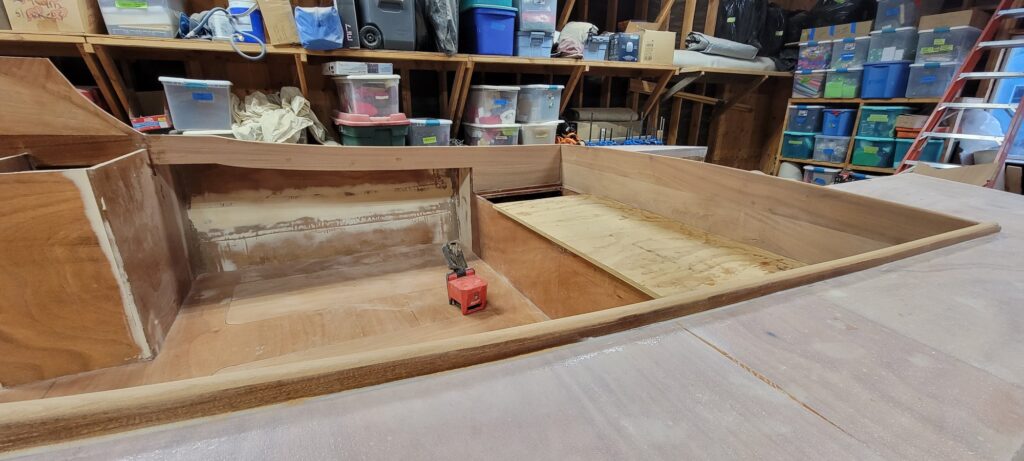
I am stalled on deck and cabin waiting on plans from the designer. In meanwhile, the custom seats arrived and I could test fit them and confirm location of the bulkheads just aft of the seats that define the forward sides of galley cabinets. I reduced the width of these cabinets by 5″, to 15″ wide, to get a bit more legroom. The seats are adjustable fore and aft by 6″ and wanted the adjustment room. Got those bulkheads glued in. Note that I put hatch lids in the bottom of each galley cabinet for access under the sole.
9/20/2022
This boat has sole! And it’s glued in. Big milestone, considering all that needs to be thought through prior to this. I included hatches everywhere for good access. The aft four hatches are identical 18×42″. Feels good to be able to walk around without balancing on frames nor stand on the sloped hull.
9/17/2022
This tank is never coming out. The center compartment sole frames are in. But the tank is fully accessible to hold down and connect up. It’s lying on a bed of 1/4″ neoprene. Got the Sole plywood for this section cut out except for the hatch openings.
9/16/2022
Fabricated side hold-down locations for fuel tank, cut out access holes in longitudinal BHs for access to hold-down brackets, and glued down the plywood planks that support the tank. Then installed the center piece with drainage holes. Should support the tank well. While the tank will be permanently installed inside it’s compartment, the hold-downs can all be accessed later, after the sole is complete, to adjust tightness of bands holding the tank down.
9/13/2022
Cut out and installed the sole of the helm/Galley area with cabosil-thickened epoxy.

9/6/2022
Installed the sole inside the cabin, including the cut-out for hatch. Then, installed the bench fronts that are angled in toward the potty to give more usable area for the benches. Note that I added some ventilation in and out of these small triangular compartments. Then fitted the bench tops and cut out the hatches. These were tricky cuts so I first made a paper template, copied it onto cheap 1/8″ masonite and then carefully tuned to get the fit right. used that as a template for both sides. I admit some very minor tuning of the template for the 2nd side, but not much. I’m happy with the symmetry.
8/26/2022
Lost 2 weeks due to getting Covid. Nice to be feeling well enough to get back on it. Epoxied in the frames to support the cockpit sole. There will be three 18×42″ hatches in the cockpit. Haven’t decided if I will leave the 2 transverse support beams across each hatch opening or not. I’m not sure if they are needed for sole support. Rather cut them out so that when I catch a big salmon and can easily pop it below deck in a big cooler/bag of ice. Hum.. I can always cut them out later after the 3/4″ sole is glued down, if I choose. I didn’t frame in the center section as the fuel tank needs to go in first.
8/10/2022
The tape I used to hold down the fuel tank risers is Shurtape CP66. Really strong and stretchy so it works great for temporary clamping. I didn’t use any screws down there as this will be a wet area and I don’t want any metal corroding over time and then leaving a hole for rot to start. Also got some of the cockpit sole cleats in. I put a filet of thickened epoxy underneath these cleats as they will have a lot of load with people walking around, etc.
I really love the Milwaukee 360 degree laser level. Used it to create risers for the fuel tank so that it sits level, and also here to mark locations of the cleats for the cockpit sole. Note that the cockpit sole does slope down toward the aft, for a self-draining cockpit, but the sole is level from side-to-side.
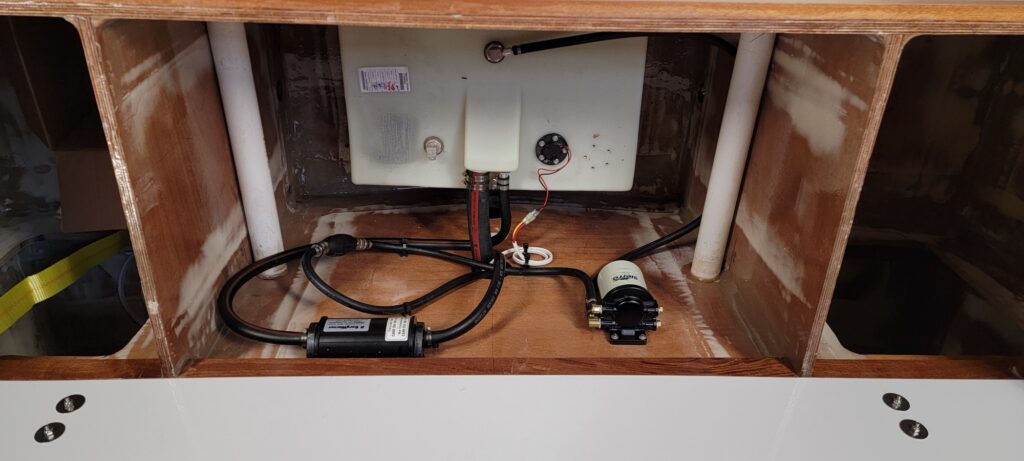
A couple pics here of the completed sole framing (cleats) in the cabin area, including how the Thetford 345 is framed in just aft of the bow thruster tube. This gives 12″ forward of the tube (and aft of BH2) for the SidePower SE30 motor to be mounted horizontally.
8/2/2022
Installed sole framing in helm/galley area. There will be one large 18×42″ hatch in the middle, with a doubled support beam across the middle.
8/1/2022
Finished up the cabin sole framing including spots for 3 hatches and the porta-potty. Glued up the hatch framing for galley sole.
7/28/2022
Have been working on the under sole areas including encapsulation with epoxy, cutting limber, ventilation and access holes, and adding cleats to support the sole and framing around access hatches. Cleats are of sapele – seems exotic, but it has good rot resistance and is about the lowest priced hardwood I can get locally. It’s also very strong and makes good sole “joists”. Not done, but making progress. The goal is that all compartments will be ventilated and there will be good access so that running wires, etc later will be facilitated. I did not put limber holes in the cabin area bulkheads as I want those to stay dry (for most part). At least I don’t want bilge water from aft going forward.
Installed a “floor” in the anchor locker about 6″ above waterline and above the U-bolt, to avoid corrosion on the latter. Put an extra large ventilation hole in BH1 under the floor level for access to the U-bolt nuts.
7/11/2022
Pulled all the staples out and am soaking with water to swell the staple holes smaller (or shut). When wet, it gives some idea of how pretty it will look. 🙂
7/9/2022
Planked the transom with solid sapele, ripped edgewise to get 2 pieces from 3/4″ stock and then planed to 1/4″. Used thickened epoxy to glue them on and staples with gun set to 60 psi to leave the heads proud for easier removal.
6/14/2022
Mostly done with fairing these inside fillets. Going through another inspection this afternoon to catch any low spots. Finally about ready to start some real wood working. 🙂
6/13/2022
Sanded inner fillets a bit before adding fairing compound to those most visible.

6/6/2022
All done with inside fillet glass layups. Quickly hitting the high spots and partially feathering glass edges now with a sander and adding fairing filler to float things out. Then to encapsulate the entire interior with epoxy.
5/27/2022
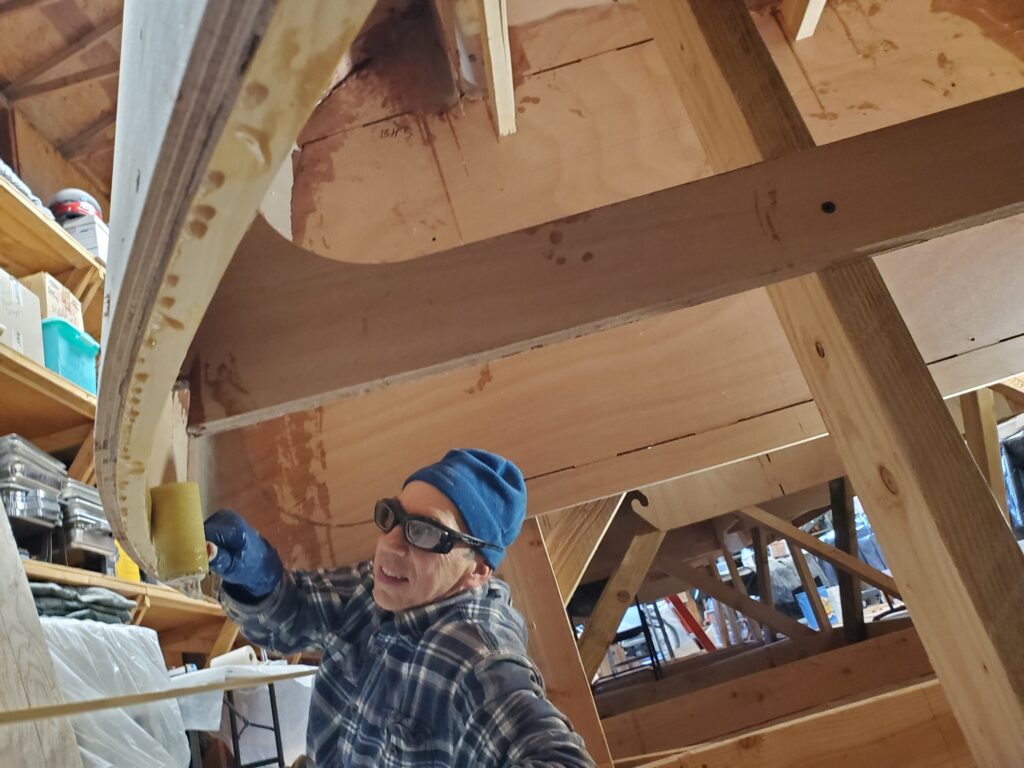
Been a while since I posted – was distracted with an Offshore sailboat race. Started working on horizontal fillet layups this week. I’m doing a combination of 4″ biax + 6″ biax + 8″ woven glass over wood/cabosil thickened epoxy for some, and in areas that I feel could use the extra strength, I’m using 3 layers of 6″ biax in a staggered layup. Along the transom to hull and transom to bulkheads I’ve did the 6+6+6 over thickened epoxy twice, for 6 total layers.
I still have mostly Fast hardener and it’s been too crazy when the temp in garage is 80F. Have to work too fast before the fillets heat up. Makes it harder to get all the air bubbles out – using a bubble roller dipped in alcohol to keep from sticking. For some of the more difficult ones (like this cramped space in bow) I’m using Slow. Way better – I can work at a reasonable pace. I’m about 1/3 done after a week of part-time work.
4/25/2022
Finished sanding the tabs (and entire interior) in prep for horizontal fillets and also for fairing the already filleted verticals. Started with a 6″ DA Bosch, in aggressive spinning mode with 60G paper and vacuum attached, and that was fairly clean but was quite heavy and tedious. Finally decided that I’m going to have to clean dust out of entire garage anyway, so jumped in my suit, including respirator, and used the Milwaukee M18 cordless polisher with 8″ disc and 80G paper. Made a huge mess, but was about 3X faster than the Bosch and easier on the body.
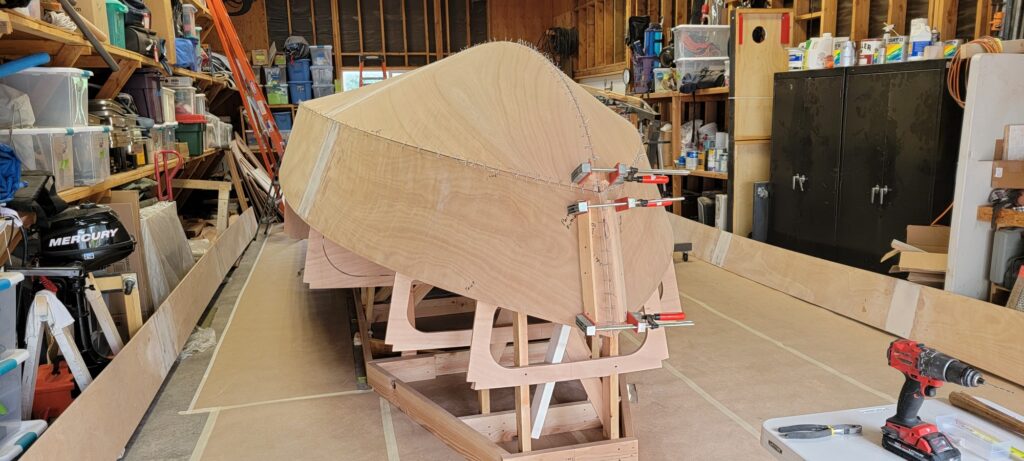
It’s been fun to finally jump inside to see what it’s going to be like, and to imagine how I want to finish her up. I’ve cut out the portions of bulkheads that were temporary, including the cut-out on transom for the outboard and the scallops on the aft sheers.
4/16/2022
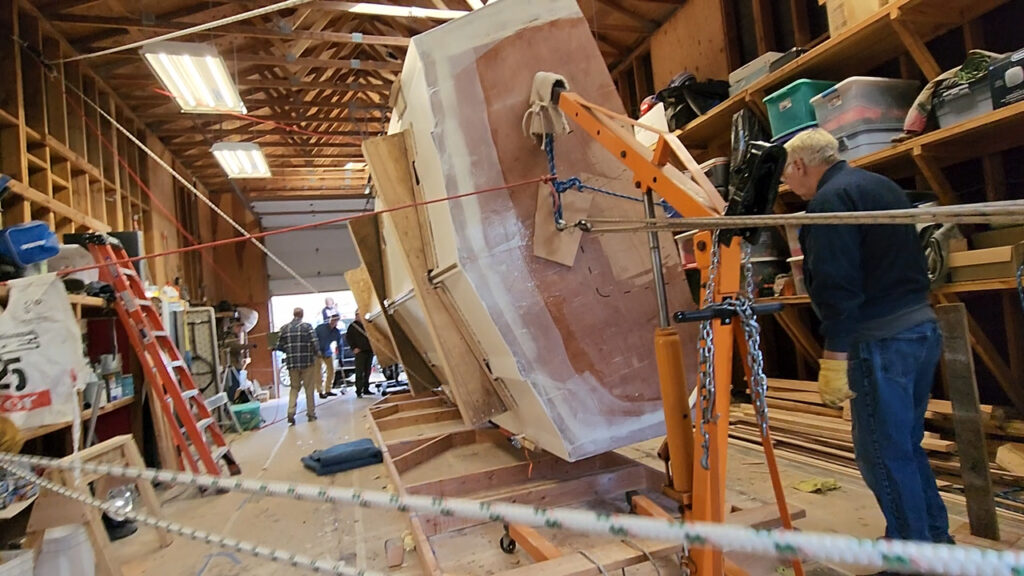
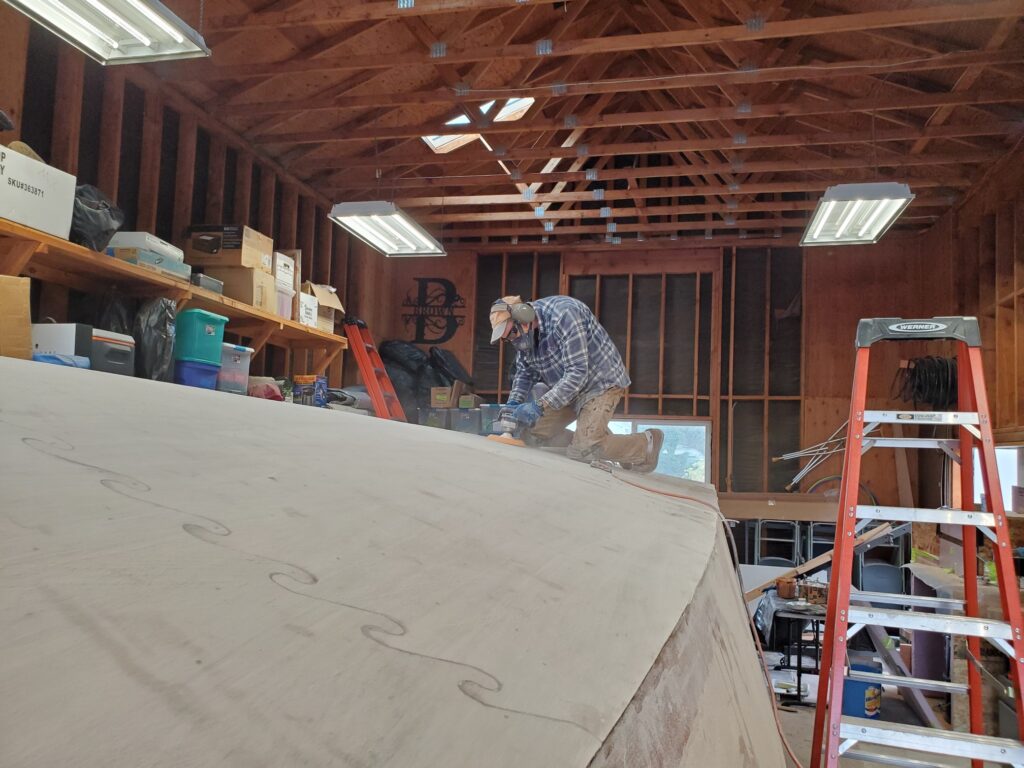
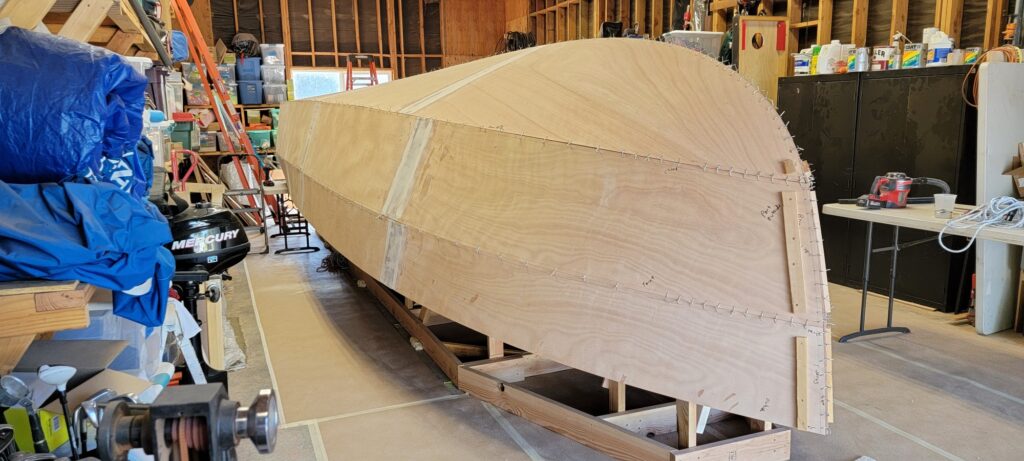
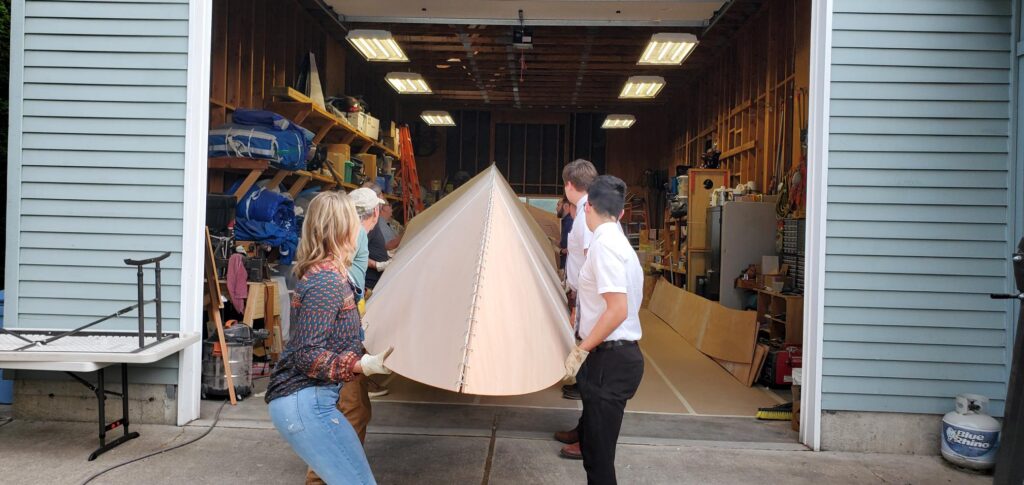
Hull is Flipped! No one got hurt, nor did the boat. Once it settled into her cradle she sat level to waterline in all dimensions, without shims between cradle and building frame. Quite pleased. If you really care you can watch the 15 minute How-To video on the flip at Youtube Link HERE.
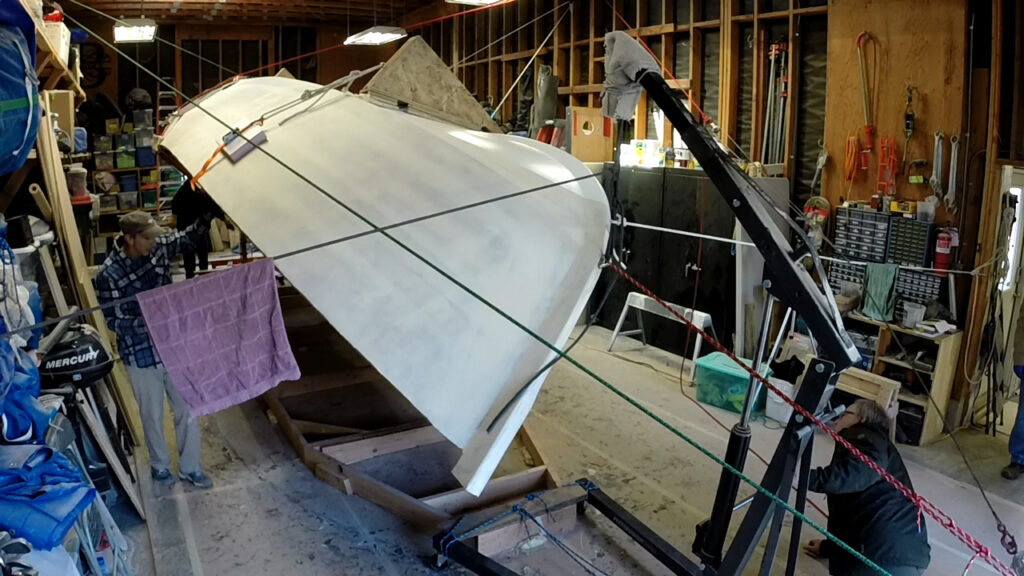
4/13/2022
Installed sacrificial brass keel strip and continued prep for boat flip. Installed U-bolt on stem and an eye-bolt on the transom. These will be hoist points and an engine hoist is positioned at each end. Built saw horses to support boat when it’s disconnected from bulkhead supports on the frame, using wood from the supports. The cradles are doubly strapped on – they will flip with the boat. They are padded with carpet with wax paper in between the carpet and the hull, to avoid paint sticking (doubt that’s an issue with this cured 2-part paint, but local boat shop does it).
4/7/2022
Finished up 4 coats of primer, a ton of sanding, and then 3 coats of 2-part Interlux CV Performance. This paint is a 50/50 mix of part A+B and each coat used about 20 oz (10+10) of mixed paint, applied with a 3/8″ roller. I didn’t tip it. The last roll was just the weight of the roller, with no additional pressure, to smooth things out. There is a very, very light orange peel, which is not offensive to me. Could be polished out, but I won’t bother. It’s a slick (I mean really slippery) bottom paint for boats that live on a trailer primarily (i.e. race boats, which granted this isn’t), so doesn’t have antifouling properties. But it does well below-water, particularly over the 2000e, and was recommended by Interlux for my application. It won’t dirty up my driveway with ablative bottom paint after each outing – that was a requirement.
I thought I had things very well sanded and fair, by the time I was done with the primer, but this shiny bottom coat sure points out any imperfections, particularly on the fillets. Most people won’t notice, but I do. Honestly, I rather spend the time sanding the topsides later, so am calling it good and moving on. I can see how these things could go on forever.
3/29/2022
Taped up the waterline plus 2″ for bottom paint and applied a first coat of InterProtect 2000e with a 3/8″ roller. Used 1.5 qts. There’s a few small spots to fill before next coat, but not bad at all.
3/28/2022
Finished up the 3 cradles in prep for flipping which I plan to strap to the boat during the flip. They line up to bulkheads and will rest on transverse 2x6s on the building frame.
3/24/2022
That was a week of tedious sanding, fairing, sanding.. on bright side I was mixing up less and less filled epoxy each time and the last was about a tablespoon, and I had some left over. I’m to the point sanding where I don’t know what else to do, so it must be time to paint the bottom.
In preparation for flipping, I’ve started making 3 cradles to support the hull when right-side-up. I will also take some of the load off directly on the keel, but these 3 supports will hold it upright. The supports will sit on the existing building frame, which is level from side-to-side, but which has about 2″ of fall from stern to bow. The hull is presently level to water-line and I want it level after the flip. So I used a laser level to carefully measure what needs to be the relative heights of the cradles before flip, so that after the boat is level. I can tune with shims, but it should be very close without shimming, if all goes well. After I get them all built, I will add carpet to the pads. Note the cut-outs for the strakes so load is not resting on them.
It’s a good sign that the angle on each side of the supports is the same to result in a level cradle!
3/19/2022
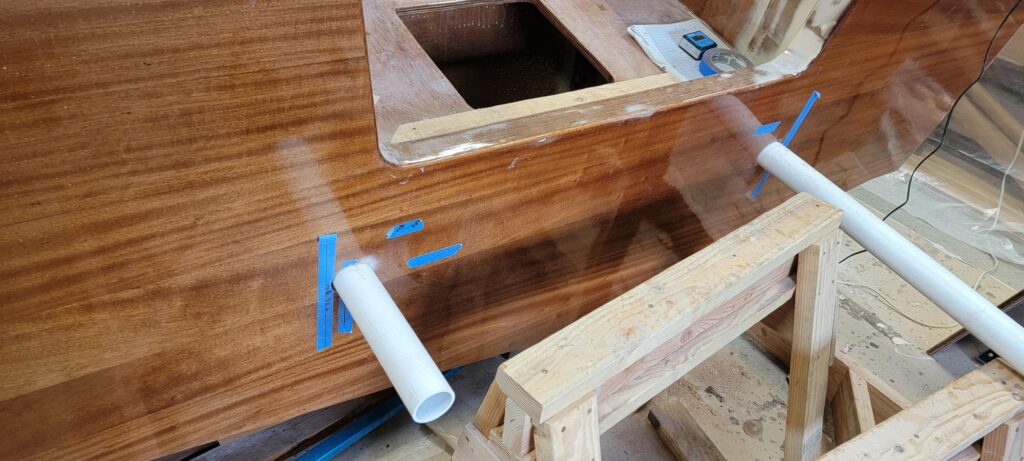
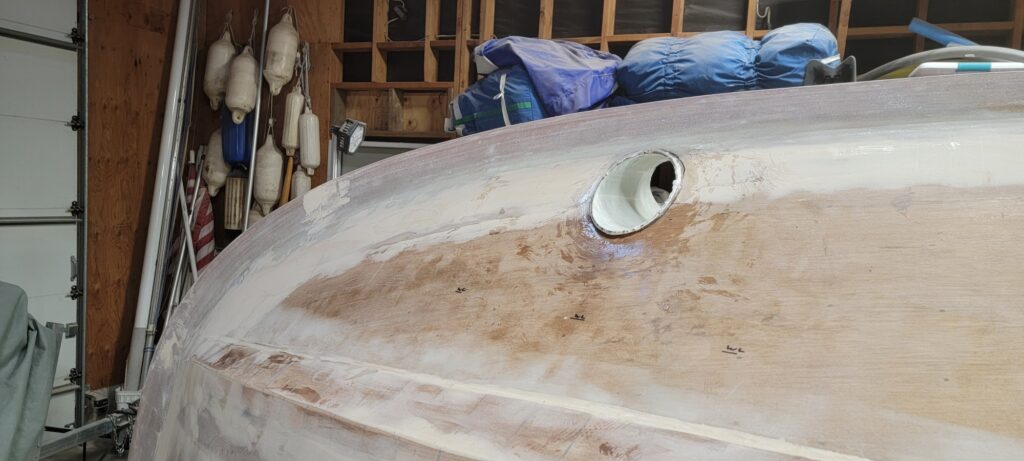
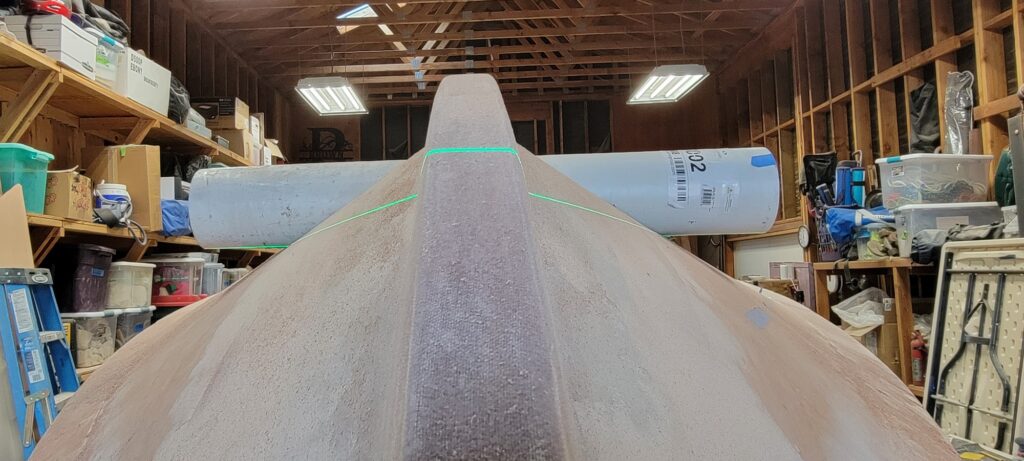
Finished up dynel with a final layer on the stem, and are getting the fill coats on, using West Microlight for the final coat. Have some sanding to do this week, but getting closer to being able to prime the bottom. I wish I could have put the bow thruster about 4″ more forward, but was squeezed between all the constraints on tube installation specs for distance below WL, above keel, tube width, etc.. It will work fine, in any case.
3/17/2022
With the bow thruster hole done, the last bit of dynel was laid on the bow section. The fill coats are mostly done on the rest, besides final sanding, and will start filling the bow tomorrow. Will also pop another layer of dynel on the stem to overlap again onto the hull.
3/15/2022
Got the 3rd and final fill coat on the side and sheer panels – looking fair before sanding. Built up the forward sides of bow thruster tube with cabosil-thickened epoxy (in 3 layers to reduce heat) and carved out the back edge so that water flow will not easily hit the back edge of the tube.
3/14/2022
Applied a second fill coat to the dynel, after hitting high spots with a sander. Then worked on the bow thruster tube. Roughed in the holes with a jig saw, then beveled the edges with a die grinder with an aggressive bit and a cut-off tool with flap disk (the latter worked great). Used the laser level as a guide to get the tube precisely level, while staying square to the bulkheads. Fits dyno! Glued in with a fillet thickened with cabosil and several layers of biax glass inside, as a start. Plan to add more layers of glass inside.
3/12/2022
Got dynel on for the aft 16′. Found that with a friend, Abby, mixing 9oz at a time using Fast part B, I could keep working with “cool” epoxy and the 1/8″ foam rollers didn’t exo-therm on me. We didn’t dynel the forward section as I’m going to pop in a tube for a bow thruster first – starting working on that today by doing an inside keel layup between BH2 and BH3 and getting hole locations figured out. Got the first fill coat on the dynel, using thickened epoxy with 50% by volume fairing filler.
3/9/2022
After a nearly 3 month time off with temps in the garage too cold for good epoxy work, I’m finally back at it as of about a week ago. Well, it’s still cold outside but not so bad and I’m running 4 electric heaters in the garage on the days I’m doing epoxy getting the temp up into low 60s F.
The first order of business was to get the fillets and glass/dynel lay-ups done on the stem and keel. Over a thickened epoxy fillet I laid 2 layers of 12 oz biax glass and 1 layer of dynel that encased the entire stem/keel and out a bit wider than the glass. Then floated it out the next day with fairing compound and finished sanding fair today. Tomorrow will start a final layer of dynel over the entire hull.
1/8/2022
Finished shaping the flat chine gains at the bow. Thought I’d coat the stem, keel, strakes and flat chines with epoxy, before doing the keel filets and glass layup, followed by dynel over entire hull. But, with this cold weather the first batch of epoxy went on horribly! It was 45F in the garage, and the epoxy was 70F, but when it hit the cold hull it didn’t flow nicely, and being so warm to start it kicked off and gelled too quickly.
Overall a broken play, so I quit after that first batch, and will re-sand it flat in a couple days. I may have to put the boat build on hold for a while until it warms up, as I don’t have a way to heat our RV garage (uninsulated). In meanwhile, I’ll prep our other boat for an offshore race in May, and slow things down on Surf Runner, working on it as the weather permits.
1/4/2022
Happy New Year! I took a couple weeks off for Christmas and enjoyed the time with all our kids here. It’s been in high 20s in the garage, so not too appealing, and too cold for new epoxy anyway.
Did get out for some sanding, it’s endless. I was really struggling with how to do the “gains” on the chines at bow. Finally decided on a 3-step process..
1) The chine flats are planed/sanded to be planar with the sides.
2) The bottom surface of the chine flats (surface closest to keel) is flattened for the last ~6′ toward the bow so that even though there the dead rise angle increases at the bow, the chine flats don’t get steeper (I hope that makes sense), until step 3. This also made the blocks narrower as they approached the bow. This should help “kick out” the spray and made for a dryer ride (is my theory). And,
3) At 14″ from the stem, the bottom surface of the chine flats starts to taper steeper, approaching a more parallel angle to the bottom panels, and the chine apex (corner) curves upward putting it at the location of the original chine (before I added the flats), and then I rounded the chine a bit for the last 2″ to the stem, for the disappearing “gain” act. (I hope that made some sense to somebody :-/)
12/17/2021
Fair, sand, sand, sand, fair, sand.. rinse, repeat. Not the most fun part of the project, but it gets a little more polished each day, and that gives some satisfaction.
12/13/2021
Started shaping the flat chines. Used power plane, jack plane, block plane and various sanders to get the outer edge of the flat chines to be in plane with the sheer panels. Have some low spots to fill.
12/10/2021
Finished gluing on the flat chines. Couldn’t get the twist needed at bow so I cut individual sections about 2-3″ wide and glued in place individually supported underneath by a plastic covered batten and stapled at top. Covered with peel ply to help contain the mess. I’m sure the staples will be a bear to remove, but one step at a time.
12/9/2021
Starting installation of the flat chines. Tricky business, getting the right width/depth/spacing of relief cuts to make the bends/twists.

12/7/2021
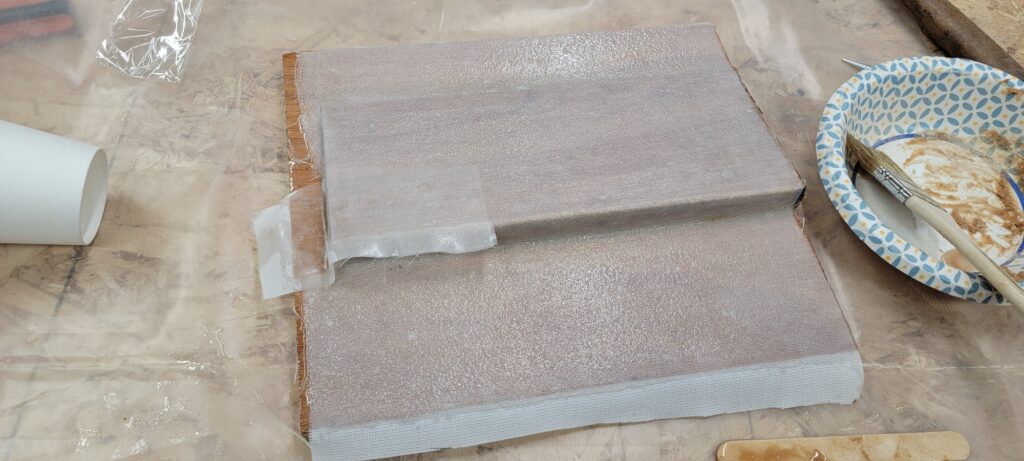
Rounded the strake corners with a 1/8″ quarter-round bit, so that dynel will lay over, and made up a little test board with a strake and glassed with dynel to try it out. Weird stuff, dynel, never used it before. Added a bit of peel-ply on the corner to see how folded dynel works there. Devlin highly recommends, so I’m using it. Installed the flat strakes. To help get the right twist on the pointy end, toward bow, I temporarily attached a plastic-wrapped stick for the strake to rest against, and clamped it down with a transverse strap.
12/4/2021
Tapered the stem, switching between power plane, various aggressive sanders and a hand block plane. That was work!!
12/2/2021
Shaped the plywood on stem/keel to match the inner core. Used a laser to draw lines where spray strakes will be mounted on bottom. They are ready to install. Aligned the laser to reference lines on the 2 sticks temporarily stapled to the keel, so the strakes will be parallel to and the right [horizontal] distance from centerline, then marked line with straight-edge and sharpie.
12/1/2021
Cleaned up the keel sapele core, giving it a nice shape on the curved stem, then fit the 1/2″ ply outer pieces and attached with cabosil-thickened epoxy. Cut out the strakes.
11/29/2021
Cut a scarf taper on the ends of the laminated sapele stem and keel, where they connect together, and glued the stem on one day, then the keel another day. Ratchet straps worked well to clamp everything down.
11/24/2021
Carefully fit 2 layers of 3/4″ sapele so joints are non-overlapping to glue up the stem. cut it out per template and it fit quite nicely as a first pass (not attached yet). Glued up keel pieces to make a 1 1/2″ x 1 1/2″ keel. Will need to scarf the two 11′ lengths tomorrow. Still deciding if I scarf these to the stem before mounting on the hull as one big unit, or not. ??

11/22/2021
Used the plans to scale up and loft onto a sheet of 1/2″ MDF the curve for the stem up to the point where the keel is relatively flat, about 7′ from the bow. This gave a rough start for a template that after some careful trimming fit onto the boat. Will use this template to laminate up a stem.
11/20/2021
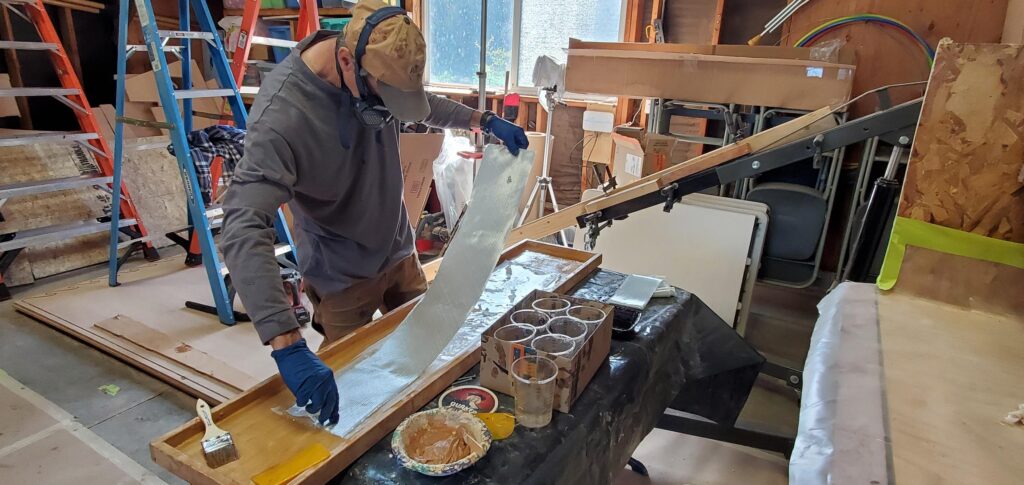
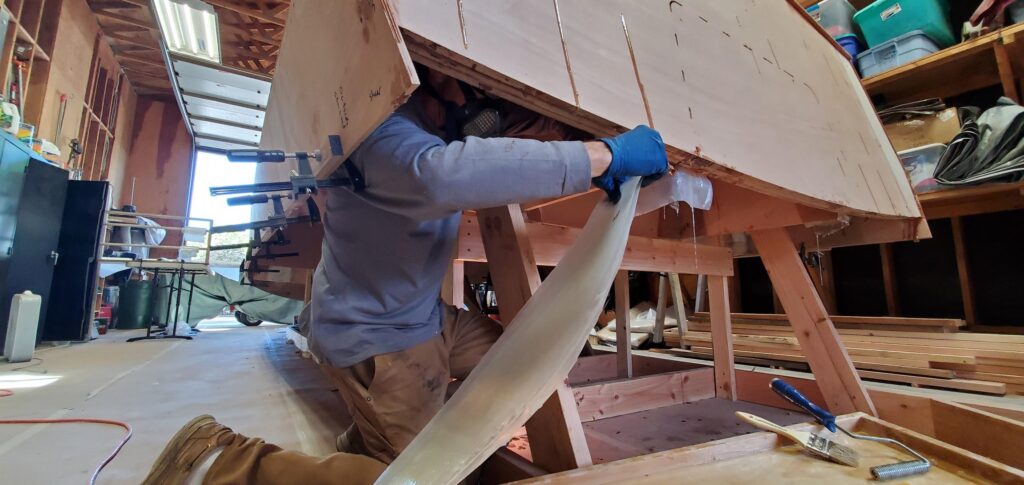
Finished glassing the bow, and hence entire hull with layer #1. Peel ply resulted in very little sanding for about 90% of it. There were some misses that need a bit of fairing cleanup, including the glass overlap areas. The challenge was that I’ve been using Fast part B and it just doesn’t give me enough working time, even at 50F. Got the starboard side and sheer panels sanded. Will get the hull all fair again before jumping on the outer stem.
11/18/2021
Got about 80% of 6oz woven glass on. Good thing I had some help from friend Travis for much of it as the Fast part B barely gave us enough time. After he left, I used 50/50 Fast/Slow and that gave me enough time on my own. We went transverse on the glass, sheer to sheer, starting from transom, and put peel ply over (might be overkill, but will take less epoxy $$ coating to get rid of the weave, and be less sanding).
11/16/2021
Finished fairing the hull and encapsulated with epoxy in prep for 1st layer glass. I used a 6″ squeegee on the bottom panels, and then found that an 1/8″ foam roller worked better for the sides and sheer panels. Having the bare wood coated with epoxy before glass will make wetting out the glass easier and faster – Anything to save time is good, especially with this Fast part B hardener. It was about 55F degrees in the shop today when I applied the epoxy, so on the cool side, but better than the 38F when I got out there this morning! It’s dry to the touch this evening.

11/12/2021
The chines, taints, keel line, stem and around transom have all be taped. After a light sanding on the tape edges, added epoxy thickened with glass microspheres as a filler to float out all the edges.
11/9/2021
Finished up prep for 8″ biax cloth on chines/taints/keel. Left the taints fairly sharp as they have an obtuse angle. Then put a 1/4″ round edge on the chines and transom corners so that glass will wrap well. Got tape on the taints – wow, with temp just under 50, the epoxy was a real chore to wet out through the 12 oz. biax, with squeegee, foam and metal rollers helping. Covered with peel ply. I was getting nervous as I’m using fast part B almost exclusively now, and I was afraid it was going to set too quick. Worked okay though. Still need tape on the chines and keel, in this picture.
11/7/2021
Sanded and added fairing epoxy to chines/taints in prep for taping. Filled in keel area. This pic shows the cold-molded layering at transom.
11/6/2021
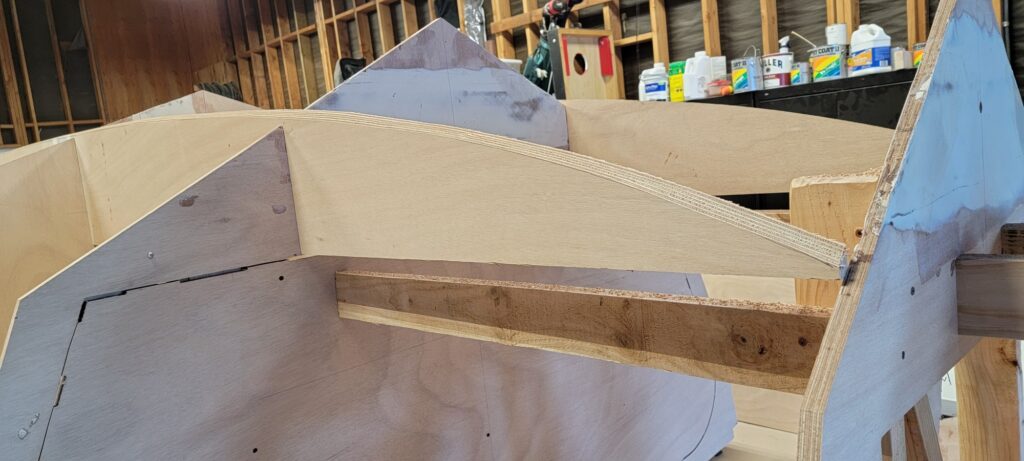
Got the port side sheer clamps on, cut the clamps to length at the bow with a multi-tool, finished the fit of the breast hook and glued it home. The clamps really helped fairness of the sheer. 🙂 Finished planing/sanding the 1/4″ cold-molded bottom layer to match the angle of the side panels at the chine. Needs a bit of fairing and I’ll be ready to tape the chines, taints and keel in prep for 1st layer of sheathing.
11/5/2021
Installed the starboard side sheer clamp with doubler, with help from neighbor Paul to wrestle around these 27 foot long clamps. They helped fair up the sheer nicely. Aft, at the cockpit, you can see the classic Devlin scallop (the lower part of that plywood will get cut away. These were clamped tightly in place and then screwed in with deep countersunk SS screws. Will fill holes and glass over. Left a lot of clamps at the bow to keep things tight around the curve. Left the clamps a little long at the bow – will trim length to fit flush to breast hook.
11/4/2021
Scarfed up the entire lengths of sheer clamps, including scallops after cleaning up the hull along the sheer and tuning notches in bulkheads so everything fits.
11/3/2021
Cleaned up the scarfs and cut the first scalloped sheer clamp after bending a curve on it with a batten. Will use that as the pattern for the next 3 (as they are doubled on each side).
11/2/2021
Fashioned shear clamps (inside rails along top of the hull) of yellow cedar and scarfed to length to cover the first 2/3 of both length (they will be laminated 1 1/2 x 1 1/2″). The sheer aft will have the classic Devlin scallop, so using laminated marine ply for that part – needed 10′ so had to scarf those too. Made a 1 1/2″ thick breast hook of laminated sapele.
10/28/2021
Cleaning up the bottom for sheathing.
10/27/2021
Filled all the screw holes with toothpicks dipped in epoxy. Looks like a porcupine! Glad I didn’t slip and fall on it! Will flush cut them off tomorrow with a multi-tool, then have a bunch of sanding and a bit of fairing to do in prep for sheathing.
10/24/2021
Cold-molded port bottom. Did aft 2 panels on my own. Steve helped with the forward panel. Epoxy oozed out of every weep hole on the entire boat, so I’m pretty confident the panels are glued down well. Yay – glad to be done with that!
10/23/2021
Cold-molded starboard bottom. Although I’m doing most on my own, it was super helpful to have our friend Steve give an extra hand with this step. Took 4 hours to glue/screw the first side down after dry-fitting.
10/21/2021
Ready for cold-molding the bottom with 1/4″ ply.
10/19/2021
Sanded up the keel, chine and taint joints. Keel and chines are fair right off. The taints have a couple spots where the panels were slightly mismatched so I’ll have a little bit of fairing to do before I tape them. I put 6″ biax on the keel and chines in meanwhile in prep for cold molding the bottom. Used peel ply again to practically eliminate sanding. In the pic, the keel was done after the chine tapes were dry and peel ply removed. Peel ply is still on the keel tape.
10/14/2021
Finished the vertical bulkhead fillets. Good call to use peel ply on them. I love the epoxy mixer! You can see the countdown timer on top of controller, preset for 2 minutes. Still mixing thickened epoxy by hand.. for now. Filled wire holes and cracks between panels too.
10/11/2021
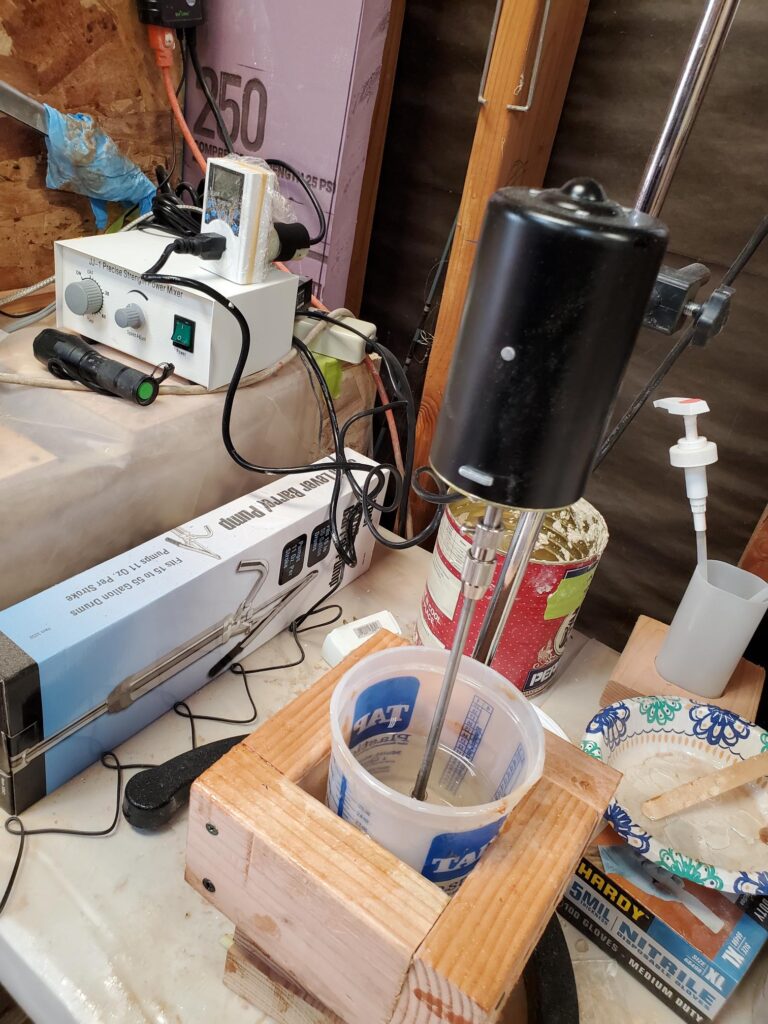
Completed 44 vertical fillets so far, bulkheads to hull panels. 24 to go. Set up an epoxy mixer on a 2-minute timer that’s saving my wrist and a bunch of time. Will get a pic of that soon.

10/9/2021
Back at it, after 2 weeks off for vacation. Peel ply for vertical fillets is all cut out, glass all organized for remaining fillets and did a bunch of sanding in prep. Should finish inside filleting this coming week.
9/23/2021
Work continues on vertical fillets bulkheads to hull on inside. Slow going on my own, but considering I just received wood exactly 1 month ago, I’m not doing too bad. Am happy with how the peel ply is working out. Will be taking a couple weeks off from boat building for some other matters, but did get the rest of the glass cut out to finish the rest when I jump back on.
Boat looks cool without any wires. Happy to report that I didn’t cut myself on any wires in the process – a miracle as the boat was covered with “barb wire” after stitching.
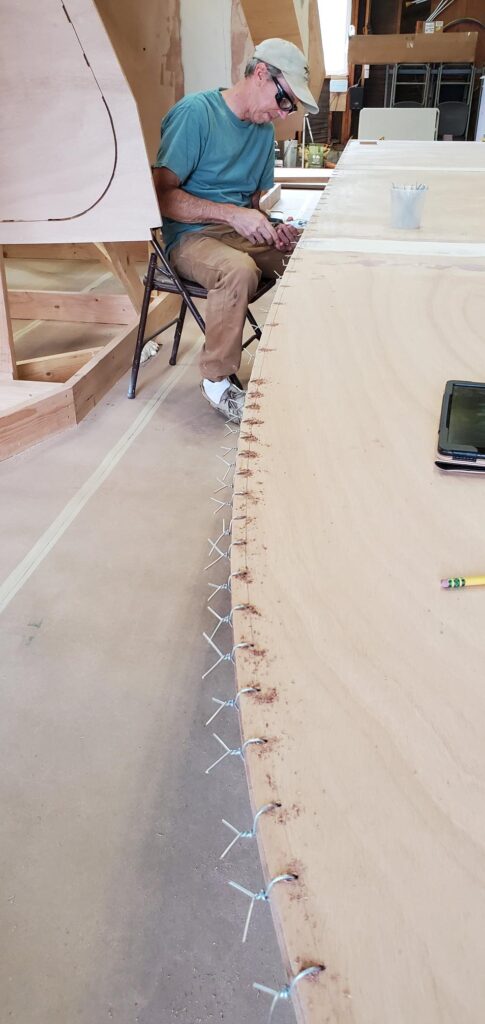
9/21/2021
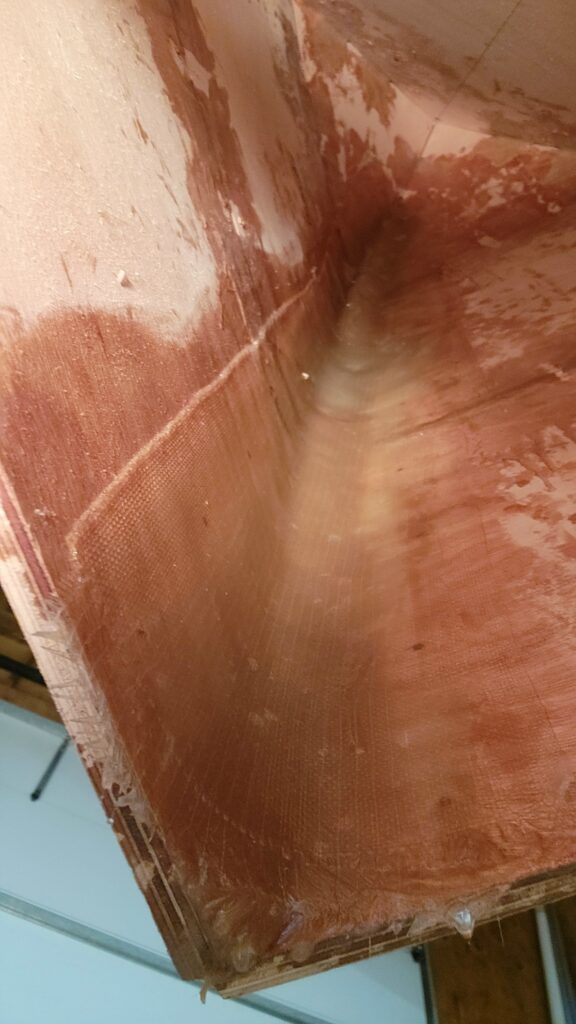
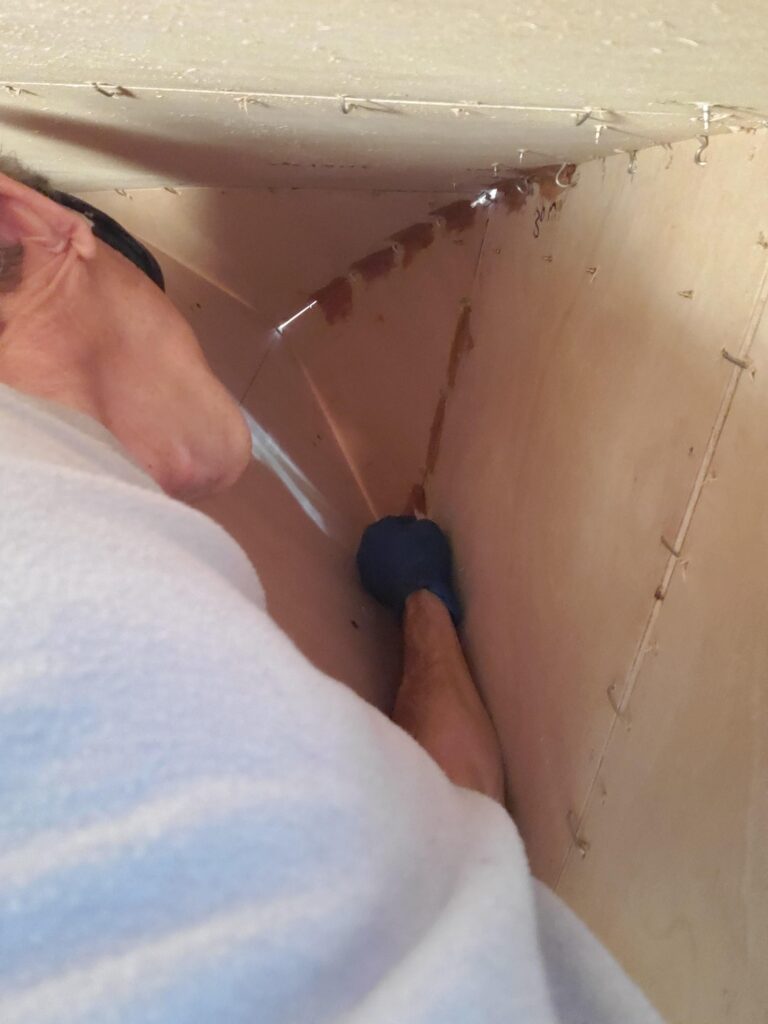
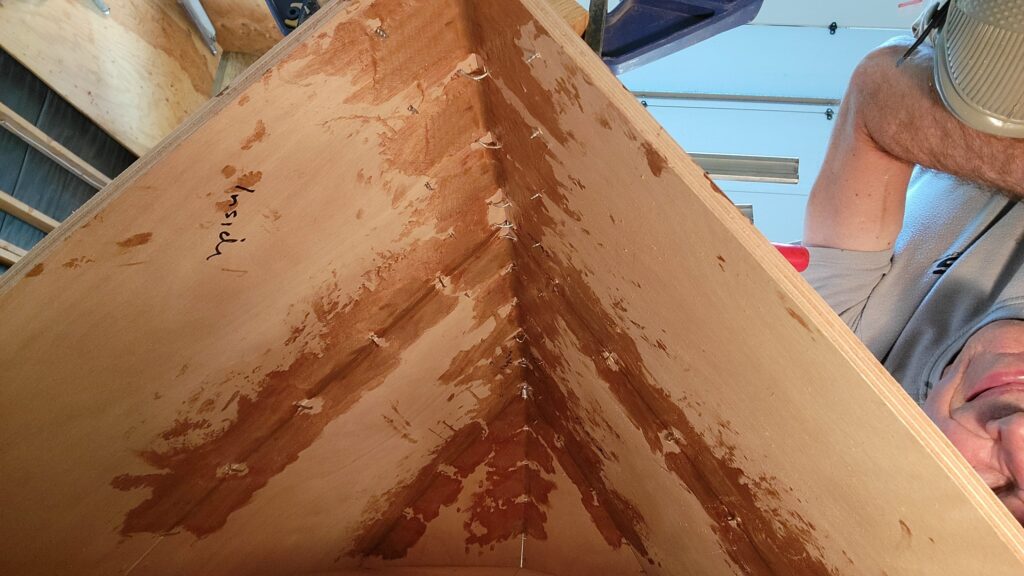
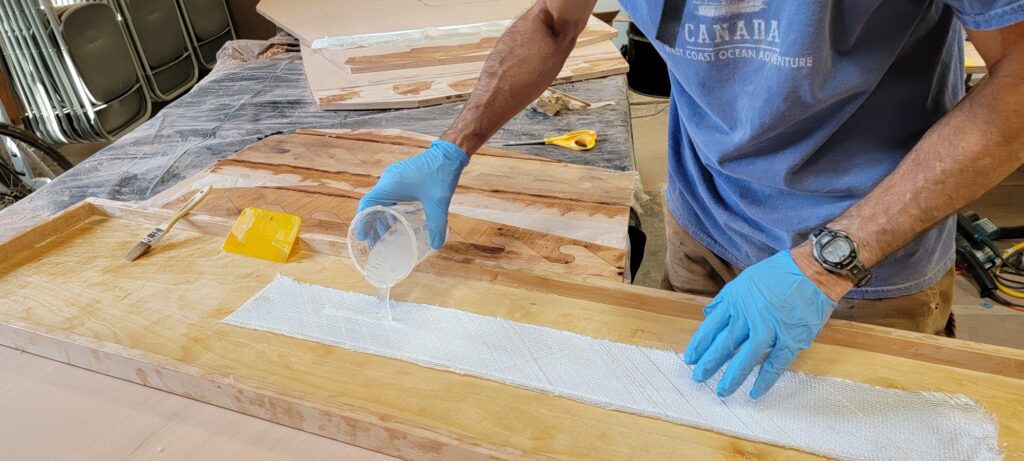
Established my methodology for filleting the vertical portions of BHs to hull panels: How much epoxy to mix in thickened and unthickened form, how much cabosil/wood flour to mix in, etc.. First, I wet the joint about 4″ on each side with unthickened epoxy. Then smear in the “peanut butter” and squeegee it with a custom cut yellow plastic squeegee to get the right radius fillet. In the layup box, the peel ply goes in first, then 8″ woven 6 oz., then 6″ biax 12 oz, then 4″ biax 12 oz, wetting out each layer as I go. Then the whole thing goes onto the joint over the fillet and I smooth out any air bubbles with an aluminum bubble roller. Got 12 joints done between the transom and BH8, then wet forward and did the stem, after removing all the wires up there. One learning is I need to make the peel ply wider – I cut it 10″ but it got wet at the edges in some places, which I’m sure will make it harder to remove tomorrow.


Almost had a disaster at the stem due to the acute angle of the panels coming together, the thickened fillet was a little thicker than aft and it really heated up. I was afraid the joint would pop open, but it didn’t. I left some clamps on to be sure. After I flip the boat, I might add some even wider glass up there for another couple layers.
9/20/2021
Tabbed all the bulkheads to the bottom panels. Tabbing is done – that’s a milestone. Removed all the wires except at the bow/stem area. Ready to start filleting BHs to side/sheer panels – basically the vertical areas.
9/18/2021
Finished tabbing the hull panels and longitudinals. Still have bulkheads. The stem was a challenge – good thing I’m a nimble sort of guy and fit in tight spaces. I had wired 2″ apart and pulled every other stitch so I could tab in between. Using clamps to ensure it stays together in meanwhile. Also, I ditched the little box and am wetting out tabs on a small sheet of 1/4″ ply so I can do 8 at a time. Mass production in order! Also got the 3rd layer of transom glued on – fit nicely.
9/16/2021
Have been tabbing the inside with about 4″ squares of biax glass in between the wire stitches. Not too hard, but tedious and slow going as there are about 500 to do! I would take enough material for about a 2 hours stretch under the boat and could get about 45 tabs in that amount. Would go faster with more people, but I have to do all the mixing, smearing thickened epoxy in joints, wet out the glass, spread it smooth, etc. here’s my set up and small example of what it looks like. I do pipeline the wetting out of 3 pieces of glass in the box, so I don’t have to wait for the epoxy to soak in.
Got tired of tabbing after about 100 tabs (did about 50 more yesterday) and glued the 2nd layer of transom on with thickened epoxy.
9/14/2021
Short day, going sailing. 🙂 Glued in the first layer of transom and clamped on some temporary oak “rub rails” to keep the sheer fair while I glue some glass tabs in between wires. The side panels lay flat on the bulkheads, but the sheer panels spring out at about mid-ship and aft. So I pinned them to the bulkheads, but in between bulkheads the sheer panels were flairing out. I was concerned they would get set at wrong angle relative to the bulkheads and make fairing harder later. The oak rails got rid of the “scalloping” sides.
9/13/2021
The sheer panels are on making wire stitching complete. Temporarily mounted 1 layer of transom to check fairness and made a bunch of measurements to confirm I’m ready to start tabbing panels together with glass.
9/10/2021
Sides wired on today. Did the first side on my own, using the cherry picker to hold the other end. Kind of tight on port side for that, so my good neighbor helped me out. Note that the bow is pulled in fairly tight now.
9/9/2021
Applied the stitching process (routed chamfer, drilled holes, wired it up) to the 2 bottoms, then got 8 friends, including 3 missionaries, to help put it on the bulkheads on frame. Seems to fit very well! Amazed how nice the bow looks – hard to believe the flat plywood bent into that nice shape.
There’s a lot of tension on that first wire at bow – need to get that pulled together a bit more solidly.
9/8/2021
Since I’ve never done a stitch-n-glue before, thought I’d put together a little sample to get router set up, practice on wire tightness, etc. Beveled inside edges at 45, 1/4″ deep (since 1/2″ stock). Marked line at 1/4″+1/8″ = 3/8″ for drilling 1/8″ holes. Using 14g galvi steel electric fence wire. Straight-forward enough. Will get better at it as I go. 🙂

Did another round of tuning/tweeking the bulkheads for squareness, etc. to make sure everything was to my satisfaction from bow to stern and ready to start stitching up the bottoms tomorrow. Also, power planed a bevel on the longitudinals to match bulkhead angles.
9/7/2021
Mounted the longitudinals in place. Was pleased that they fit nicely into the bulkhead slots. The cherry-picker was helpful to get them on top of the hull. Will need to bevel these a bit before planking.
9/6/2021
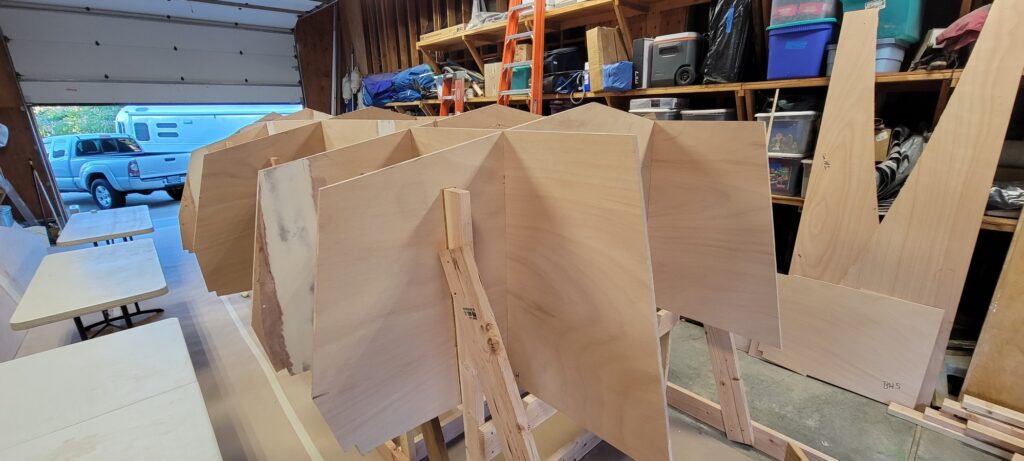
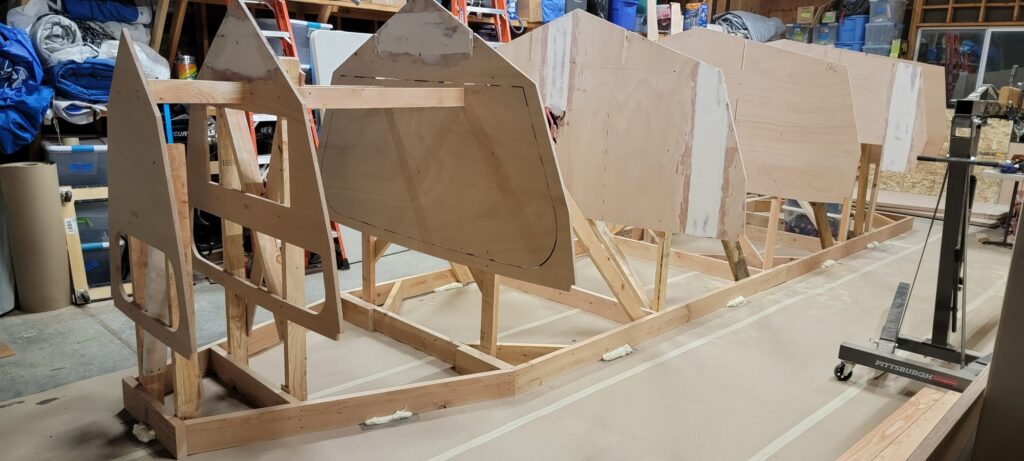
Mounted the rest of the bulkheads on the frame and installed bracing to ensure that each is centered, level, square, plumb, at proper station location, and at the right height so a level laser can shine through all the “mouse holes”. This baby is strong!
9/4/2021
All the panels are done, so rearranged the garage for building time. Set the frame in place with foam insulation and used the laser level to “draw” a centerline, which I transcribed to the floor and faces of all building frame cross members. Since I’m doing most of this build on my own, used the cherry picker to hold bulkheads roughly in place while I aligned them up with the laser level. I’ve drawn centerlines on both sides of bulkheads to work to and the level line is set at the center of the “mouse holes” on each BH.
The nights are getting colder, in 40s, and it feels like fall is coming, so I took some time out to build an insulated enclosure, with heater, for the epoxy.
9/2/2021
Have a bit of sanding on the fairing in a handful of places, but effectively done with all the puzzle scarfs. Time to rearrange the shop for the next phase, get the building frame in place and prepare to start mounting bulkheads.

9/1/2021
Glassing the last of the bulkheads and longitudinal puzzle scarfs, using a box method suggested by Devlin. Works well. I wet out the the 6 oz woven glass first, then lay on the 12 oz. biax, wet it out, squeegee off excess and lay into the pre-soaked recessed puzzle joint.
8/27/2021
Sides and Sheers scarf joints are faired and sanded, done for now. Didn’t take much sanding, a good thing, and they are nice and planar. No second coat of filler needed. Glassed the hull bottom scarfs and, after curing enough to harden, put fairing compound over. Will do the other side on Monday. Seems smarter to do it this way, as I can do one side completely in a day, and wait until the next day to flip, versus having to flip partially cured material and risking messing it up (with wrinkly visqueen underneath).
8/26/2021
Epoxy thickened with fairing filler goes on next with a 12″ sheetrock taping knife. Both sides and sheer panels have fairing compound on them now. A bit of sanding tomorrow and these will be done and I can start on bulkheads which are all cut out now.
8/25/2021
Used power planer to take 1/32″ off each puzzle scarf and then used the 6″ disc sander with 40g in aggressive mode to feather into the edges of the recessed area. 4″ wide biax 12oz cloth, with 6″ wide 6 oz woven over it, to re-enforce the scarfs. This glassing is an extra step that I don’t do with more traditional tapered scarfs. Should be super strong though.
8/24/2021
Epoxied up all the puzzle joints for hull bottoms, sides and sheer panels. Stacked them up with plastic in between to get them all done at same time. After wetting out with unthickened epoxy, squeegeed in epoxy with wood flour.
8/23/2021
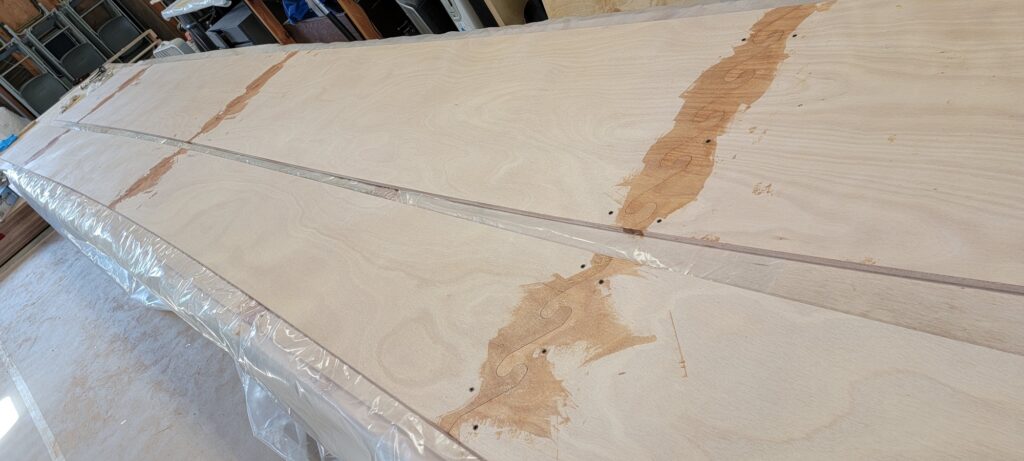
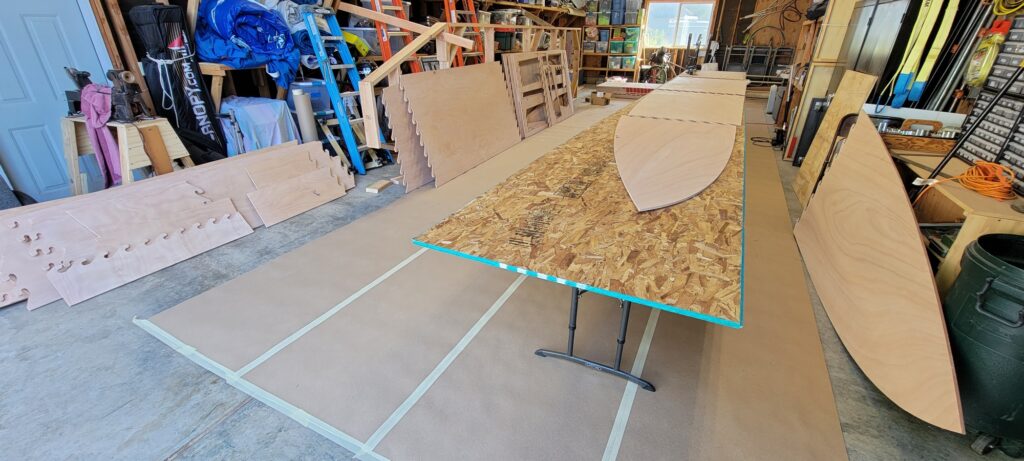
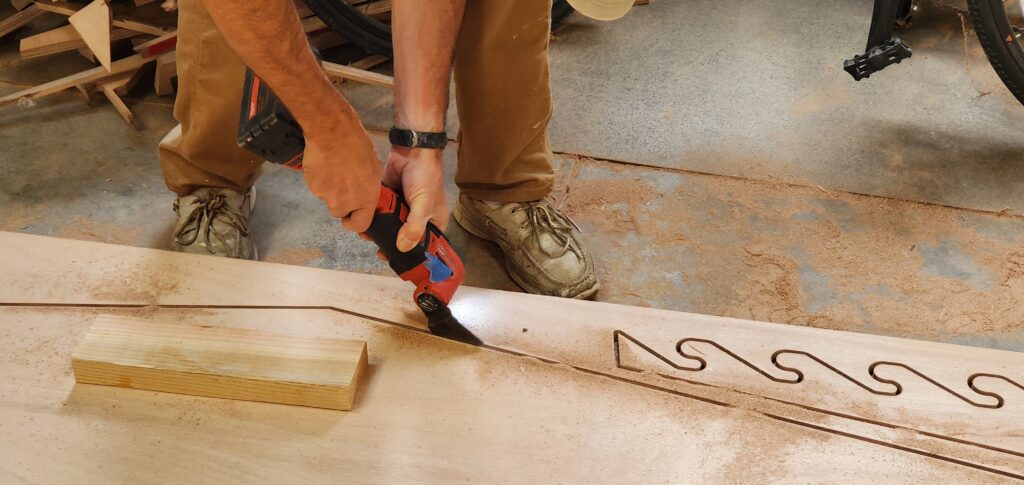
It took a full week until the “1 day” shipping got here. Fortunately, good neighbors unloaded it from the truck sheet-by-sheet into my garage while I was away. Today, the first official day of working on the boat, I set up the garage for gluing all the scarf puzzles together, and cut out and cleaned up all the hull pieces using a multi-tool and sander with 60g paper. Okay, it’s finally showtime!
8/13/2021
Plywood is CNCed and ready for shipping to me. Eager to get it here – Looks like a lot of work ahead!
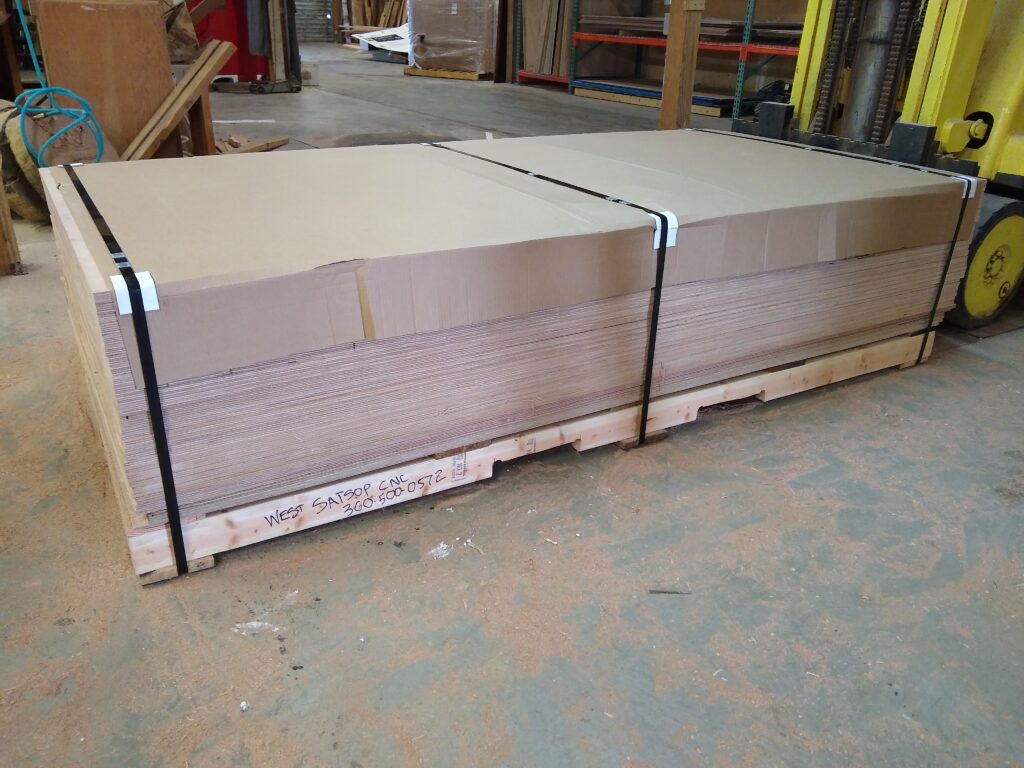
8/5/2021
Plywood for construction has not arrived, nor do I have a full set of plans, but I do have enough information (i.e. bulkhead locations for stations) to construct a building frame, so I did that much. Plywood should arrive today at the CNC shop, and I’m hoping to have it here in another week and a half.